
|
Register or Log In To remove these advertisements. |
|
|
|
|||||||
 |
|
|
Thread Tools | Display Modes |
|
|
 01-20-2019, 05:23 PM
|
#1 |
|
Registered User
Join Date: Apr 2015
Location: Finland
Posts: 133
|
Re: 1968 Chevy Bel Air Wagon Project
Thank you Advanced Design and BossHogg69, I aim to do it
right. No use botching this job as it's going to get painted afterwards, and it's not fun if it looks all crooked when painted. Got some time to finish the work on the rear of the wagon this weekend. I was going to start grinding the welds saturday, when I discovered two huge rust holes in the tail gate. A deep sigh, and a thought that this will take me a couple weeks to do hit me. On with it. I measured the big patch inte middle, and cut it out. Then made a bend on the sheet metal brake. Some persuasion later, I had a part that fit nicely. I cut away the rust, and adjusted until I could start welding. A few tacks in this pic. On the other side the sheet metal was hammered and dollied flush with the original folded skin, and rosette welded through holes that I had drilled previously. The green arrow points at some more rust. 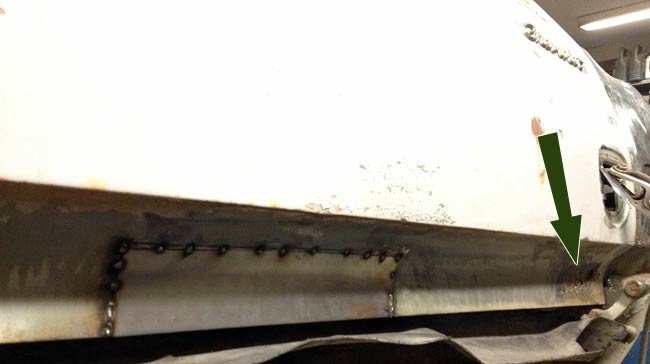 It was a busy saturday, so I only got this patch welded and partly ground. I barely looked at the other rust hole, and even thought of using fiberglass filler, it was in such an awkward place behind the hinge. Sunday I looked at the problematic hole, and decided to give it a try. I cut as much as I could with my small angle grinder with a worn down cutting wheel, and then cut the rest with a rotating file. It worked perfectly, albeit a bit slowly. I measured and cut a patch piece for it, again hammered to a nice shape, and welded it in. Grinding the welds was as hard as cutting the hole, but the same grinder with another file made grinding the welds pretty easy. I sanded the coarse-ish surface with my not-a-dremel and a sanding flap wheel of sorts. Those are toys when it comes to this kind of work, but it made a difference, and my hourly rate is very low  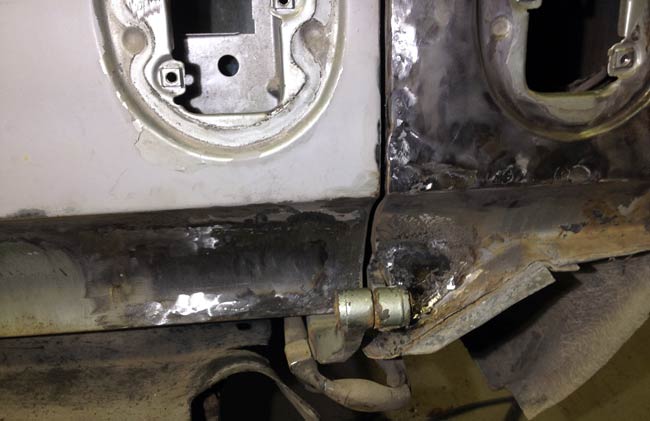 Here the welds are ground. There's also a little patch on the rear quarter, partly behind the hinge. This all was time consuming, but the result is okay, and I'm very happy to have it done. |

|

|
|
02-02-2019, 05:51 PM
|
#2 |
|
Registered User
Join Date: Apr 2015
Location: Finland
Posts: 133
|
Re: 1968 Chevy Bel Air Wagon Project
Some time has passed since I last posted any progress. I'm doing this project in real time, so sometimes less happen.
After the tail gate had been welded and ground, it was time to turn to the bumper. It too was a bit deforemed, the drivers side outer part was bent forward. The inner structure is pretty sturdy, so I cut it to have an easier job bending the end part backwards. This worked, as the bumper wasn't too hard to bend now. After test mounting the bumper on the car, it looked much better, but was too far to the left. Moving it over to the right forced me to move the left hand side bumper mount about 1/4" to the left. The arrow points at the most ovious place to see this. 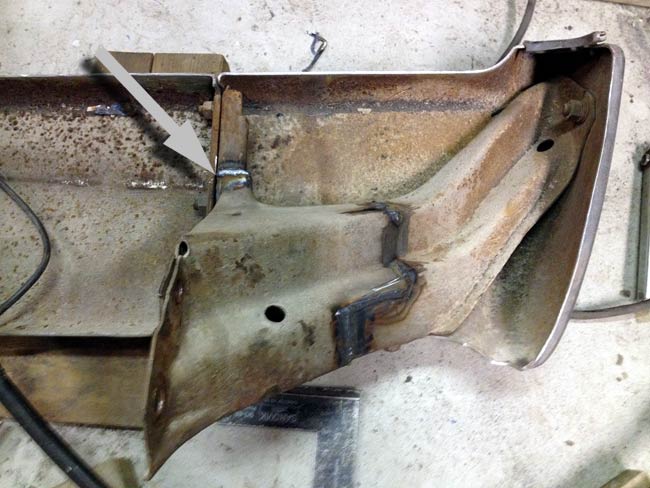 With the mount welded, the bumper fit much better to the rear of the wagon. After this pic was taken, the bumper has been slightly straightened as it's a bit crooked in the middle here. 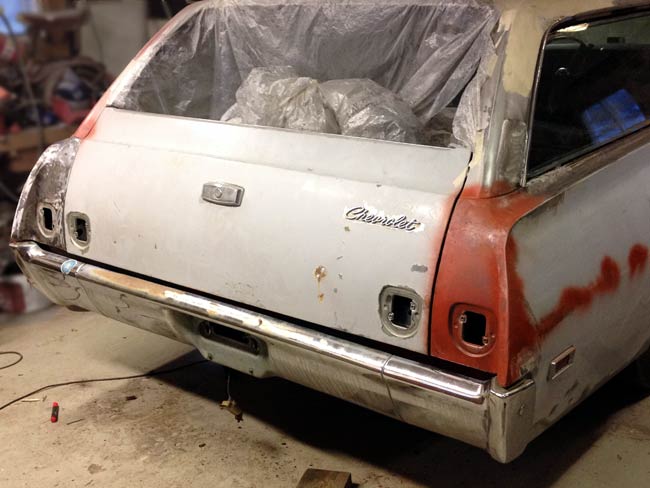 The ends also fit very nicely to the indentations in the rear quarters, so I consider this repair a success so far. 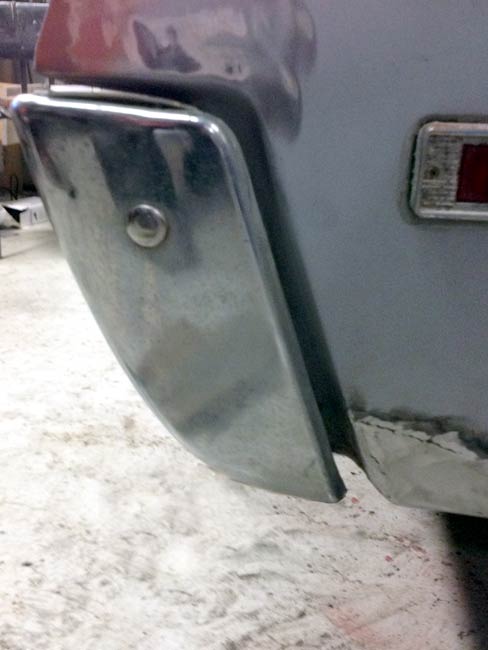
|
|
|
|
|
02-13-2019, 04:49 PM
|
#3 |
|
Registered User
Join Date: Apr 2015
Location: Finland
Posts: 133
|
Re: 1968 Chevy Bel Air Wagon Project
Since it's colder at the door, and also because my garage is a bit too short, the
car was turned around for working on the front. The front of this car is all askew, the lower part of the grille is almost an inch too far to the driver's side, and the lights of that side are too far set back by about 3/4". This car has had more than its fair share of fender benders and mishaps. The result is not nice, and it's hard to tell where to start. So I just took a deep breath and dived right in. 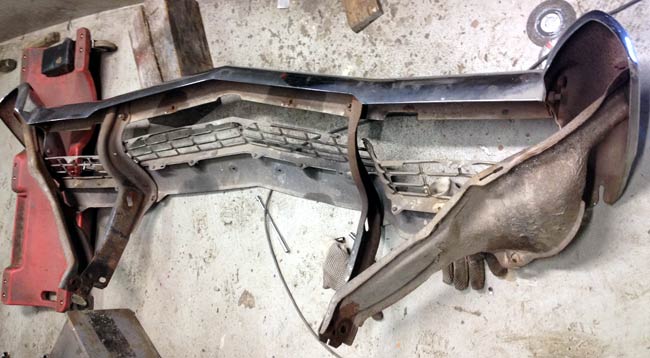 The front bumper came off pretty easily. The bottom part of the grille is attached to the bumper, some hammering remedied it not being centered. Funny enough, this was all but impossible to accomplish with the bumper mounted on the car, but with everthing unbolted it was a cinch. With things hammered and adjusted, I was almost chocked at how off the left hand side bumper end looked. It wasn't like this before.... Was it? 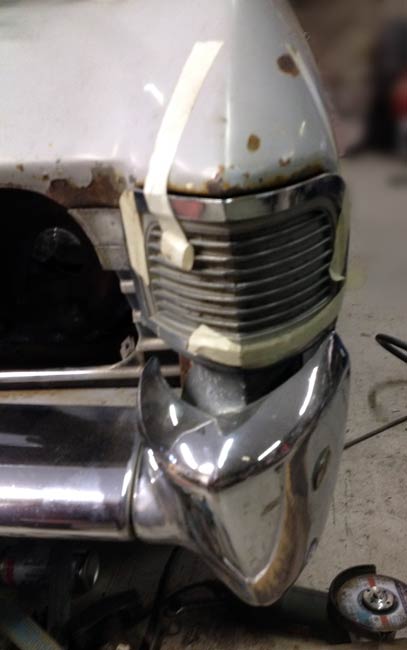 At this time measures were taken, and the whole thing removed again. A few tries later the bumper fits much better. 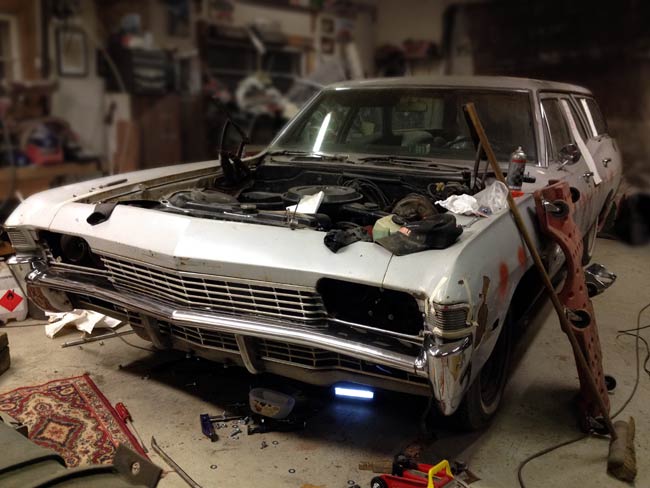
|
|
|
|
|
02-13-2019, 05:04 PM
|
#4 |
|
Registered User
Join Date: Apr 2015
Location: Finland
Posts: 133
|
Re: 1968 Chevy Bel Air Wagon Project
Some little tinkering was done along with the bumper work. I tried polishing the lower grille,
and the results look pretty promising. Not good by a far cry, but better than rattle can silver for sure. I can always paint the bright stuff later if I get tired of it, but it's harder to unpaint bumpers and grille once it's done. 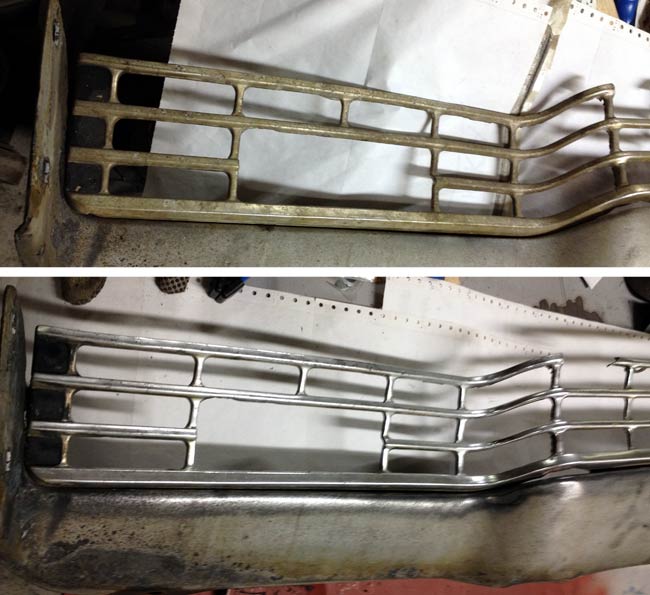 Having a real bad "before" situation helps Most of the trim and emblems are removed for polishing or sanding. Some new bits have been clicked home off the net, like new front turn lights, pedals, arm rests, window cranks etc. Those bits will make the car look well maintained, even if the bright work is a bit on the shabby side. |
|
|
|
|
02-13-2019, 05:13 PM
|
#5 |
|
Registered User
Join Date: Apr 2015
Location: Finland
Posts: 133
|
Re: 1968 Chevy Bel Air Wagon Project
As the gray paint is flaking off petty badly in places, most of it will be removed. I
was going to have the body soda blasted, but I'm too cheap, and am paying in elbow grease now. The roof and pillars are done, as is the right hand side front and rear fenders. Still just scratching the surface... Pun intended. 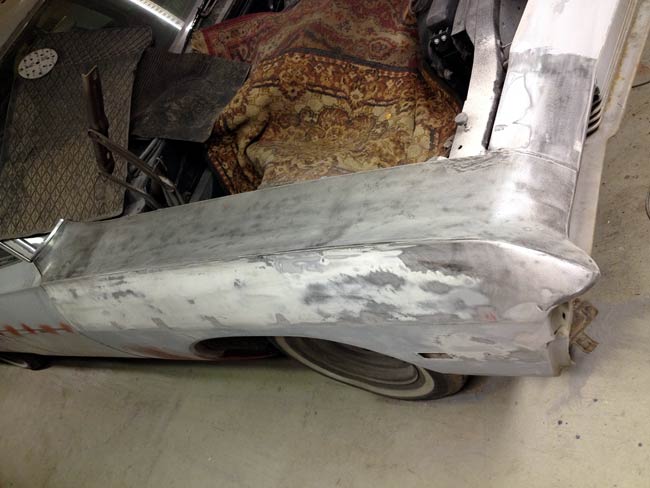
|
|
|
|
|
02-13-2019, 05:21 PM
|
#6 |
|
Post Whore
  Join Date: May 2015
Location: Alabama
Posts: 14,608
|
Re: 1968 Chevy Bel Air Wagon Project
Looking good flatbed....if your removing all your paint have you tried a 3M bristle disc...they're not cheap, but they sure do remove paint good...almost like just wiping the paint off....and no metal damage..they make them in the roloks and for hand grinders...sure beats hand sanding
__________________
Mongo...aka Greg RIP Dad RIP Jesse 1981 C30 LQ9 NV4500..http://67-72chevytrucks.com/vboard/s...d.php?t=753598 Mongos AD- LS3 TR6060...http://67-72chevytrucks.com/vboard/s...34#post8522334 Columbus..the 1957 IH 4x4...http://67-72chevytrucks.com/vboard/s...63#post8082563 2023 Chevy Z71..daily driver |
|
|
|
|
02-13-2019, 11:25 PM
|
#7 |
|
Senior Member
Join Date: Jul 2012
Location: Oblong, Illinois
Posts: 7,017
|
Re: 1968 Chevy Bel Air Wagon Project
Nice work Flatbed. How did you polish the grill?
Handy recommendation Greg. I’ve never used one though would be handy. |
|
|
|
|
02-13-2019, 11:27 PM
|
#8 |
|
Post Whore
Join Date: May 2015
Location: Alabama
Posts: 14,608
|
Re: 1968 Chevy Bel Air Wagon Project
only downside to the bristle brush is cost and life of use...but it works like magic...
__________________
Mongo...aka Greg RIP Dad RIP Jesse 1981 C30 LQ9 NV4500..http://67-72chevytrucks.com/vboard/s...d.php?t=753598 Mongos AD- LS3 TR6060...http://67-72chevytrucks.com/vboard/s...34#post8522334 Columbus..the 1957 IH 4x4...http://67-72chevytrucks.com/vboard/s...63#post8082563 2023 Chevy Z71..daily driver |
|
|
|
|
02-14-2019, 04:56 AM
|
#9 |
|
Registered User
Join Date: Apr 2015
Location: Finland
Posts: 133
|
Re: 1968 Chevy Bel Air Wagon Project
Thank you mongocanfly, for the tip. The paint is chipping badly on this
car, and is coming off pretty easily. I just sand it off with an oscillating grinder with 80 grit sanding discs. I tried 40 grit too, but it doesn't help much, as any paint left is so deeply scratched that a lot of sanding has to go into getting those scratches out. I then sand it all smooth with 180, so that the epoxy primer will adhere, and hopfully not shrink into the scratches. The roof seems to be pretty good, so it was mostly just sanded for adhesion. I plan to spray on a nice coat of epoxy first, then block it and fill as needed with poyester filler ( much like bondo I guess), block and fill, block and fill, then epoxy again, block it down and then final paint and clear. I'll paint the final paint in a nearby paintshop, where I worked for a year a few years ago. It's well worth the cost to get the car painted in a dust free environment, with a good spray gun, mine is cheap, and not good for finer work. Thank you Advanced Design, I have an abrasive nylong bristle bruch like this one...  ... to knock off the worst pitting, and then I polish with a buffer on a powerdrill using Autosol polish. Speaking of which, Autosol for Aluminum works pretty well on chrome, and doesn't dull it as coarser versions will. |
|
|
|
|
02-20-2019, 04:42 PM
|
#10 |
|
Registered User
Join Date: Apr 2015
Location: Finland
Posts: 133
|
Re: 1968 Chevy Bel Air Wagon Project
Slow work, this paint stripping. It took some time to make a hole in the garage
wall and build a system for evacuating the dust too. The drivers side is done when it comes to paint stripping. Most is sanded down to the bare metal, and finished with 180 grit for perfect paint adhesion without risk of shrinkage into the gritgrooves. 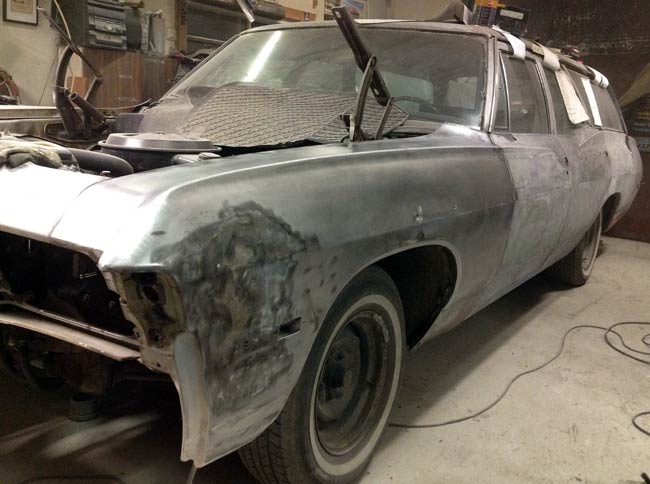 The front fender is dented, and this will be adressed before the epoxy goes on. The severely dented, shrunk and hammered hood is also ready for epoxy. 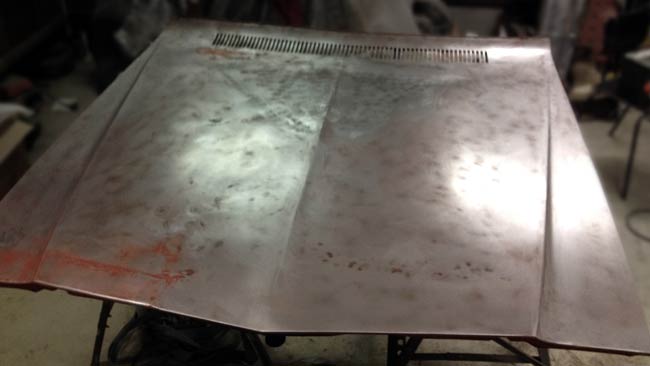 I'm assuming a lot of filler will have to be used in order to make the hood look like it's supposed to... Detail work is done according to inspiration. My aim to make the wagon look a bit nicer than just your usual respray, so details like nice paint inside the filler door feels important. The chrome is pretty much shot on this car, but I hope to be able make it look tidy anyway. 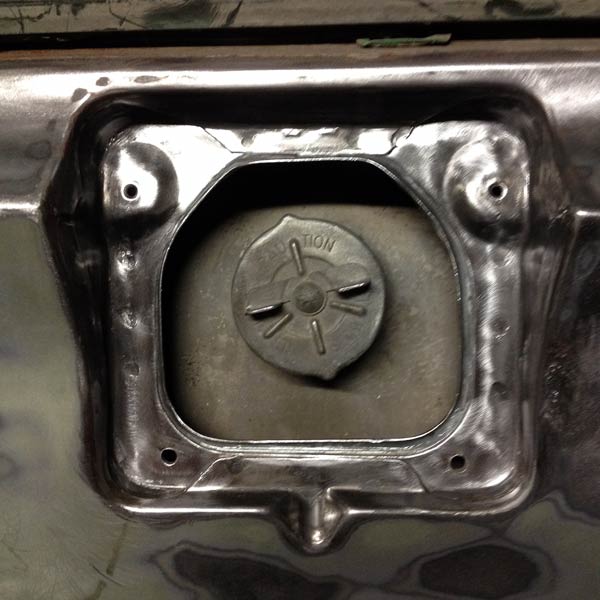
|
|
|
|
|
02-21-2019, 10:58 AM
|
#11 |
|
Proprietor of Dale's Corner
Join Date: Nov 2012
Location: Vacaville , CA
Posts: 15,920
|
Re: 1968 Chevy Bel Air Wagon Project
Subscribing to watch....I love the wagons....
__________________
"Some Days Chickens And Some Days Feathers" Dale XNGH ECV Sam Brannan 1004 R.I.P. 67ChevyRedneck R.I.P. Grumpy Old Man |
|
|
|
|
02-21-2019, 02:38 PM
|
#12 |
|
Registered User
Join Date: Apr 2015
Location: Finland
Posts: 133
|
Re: 1968 Chevy Bel Air Wagon Project
I was aiming to get the right hand side doors ground today, but decided
that making a cycone for the shop vacuum would be a good investment for future sanding. Which there will be lots of, given the shape of the wagon. The little ash vacuum I used without filter for the sander quit yesterday. Here's what it looked like:  when I took out the motor, I wasn't surprised that it didn't take long for it to burn as all the debris that otherwise would have stuck in the filter actually went through the motor for cooling. The vacuum dying was to be expected anyway, though not this fast. The filter in the shop vacuum clogs every few minutes when sanding, so a cyklone had to be acquired some way. I decided to cut off the motor portion, and glued in a bucket in its place. I found some tubing that fit the vacuum hoses in the scrap bin, and after some cutting, welding, pop riveting and gluing this is the result: 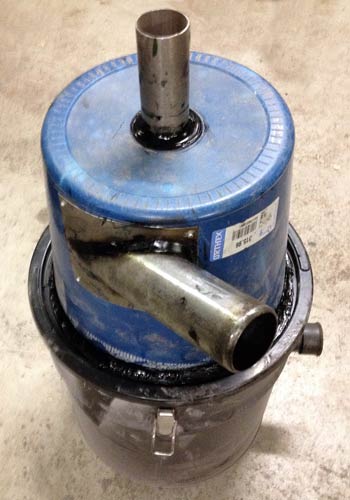 The vacuum connects to the top, and the sander to the nice exhaust pipe, this will create a whirl (cyklone) inside the bucket, and hopefully make the dust settle on the bottom, and mostly clean air to exit upwards. Who knows, it might even work
|
|
|
|
|
02-21-2019, 02:44 PM
|
#13 |
|
Registered User
Join Date: Apr 2015
Location: Finland
Posts: 133
|
Re: 1968 Chevy Bel Air Wagon Project
Hi Ol Blue K20, nice to have you on board. To me, a wagon always looked at least as
good as a coupe, and many times is more practical in use. Please all comment on my project/work/progress, the comments are a real source of inspiration for me. Last edited by flatbed67; 02-26-2019 at 08:02 PM. |
|
|
|
|
02-28-2019, 06:01 AM
|
#14 |
|
Registered User
Join Date: Apr 2015
Location: Finland
Posts: 133
|
Re: 1968 Chevy Bel Air Wagon Project
The simple cyklone works okay, and with most of the car stripped, I felt like
doing something fun for a change. Paint stripping is entertaining at best, but not fun... I had planned to paint the bumpers on the wagon, but since the front bumper came out better than expected, I was going to give the rear bumper a try too. The result is actually much better than I had dared expect, and I'm pleased with the result. It took a lot of polising, and you can still see where water has run made kind of paths. I assume a lot of polishing could get this off, but for now this is what we have. As paint and clear from some previous repair had been over sprayed on the bumper, and my chemical paint stripper didn't work on it,it was polished off. All in all time consuming, but definitely worth the while. I had started polishing before the "before" pic was taken, but the difference is still obvious. 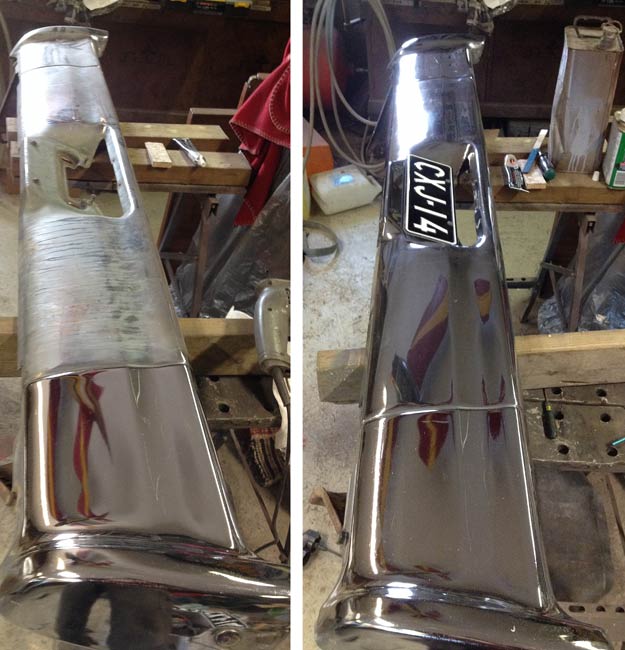
|
|
|
|
|
02-28-2019, 07:39 PM
|
#15 |
|
Registered User
Join Date: Apr 2015
Location: Finland
Posts: 133
|
Re: 1968 Chevy Bel Air Wagon Project
I think the new tail lights would look much better if they were sunk in a bit.
A friend made a simple tool for pressing sheet metal for them. I cut ten pieces of 8" x 8" sheet metal with a hole drilled in the center. I brought them with me to a friend who has a 50 ton press, and pressed them. 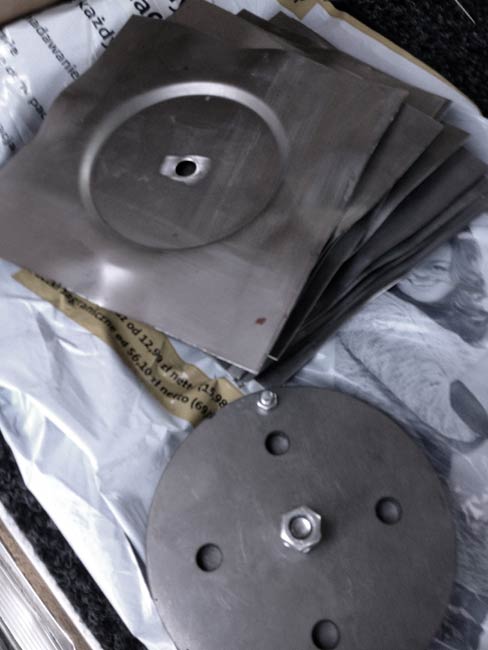 I then welded in a washer with a 1/4" hole, to have something to guide the hole saw. 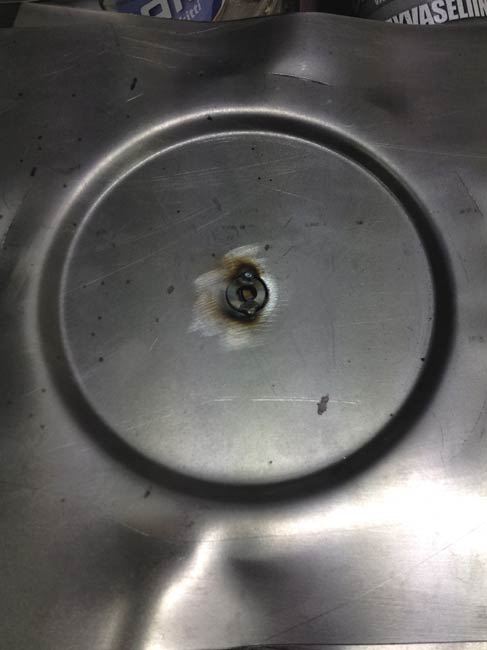 Then cut the holes for the light assemblies. 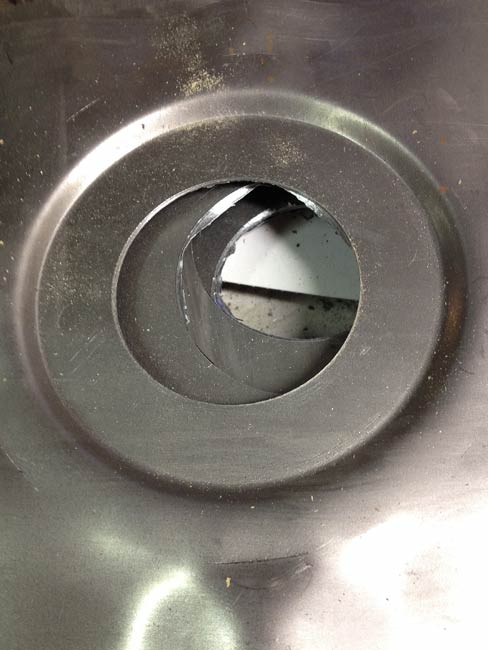 After a bit of filing, and drilling the two small mounting screw holes, a lamp could be test mounted. Oh yes, this will look good. 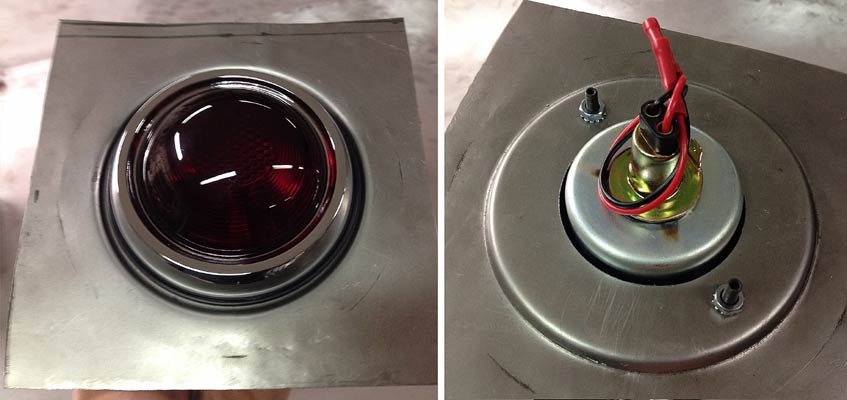
Last edited by flatbed67; 02-28-2019 at 08:01 PM. |
|
|
|
|
02-28-2019, 07:55 PM
|
#16 |
|
Registered User
Join Date: Apr 2015
Location: Finland
Posts: 133
|
Re: 1968 Chevy Bel Air Wagon Project
A small, but important issue is the outer tail lights: You can not get to them
from the inside, and the 1950 Pontiac lamps are changed from the inside. A visitor in my garage pondered if one could make a twist in system for them. It felt like a reasonably good idea, so Some 20 little tabs for all the tail lights were cut and filed, three tabs for each light assembly. Then a mounting was made, by cutting slots for the tabs. The tabs were welded to a lamp housing, and the whole thing seemed to make sense. That is until I tried to remove the tail light from the mounting plate. It was hard work for sure! As the chrome bezel is round, it was almost impossible to remove the light, without helping from the other side. 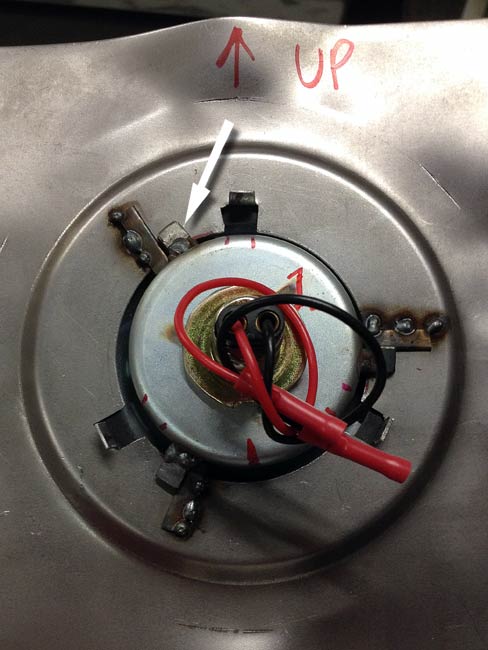 The next day a new plan had emerged, and back in the garage, the mounting studs were removed, and the holes were drilled through the bezel. Small M4 stainless screws with ground down heads were used, and proved pretty stealthy. 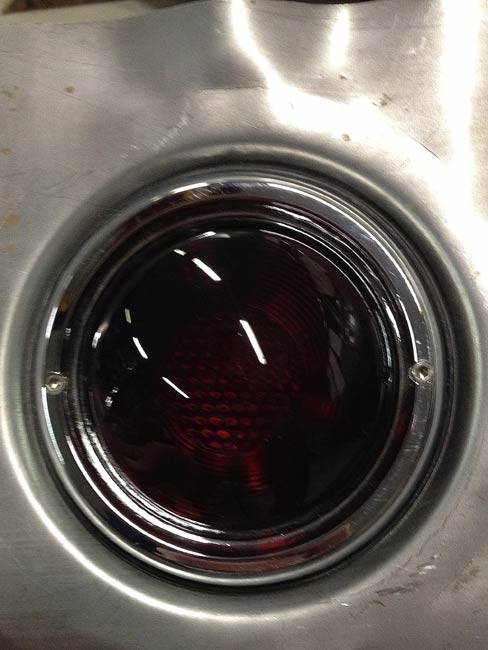 The pic is a bit out of focus, but you can see that the screw heads don't show that much. Only the outermost tail lights will be mounted like this. |
|
|
|
|
03-01-2019, 11:59 AM
|
#17 |
|
motor exploder
Join Date: Mar 2009
Location: Pittsburgh, PA
Posts: 2,346
|
Re: 1968 Chevy Bel Air Wagon Project
I LOVE the taillights! awesome ideas! Thanks for showing the stuff that DIDN'T work out - that helps just as much as showing what did!!
  
__________________
Adam 1969 Chevy CST/10 stepside, DART Big M/TREMEC Magnum Extreme/3.73's w/Detroit Truetrac 1965 Chevy Bel Air Wagon (daily driver), 327/TH350,10 bolt w/3.08's 1961 Chevy Bel Air Sport Coupe, ZZ454/M21/9" rear w/3.50's & Detroit Truetrac 2005 GMC 1500 ccsb 2wd, 6.0L/4L65e/3.73 G80 2006 GMC 2500HD ccsb 4x4, DMax LBZ/Allison 6spd/4.56's w/Detroit TrueTrac   Use the SEARCH function on this forum - it is your friend!! |
|
|
|
|
03-03-2019, 11:08 AM
|
#18 |
|
Proprietor of Dale's Corner
Join Date: Nov 2012
Location: Vacaville , CA
Posts: 15,920
|
Re: 1968 Chevy Bel Air Wagon Project
Good looking job on the tail lights. I hope you can make your goal in May.
__________________
"Some Days Chickens And Some Days Feathers" Dale XNGH ECV Sam Brannan 1004 R.I.P. 67ChevyRedneck R.I.P. Grumpy Old Man |
|
|
|
|
03-03-2019, 03:20 PM
|
#19 |
|
Registered User
Join Date: Apr 2015
Location: Finland
Posts: 133
|
Re: 1968 Chevy Bel Air Wagon Project
Thank you Ol Blue K20 and Advanced Design. I really hope that I
can make it. I just had winter vacation the last week, and it went by real fast. I got the tail lights done, and some granding and sanding, not much else. Just got to keep on every night, I guess. Anyway, I think it looks even better now, with the tail gate stripped and sanded. 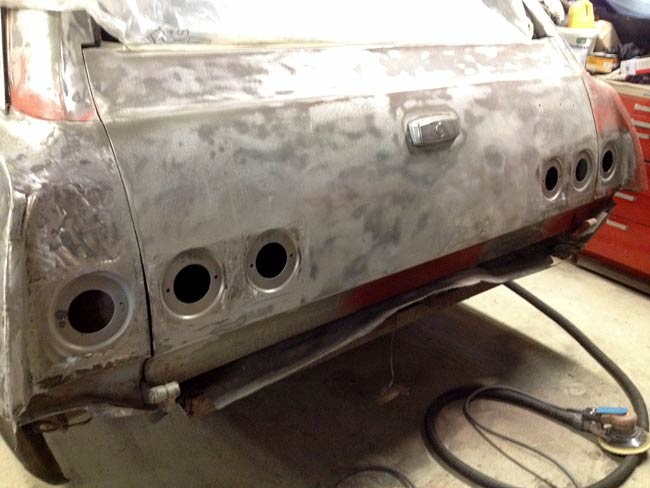 It's soon time for the first epoxy to go on. Last edited by flatbed67; 03-05-2019 at 04:45 AM. |
|
|
|
|
03-03-2019, 02:24 PM
|
#20 |
|
Senior Member
Join Date: Jul 2012
Location: Oblong, Illinois
Posts: 7,017
|
Re: 1968 Chevy Bel Air Wagon Project
Best of luck in achieving your goal! Sounds like a fun time.
Great job on the tail lights and the bumper. Excellent work! |
|
|
|
|
03-03-2019, 08:38 PM
|
#21 |
|
Proprietor of Dale's Corner
Join Date: Nov 2012
Location: Vacaville , CA
Posts: 15,920
|
Re: 1968 Chevy Bel Air Wagon Project
Looks great! You have a great start on your goal.
__________________
"Some Days Chickens And Some Days Feathers" Dale XNGH ECV Sam Brannan 1004 R.I.P. 67ChevyRedneck R.I.P. Grumpy Old Man |
|
|
|
|
03-05-2019, 04:21 PM
|
#22 |
|
Registered User
Join Date: Apr 2015
Location: Finland
Posts: 133
|
Re: 1968 Chevy Bel Air Wagon Project
Thank you Ol Blue K20, it's getting pretty close to the first coat of epoxy
primer. I got the grille removed today, and it should be one of the last things that has to be removed before paint. The rear side windows have to be removed too, the glue strips have dried out on both sides, so they hang by the top and sides only. After that, hopefully, it will be mostly "progress", in that to this point, I've been removing parts from the car almost daily. 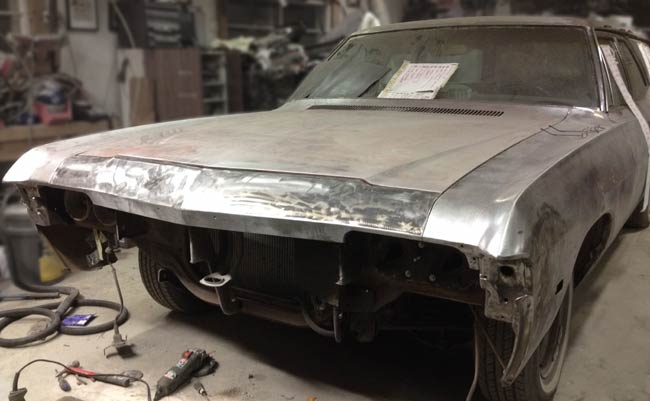
|
|
|
|
|
03-05-2019, 04:46 PM
|
#23 |
|
Post Whore
Join Date: May 2015
Location: Alabama
Posts: 14,608
|
Re: 1968 Chevy Bel Air Wagon Project
The recessed taillights are a nice touch...most people would never know it was a custom mod...
__________________
Mongo...aka Greg RIP Dad RIP Jesse 1981 C30 LQ9 NV4500..http://67-72chevytrucks.com/vboard/s...d.php?t=753598 Mongos AD- LS3 TR6060...http://67-72chevytrucks.com/vboard/s...34#post8522334 Columbus..the 1957 IH 4x4...http://67-72chevytrucks.com/vboard/s...63#post8082563 2023 Chevy Z71..daily driver |
|
|
|
|
03-05-2019, 08:06 PM
|
#24 |
|
Proprietor of Dale's Corner
Join Date: Nov 2012
Location: Vacaville , CA
Posts: 15,920
|
Re: 1968 Chevy Bel Air Wagon Project
Now the fun begins...
|
|
|
|
|
03-10-2019, 08:49 AM
|
#25 |
|
Registered User
Join Date: Apr 2015
Location: Finland
Posts: 133
|
Re: 1968 Chevy Bel Air Wagon Project
My aim is to make it look kinda factory, so people who don't know Chevrolets
that good won't notice, as you said, mongocanfly. '68 Chevrolets are rare here, so it might just work And yup, Ol Blue K20, the fun has begun! Honestly, spraying epoxy isn't the most fun thing you can do, but at least it feels like progress. In a couple days I hope to be able to block the better looking parts of the body, and then start working with body filler. It will probably take a copious amount of body filler to make this sea of sheetmetal look any kind of straight. Not only because of its size, but also, since it's been dented in all corners, and along the right hand side, the roof has been welded on, and someone sandblasted the bejeezus out of the hood. 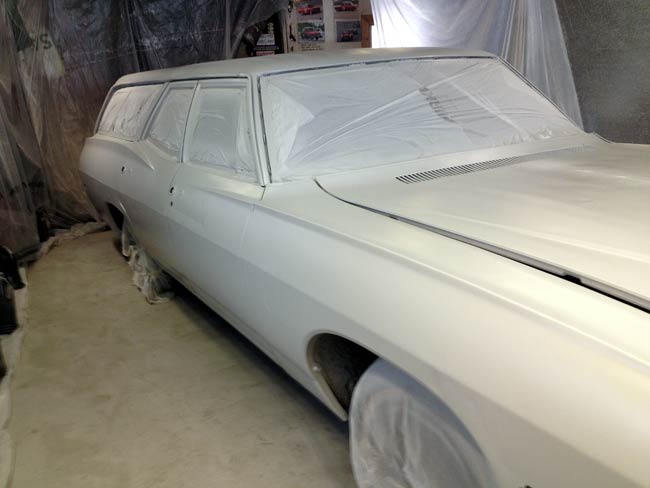 It looks better already. Amazing what a uniform color can do. |
|
|
|
|
| Bookmarks |
|
|


 Hybrid Mode
