
|
Register or Log In To remove these advertisements. |
|
|
|
|||||||
 |
|
|
Thread Tools | Display Modes |
|
|
 04-25-2019, 03:59 PM
|
#1 |
|
Senior Member
 Join Date: Jul 2012
Location: Oblong, Illinois
Posts: 7,026
|
Re: 1968 Chevy Bel Air Wagon Project
Flatbread, great job on the wagon! It looks spectacular and is sure to be a hit at the event. I really appreciate the extra effort you have put into the details as well. They make a positive difference for sure.
|

|

|
|
04-28-2019, 04:46 PM
|
#2 |
|
Registered User
Join Date: Apr 2015
Location: Finland
Posts: 133
|
Re: 1968 Chevy Bel Air Wagon Project
Thank you, Advanced Design, The more work on details I put into the
car, and the more little modifications to suit my taste, the more "mine" it feels. This wagon still needs lowered front springs and new exhausts to really feel mine. After that is done, I might start feeling some pride for it, and that's an important part of my car ownership. I wrote something about that in the beginning of this thread. I'm kinda broad minded, and am able to feel pride of any heap, as long as I like it  Aanyway... The last couple days have been filled with litle tinkerings, like adjusting the rear bumper, which now sits nicely, changing the rear shocks and cleaning the interior. And the glass, as I wrote about the other day. 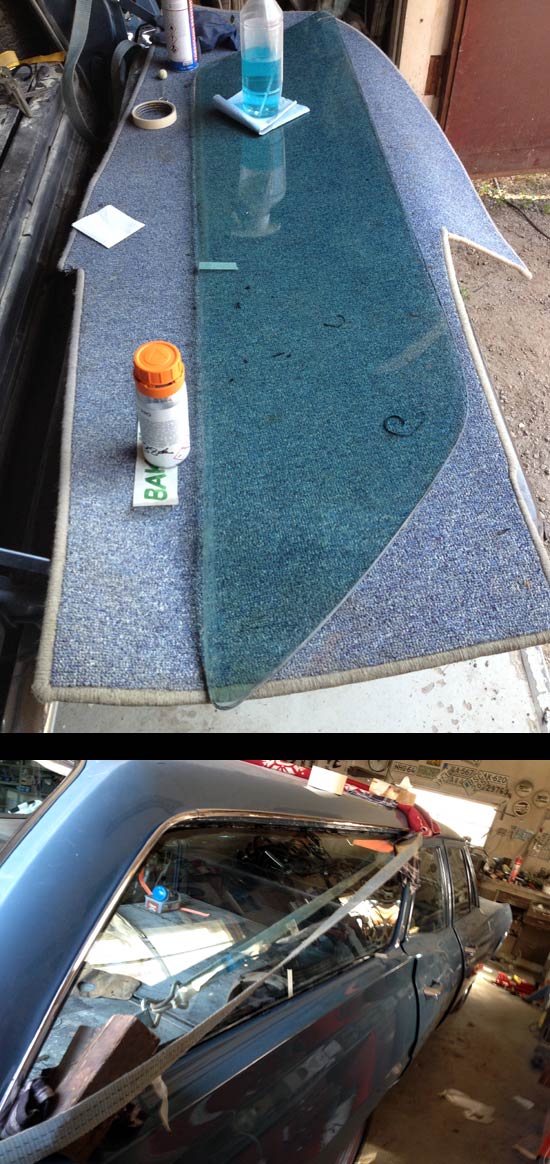 The top pic shows the glass, cleaning work going on (some old seal scraps under the glass), using the tail gate as a work bench. Can closest is SIKA primer. The glass didn't fit exactly to the frame, so I pulled it in a bit with the contraption seen at the bottom pic. |
|
|
|
|
04-28-2019, 05:09 PM
|
#3 |
|
Registered User
Join Date: Apr 2015
Location: Finland
Posts: 133
|
Re: 1968 Chevy Bel Air Wagon Project
Yesterday I got my new centercaps that I had had turned from aluminum at a
friend's shop. I measured the chromed plastic center caps that came with the new front rims, and drew a plan for new ones for the rear wheels. Four Aluminum caps, with threaded holes, with the plastic ones in the center (top pic). Second pic shows a polished aluminum cap, with the plastic one under. 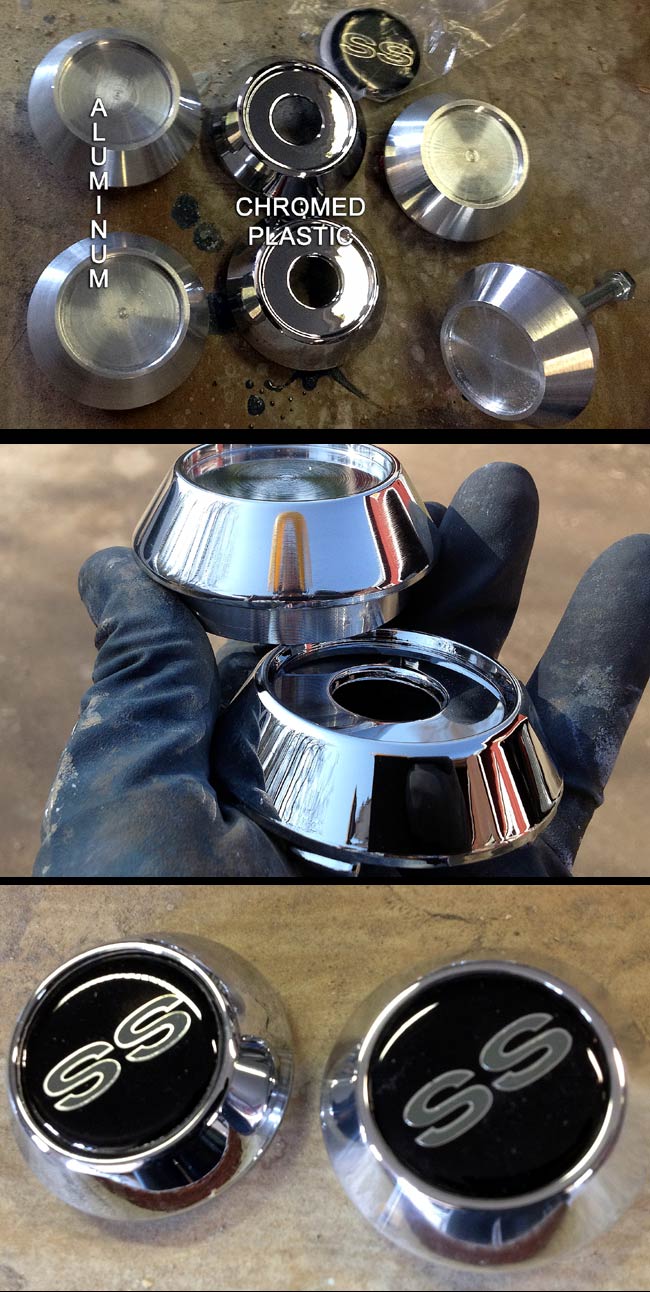 The bottom pic shows both kinds or caps with the "SS"center logo. Too bad I only have two of those, so I have to come up with something to glue to all the caps. Same as with the wheels, anyone who doesn't know, won't probably notice the difference. Even if it's not ready, I decided to take my new wheels for a spin today. With toe adjusted , and better shocks it now rides decently. Still no door seals, so it's pretty noisy. The exhaust leaks at the manifold to tube joints too. 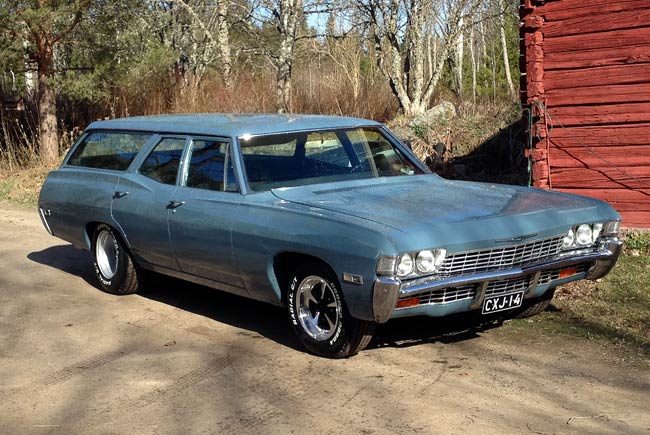 Rinsed with water in this pic, hence the ripply look. Just to convince myself that there is a difference since last October: 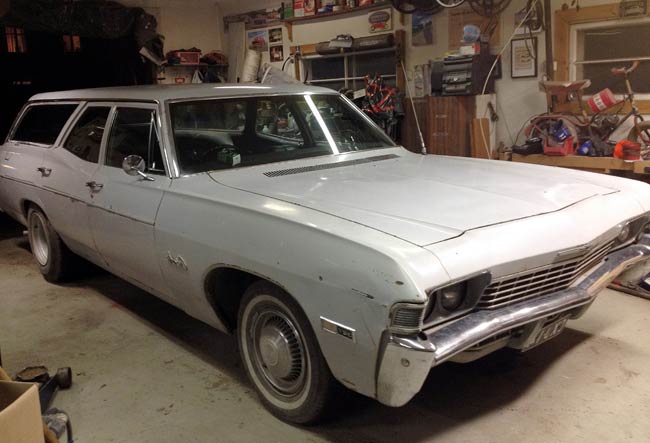
|
|
|
|
|
04-28-2019, 09:24 PM
|
#4 |
|
Proprietor of Dale's Corner
Join Date: Nov 2012
Location: Vacaville , CA
Posts: 15,939
|
Re: 1968 Chevy Bel Air Wagon Project
Thar car looks great!!! You should be proud. Especially since it's a foreign car in your country and parts aren't as available as they are here...I know I'm proud!!
__________________
"Some Days Chickens And Some Days Feathers" Dale XNGH ECV Sam Brannan 1004 R.I.P. 67ChevyRedneck R.I.P. Grumpy Old Man |
|
|
|
|
05-01-2019, 03:58 PM
|
#5 |
|
Registered User
Join Date: Apr 2015
Location: Finland
Posts: 133
|
Re: 1968 Chevy Bel Air Wagon Project
Very nice of you, Ol Blue K20, parts availability is actually pretty good,
especially since you can get things ordered over the internet. After postage and VAT the parts prices get fairly steep, though. Used parts or wrecking yard parts are a different story, most American cars are not junked and salvaged, but made to run, so that's why I have gone through some extra work to make the old parts, such as my sandblasted/ruined hood, usable again. So the Mayday cruising was a success, as I got the wagon to a driveable state, and even MOT tested just yesterday. The day was gloomy, but spirits were high. In this first pic we're lining up for a parade through town. Sometimes we've been up to about 500 American cars in this parade. bear in mind, that this is a town of about 60,000 residents' so it's a fairly small place, and the American car hobby is well represented. 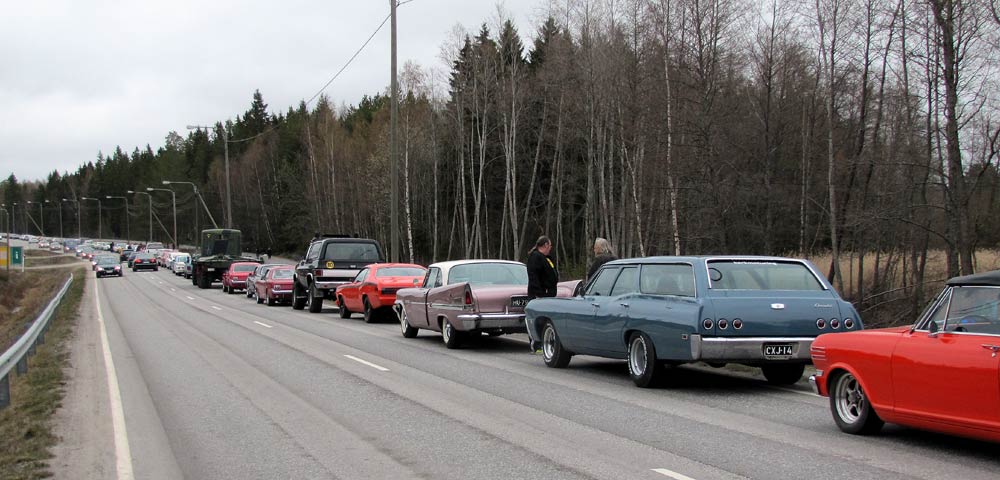 After the parade a lot of the cars assembled to a gathering on a big parking lot. 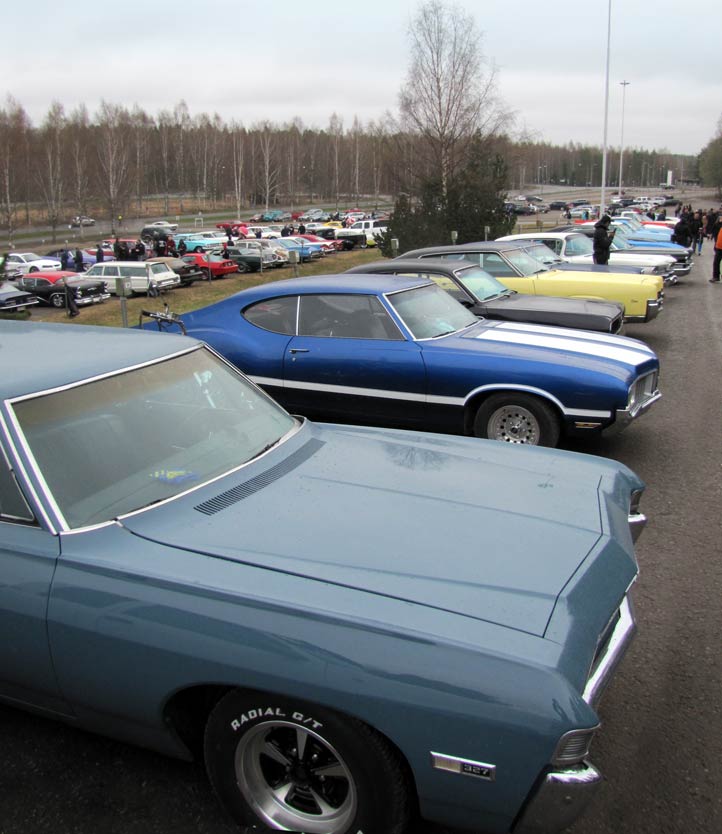 Of course we had to take our traditional family photo, but as both our sons live in other locations, there's only two of us in the pic. Your's truly and the wife in the photo. You might be able to guess who's who.  Oh, and the picnic basket was in the back seat. We enjoyed our coffee inside the car today, as it was cold with a light drizzle. Last edited by flatbed67; 05-01-2019 at 04:06 PM. Reason: picnic basket related forgetfulness |
|
|
|
|
05-01-2019, 08:46 PM
|
#6 |
|
1965 Chevy C10, 2005 4.8L/4l60
Join Date: Aug 2004
Location: DFW Texas
Posts: 8,540
|
Re: 1968 Chevy Bel Air Wagon Project
Great build and family pic!
__________________
Clyde65 Rebuild of Clyde http://67-72chevytrucks.com/vboard/s...84#post8338184 69 Aristocrat Lo Liner build http://67-72chevytrucks.com/vboard/s...84#post7561684  support our troops! |
|
|
|
|
05-01-2019, 10:50 PM
|
#7 |
|
Senior Member
Join Date: Dec 2009
Location: TN.
Posts: 7,942
|
Re: 1968 Chevy Bel Air Wagon Project
This goes to show that hard work Pays Off.
Great Job!!!! 
__________________
________________________________________________________________________________________ ____________________________________________ 84 Chevy K-20 63 Impala (my high school car) http://67-72chevytrucks.com/vboard/s...Crew Cab Build |
|
|
|
|
05-02-2019, 09:13 AM
|
#8 |
|
Senior Member
Join Date: Jul 2012
Location: Oblong, Illinois
Posts: 7,026
|
Re: 1968 Chevy Bel Air Wagon Project
That is a great picture of the two of you! And the parade had to be a fun time. Great job on the wagon. The before and after pics show a stunning improvement.
|
|
|
|
|
05-02-2019, 09:42 AM
|
#9 |
|
Proprietor of Dale's Corner
Join Date: Nov 2012
Location: Vacaville , CA
Posts: 15,939
|
Re: 1968 Chevy Bel Air Wagon Project
Looks like a good time great pics. The car looks great
__________________
"Some Days Chickens And Some Days Feathers" Dale XNGH ECV Sam Brannan 1004 R.I.P. 67ChevyRedneck R.I.P. Grumpy Old Man |
|
|
|
|
05-07-2019, 03:41 PM
|
#10 |
|
Registered User
Join Date: Apr 2015
Location: Finland
Posts: 133
|
Re: 1968 Chevy Bel Air Wagon Project
Thank you Clyde65, Getter-Done, Advanced Design and Ol Blue K20 for
the support and nice words! This last weekend I was supposed to make new exhaust pipes for the wagon. A few new parts were lugged home for fabrication of the new pipes. A pair of Flow tech Raptors, and some 2-1/2" tubing. I had some lying around from earlier builds, so it should suffice. 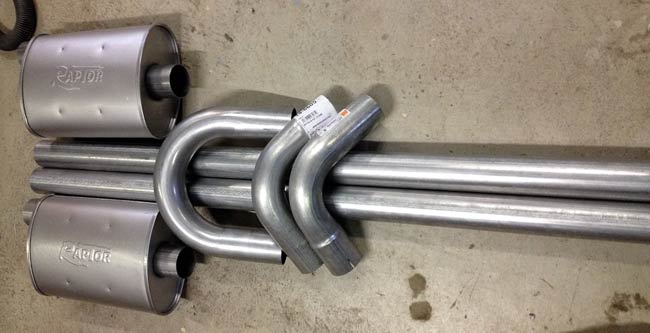 Apparently I'm getting slower, because the whole weekend went by, and only one pipe was produced. Well, while at it, the rear shocks were changed for brand new ones. Here's what the old exhaust looked like. Not a performance exhaust by any measure either. The cross over pipe was rusted through in a couple places, hence the awful sound. 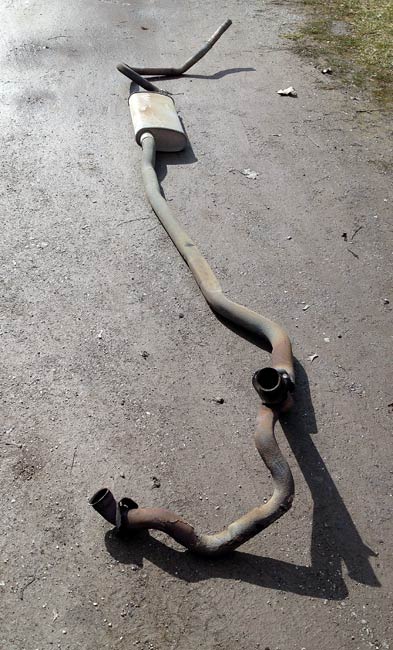 I tried to get the exhaust neatly tucked up along the prop shaft, and luckily the Chevy transmission crossmember is bumped up for twin exhausts, so they can be made nice and tight on both sides (As opposed to Oldsmobile crossmembers I've wrestled with). I really dislike exhausts that show under the car's profile hanging below the frame. Here's the right hand side exhaust system: 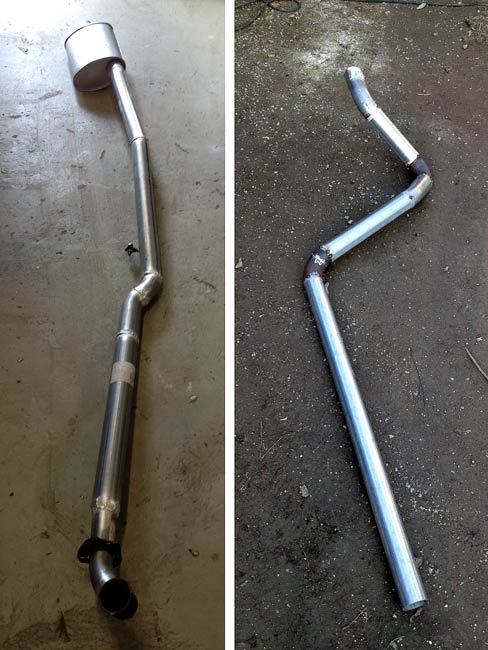 The front part to the left, fully welded and ready to go back under the car. I painted all the welds with a Dinitrol rust protective heat resistant paint that contains aluminum. The rear part on the right is only tacked in this pic. 17 pieces alltogether for the whole pipe. Still only one hanger welded to the pipe. Two more will get fabricated, one at the muffler, and one aft of the rear axle. One more to go. |
|
|
|
|
05-09-2019, 03:16 PM
|
#11 |
|
Registered User
Join Date: Apr 2015
Location: Finland
Posts: 133
|
Re: 1968 Chevy Bel Air Wagon Project
A few days "wasted" on other aspects of life, I finally had the time to make
the right hand side exhaust pipe totally finished. I thought I'd share my view of a good hanger for the tail part of the pipe. I've used this type of hanger under my hot rod, and it worked for years. The idea is you put the weight on the rubber thingy, not a pull force. 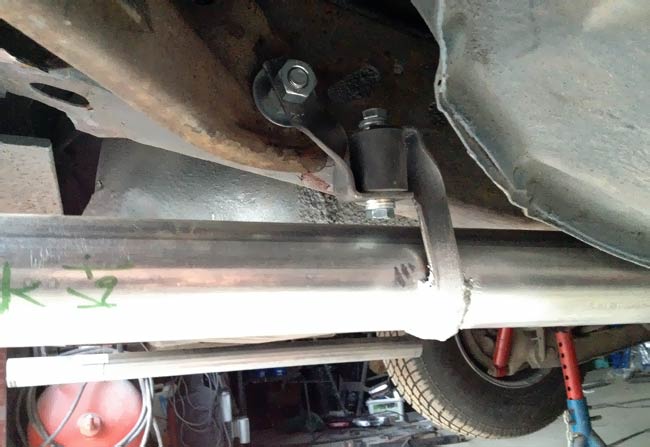 The 1/8" thick bar stock pieces go around each other, and the threaded metal inserts in the rubber is just holding things in place. The result is a firm mount, that does not wobble, and not too much vibration is transferred to the frame. These rubber pieces are about 3/4" in diameter, and the threads are M8 (about the size of 5/16" UNC), top and bottom, not through threads. I have tried hanging exhaust pipes off 2" diameter ones with M10 (3/8") threads, and the metal will rip off the rubber inside a few months. Before I made them, I felt I needed some inspiration to make my exhaust hangers, and here are a couple fun youtube clips on how to make them: A super cheap way to make exhaust hangers that takes no time at all to make Well. No, I can't imagine how this kind of hanger would do the job. In this clip we apparently will learn to do it like a muffler shop: How to muffler repair - hanger repair -muffler shop At exactly 5 minutes into this video, you can see the result. Always nice to have experts on youtube give you advice on making things for your car. 
|
|
|
|
|
05-09-2019, 03:26 PM
|
#12 |
|
Proprietor of Dale's Corner
Join Date: Nov 2012
Location: Vacaville , CA
Posts: 15,939
|
Re: 1968 Chevy Bel Air Wagon Project
Cool hangers. ......
__________________
"Some Days Chickens And Some Days Feathers" Dale XNGH ECV Sam Brannan 1004 R.I.P. 67ChevyRedneck R.I.P. Grumpy Old Man |
|
|
|
|
05-11-2019, 04:44 PM
|
#13 |
|
Registered User
Join Date: Apr 2015
Location: Finland
Posts: 133
|
Re: 1968 Chevy Bel Air Wagon Project
Thanks, Ol Blue K20. Now the whole exhaust is ready and hung on a total
of six hangers. The exhaust sound is nice and growly for a little 327, and so far I'm very pleased with the result. It's just awesome, how much difference a new exhaust does, when the old one was so leaky and awful. The wagon feels a hundred times better, and I haven't even taken it for a ride yet. Got the exhausts ready about half an hour ago, it's almost midnight, and it's raining. I uploaded a clip to youtube, but I couldn't figure out how to embed it, so you just have to make do with a link: https://www.youtube.com/watch?v=9dW9IKNHAnE
|
|
|
|
|
05-11-2019, 08:15 PM
|
#14 |
|
Registered User
Join Date: Apr 2008
Location: Hampton, Ga
Posts: 888
|
Re: 1968 Chevy Bel Air Wagon Project
Sounds awesome!
- Josh
__________________
1967 Buick Special wagon 1968 Jeep Wagoneer 1958 Chevy Panel Truck 2017 Suzuki M109R |
|
|
|
|
05-12-2019, 09:22 AM
|
#15 |
|
Proprietor of Dale's Corner
Join Date: Nov 2012
Location: Vacaville , CA
Posts: 15,939
|
Re: 1968 Chevy Bel Air Wagon Project
Sounds great! Nice and throaty. ...
__________________
"Some Days Chickens And Some Days Feathers" Dale XNGH ECV Sam Brannan 1004 R.I.P. 67ChevyRedneck R.I.P. Grumpy Old Man |
|
|
|
|
05-16-2019, 02:59 PM
|
#16 |
|
Registered User
Join Date: Apr 2015
Location: Finland
Posts: 133
|
Re: 1968 Chevy Bel Air Wagon Project
Thank you for the nice comments on the exhaust sound. It does sound nice
and throaty, but Almost too loud, I'm afraid. We'll see, I have driven the wagon with no door seals, so it might feel different when those are done. Must be something with the previous owners of my cars. So many things done so wrong. When I removed the door seals, I marked them with masking tape for orientation and by door ( eg left front door ). I do mistakes, but I remember taking them off two different days, and the left hand ones were marked with red marker, and the right hand ones with black, so I'm pretty confident they were marked right. Of freaking course the PO had put the right hand side front door seal on the driver's side! When I had done the front door, and was working on the rear door seal, I noticed that they were inside out, opposed to eachother. I tried the fit, and decided the front door one was the wrong way around. Deep sigh, and picking out thirty odd little plastic fasteners, putting them into the other door seal, and working out how it would mount. I'll get it sorted, but it's like biking uphill all the time 
|
|
|
|
|
05-19-2019, 07:46 AM
|
#17 |
|
Registered User
Join Date: Apr 2015
Location: Finland
Posts: 133
|
Re: 1968 Chevy Bel Air Wagon Project
I was so annoyed with those door seals. I know, my own fault for putting one on
the wrong door. Still annoyed the heck out of me, having to pull all the little plastic fasteners out of the new painted window frame. Easy to blame the PO. Yesterday we had a cruis in at a local gas station/diner. A guy who took pics of all the cars at a previous event, April 30, happened to snap one of mine too, so I asked for promision to use it, so here it is. 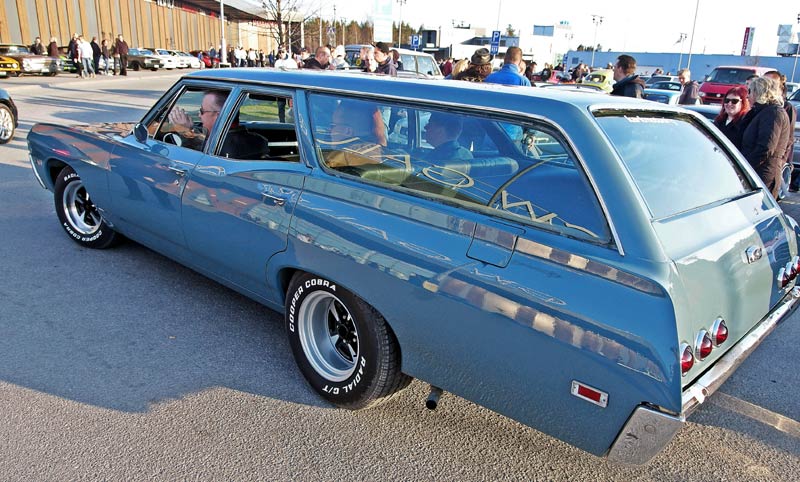 With new exhaust and door seals in place, the ride is pretty nice. I just need to get the front lowered and aligned. (some additional work may be needed  ) )
|
|
|
|
|
05-19-2019, 08:23 AM
|
#18 |
|
Proprietor of Dale's Corner
Join Date: Nov 2012
Location: Vacaville , CA
Posts: 15,939
|
Re: 1968 Chevy Bel Air Wagon Project
Looks great out in the sun.
__________________
"Some Days Chickens And Some Days Feathers" Dale XNGH ECV Sam Brannan 1004 R.I.P. 67ChevyRedneck R.I.P. Grumpy Old Man |
|
|
|
|
06-13-2019, 03:59 PM
|
#19 |
|
Registered User
Join Date: Apr 2015
Location: Finland
Posts: 133
|
Re: 1968 Chevy Bel Air Wagon Project
It's been some time, and I've been waiting for the driver for the sequential
turn lights. A good friend of mine has made the system, and programmed the micro controller. I just got it home, and of course there's a lot of work to do with packaging, mounting of the driver, and getting all the cables and leads to go to their respective bulbs. So here's the whole gorgeousness sprawled out on the kitchen table:  Workflow from left to right: In: -Left and right front turn signal wires (the original relay will be shorted). -Brake light wire from pedal switch -Hazard (also relay removed/shorted) These signals will be processed by the programmable Arduino micro controller to send on signals to certain outputs. These signals go to the amplifier card, so that they get powerful enough to drive the relays on the relay card. There are eight relays on the relay card. Six for each one of the tail turn/brake light filaments, and one each for the front turn lights. The "Low park driver" will supply a lower voltage to the rear park light on the side to which the turn signals are blinking. This will require another two relays. I've also planned to put in a panic switch, that gets me brake lights if this whole system fails for some reason, just as a safety precaution. Normal tail lights will work even if the system is shut down The Arduino controller will be powered off a 12V to USB thingy, a bit like a phone car charger. The relay card and amplifier card will be powered off 12V when ignition is on. Chevrolets have working brake lights at all times, but in this case the break lights will work only when the ignition is switched on, like in most any European car. The remote is just silly. There's a radio receiver on the relay card, so you can remotely turn on any one of all tail lights with the remote, if the relay card is getting its 12V power supply. I have no idea when to use this, but it came with the system at no cost. Actually the whole shebang was gifted to me. It's really great to have good friends
|
|
|
|
|
06-13-2019, 05:42 PM
|
#20 |
|
Registered User
Join Date: Apr 2015
Location: Finland
Posts: 133
|
Re: 1968 Chevy Bel Air Wagon Project
|
|
|
|
|
06-17-2019, 07:31 PM
|
#21 |
|
Proprietor of Dale's Corner
Join Date: Nov 2012
Location: Vacaville , CA
Posts: 15,939
|
Re: 1968 Chevy Bel Air Wagon Project
That's cool! Ilike it a lot
__________________
"Some Days Chickens And Some Days Feathers" Dale XNGH ECV Sam Brannan 1004 R.I.P. 67ChevyRedneck R.I.P. Grumpy Old Man |
|
|
|
|
06-17-2019, 08:07 PM
|
#22 |
|
Registered User
Join Date: Apr 2015
Location: Finland
Posts: 133
|
Re: 1968 Chevy Bel Air Wagon Project
Thanks, Ol Blue K20, I'll be back in a bit, there's work with the boat going
on, and midsummer's coming up. Hopefully I'm back on track in a week or so. I was to the local speed shop today, and bought new bushings for the lower front control arms, so when I lower it, I assume there will be potential for a bit better handling. I'm going to put in a good bit of caster, and try to get camber close to zero. More caster, because I think it's too twitchy now. Like Arnie said: "I'll be back" |
|
|
|
|
06-17-2019, 08:18 PM
|
#23 |
|
Registered User
Join Date: Apr 2015
Location: Finland
Posts: 133
|
Re: 1968 Chevy Bel Air Wagon Project
Oh, befoe I forget:
We visited an American car meeting this weekend. It doesn't show in this pic, but there were at least a couple hunded American cars in attendance. 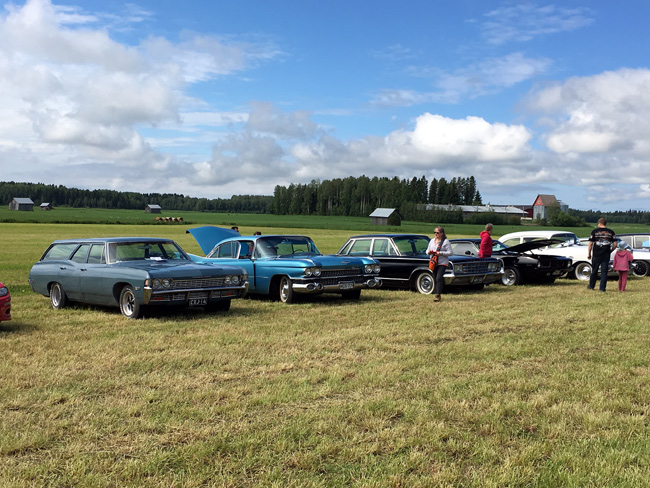 What bugs me, is that the wagon still seems to have this effect on other people and their cars: 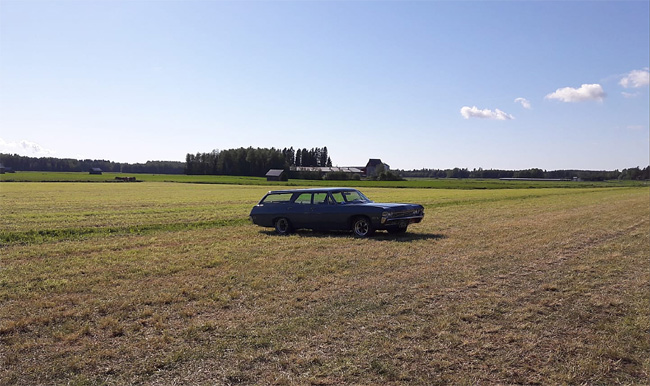
|
|
|
|
|
07-03-2019, 04:44 AM
|
#24 |
|
Registered User
Join Date: Apr 2015
Location: Finland
Posts: 133
|
Re: 1968 Chevy Bel Air Wagon Project
Finally something happening on the wagon. Some work on the boat has been
done, and some boating, of course. Anyway, time to work on the altitude in the front of the wagon. After some measuring and planning, the desired amount of lowering is about three inches. I measured the coils and decided a bit more than one coil will have to go. When I got the spring out, though, it was tighter coiled in the ends, than in the middle, so the amount of coil cutting is still in the open. 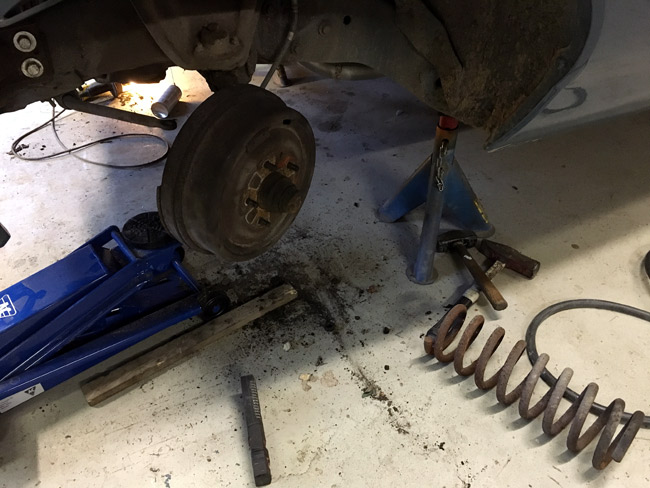 The coils are tighter towards the ends. Oh well, it's just a matter of deciding. The rubber around the lower ball joints were shot, and as the local speed shop can't get new rubber, I had to order new ball joints too. $150 a pair, if you care to know. 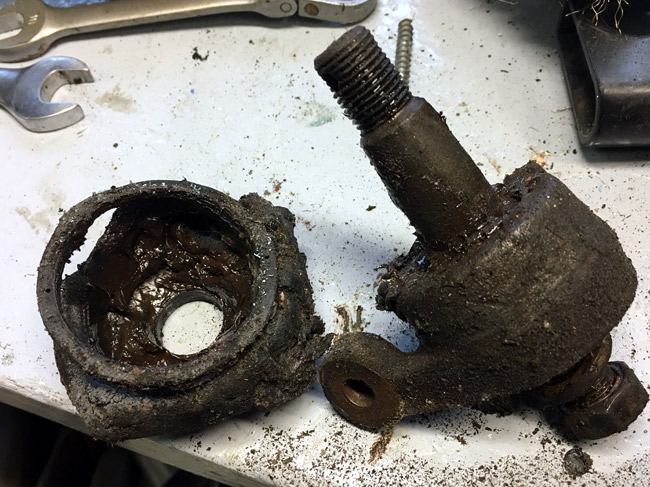 I was investigating the shims situation in small parts drawer, when it dawned on me, that the reason for there not being any shims, migt be that you don't use shims on this kind of car. After some studying I learned how to do it. On the forward strut on the lower control arm, you adjust caster on this nut: 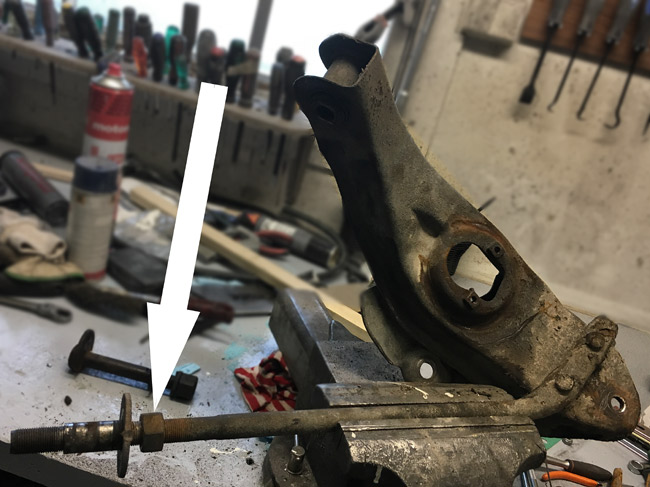 The nut, of course has some washers and grommets, and another nut on the other side of what is a mounting point in the frame. Then the inner bolt that attaches the lower control arm to the frame is excentrical, and that's what you adjust caster with. 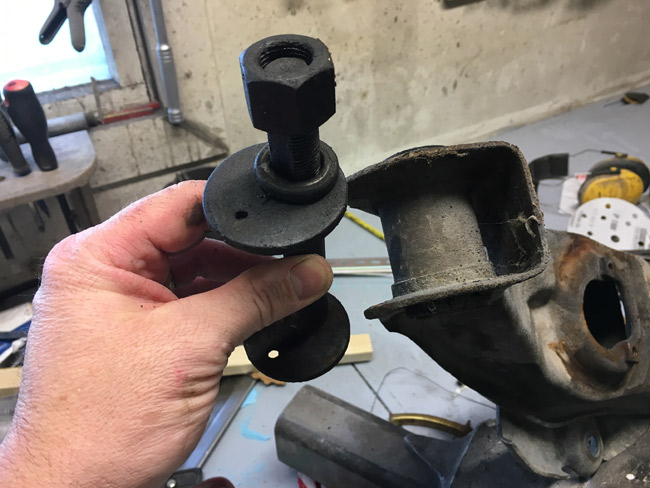 You learn new things every time you work on a car. It's a great part of our hobby. Now out to the shop to change all the bushings! Oh, and I know it's not recommended to lower a car by cutting coils, but it's worked for me. An old front spring that's a bit soft gets a bit stiffer when shortened, and I like the firmer ride. A good alignment job usually make the cars drive decently after. |
|
|
|
|
07-03-2019, 05:25 AM
|
#25 |
|
Post Whore
 Join Date: May 2015
Location: Alabama
Posts: 14,618
|
Re: 1968 Chevy Bel Air Wagon Project
what ive done in the past was cut one full coil,,(red mark)...then heat the coil...(blue mark)...to replicate the original compressed part of spring..so it sits flat on spring pad...
usually, but not always ,1 coil is about 2in....
__________________
Mongo...aka Greg RIP Dad RIP Jesse 1981 C30 LQ9 NV4500..http://67-72chevytrucks.com/vboard/s...d.php?t=753598 Mongos AD- LS3 TR6060...http://67-72chevytrucks.com/vboard/s...34#post8522334 Columbus..the 1957 IH 4x4...http://67-72chevytrucks.com/vboard/s...63#post8082563 2023 Chevy Z71..daily driver |
|
|
|
|
| Bookmarks |
|
|


 Hybrid Mode
