
 |
|
|
#1376 |
|
6>8 Plugless........
 Join Date: Sep 2007
Location: Prairie City, Ia
Posts: 17,139
|
Re: Junkyard Jimmy Super Low Buck Build Thread
So now you want it to be a bouncer?
 That is weird about the torch. maybe the hoses are made in USA and the torch and regulators are made in China? That is weird about the torch. maybe the hoses are made in USA and the torch and regulators are made in China? 
__________________
Ryan 1972 Chevy Longhorn K30 Cheyenne Super, 359 Inline 6 cylinder, Auto Trans, Tilt, Diesel Tach/Vach, Buckets, Rare Rear 4-link and air ride option Build Thread 1972 GMC Sierra Grande Longhorn 4x4 1972 Chevy Cheyenne Super K20 Long Step side tilt, tach, tow hooks, AC, 350 4 speed 1972 C10 Suburban Custom Deluxe 1969 Chevy milk truck 1971 Camaro RS 5.3 BTR STG3 Cam Super T10 1940 Ford 354 Hemi 46RH Ford 9" on air ride huge project Tired of spark plugs? Check this out. |
|
|

|
|
|
#1377 | |
|
GEARHEAD
Join Date: Aug 2003
Location: MN
Posts: 6,125
|
Re: Junkyard Jimmy Super Low Buck Build Thread
Quote:
I go to adjust the pressure for the downstream flow and it's missing the adjuster screws in the regulators. I dig around the packaging but no luck. I sent a message to the seller, we'll see what happens. In the mean time, I try out my old used regulators for the first time since I got them and it works. 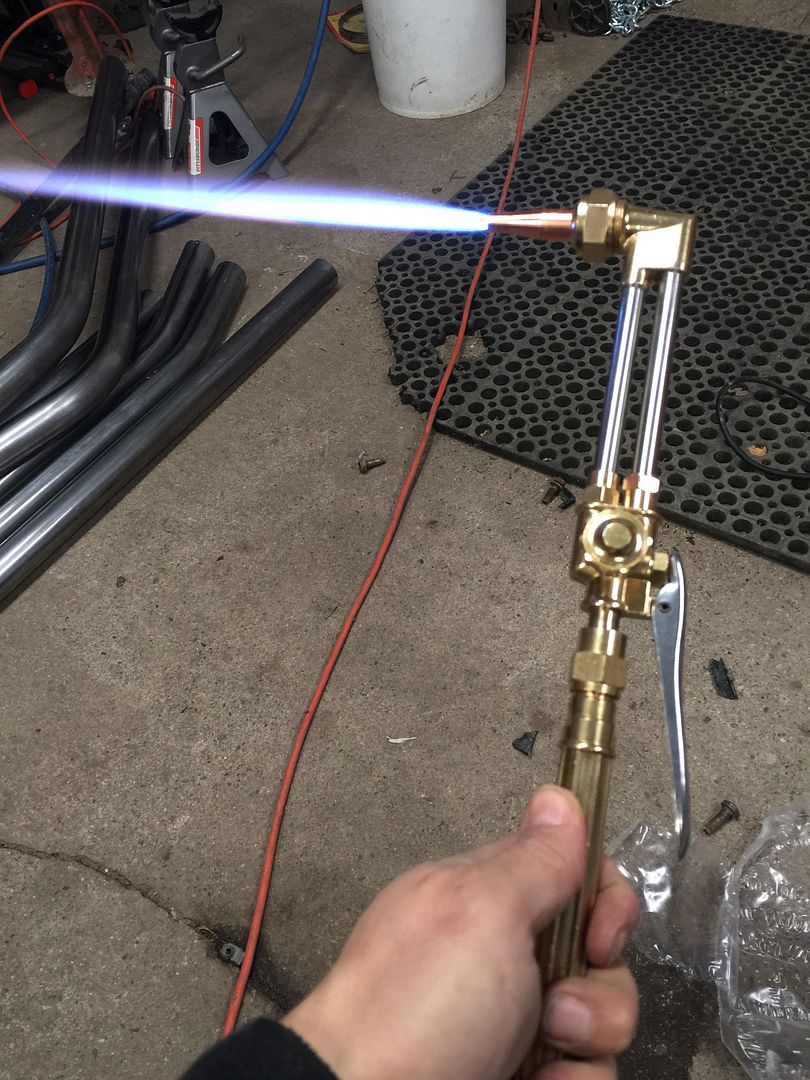 I was working a little bit on getting those rear leaf springs out. Of course the bolts are rusted into the bushings. I get the 4 1/2" angle grinder out and it doesn't quite reach all the way through to cut the bolt. I was able to turn the bolt enough to cut the rest. So I go to the store to see if I can get a deal on a bigger angle grinder. They are spendy compared to the small ones. For an extra $50 I got this super-whammy-dine 7/9" milwaukee. Then bought the wrong style cut off wheel, so I didn't really get to test it out. It does work though. 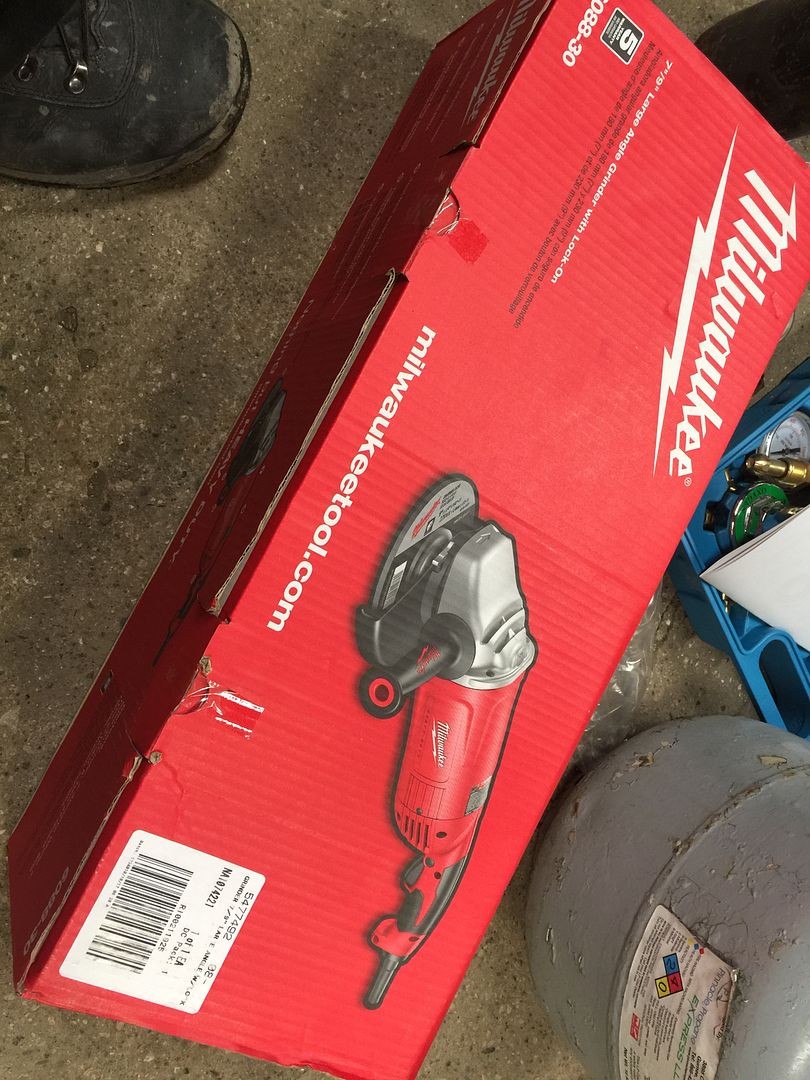 I wanted to at least get something done so I started measuring things for the first hoop to go in. The single wall top is about 43-3/4" to the top of the bed floor ribs. I set the height for the hoop to be about 43-1/4" and have about 1/2" clearance with a 3/16" plate on the tube bottom. 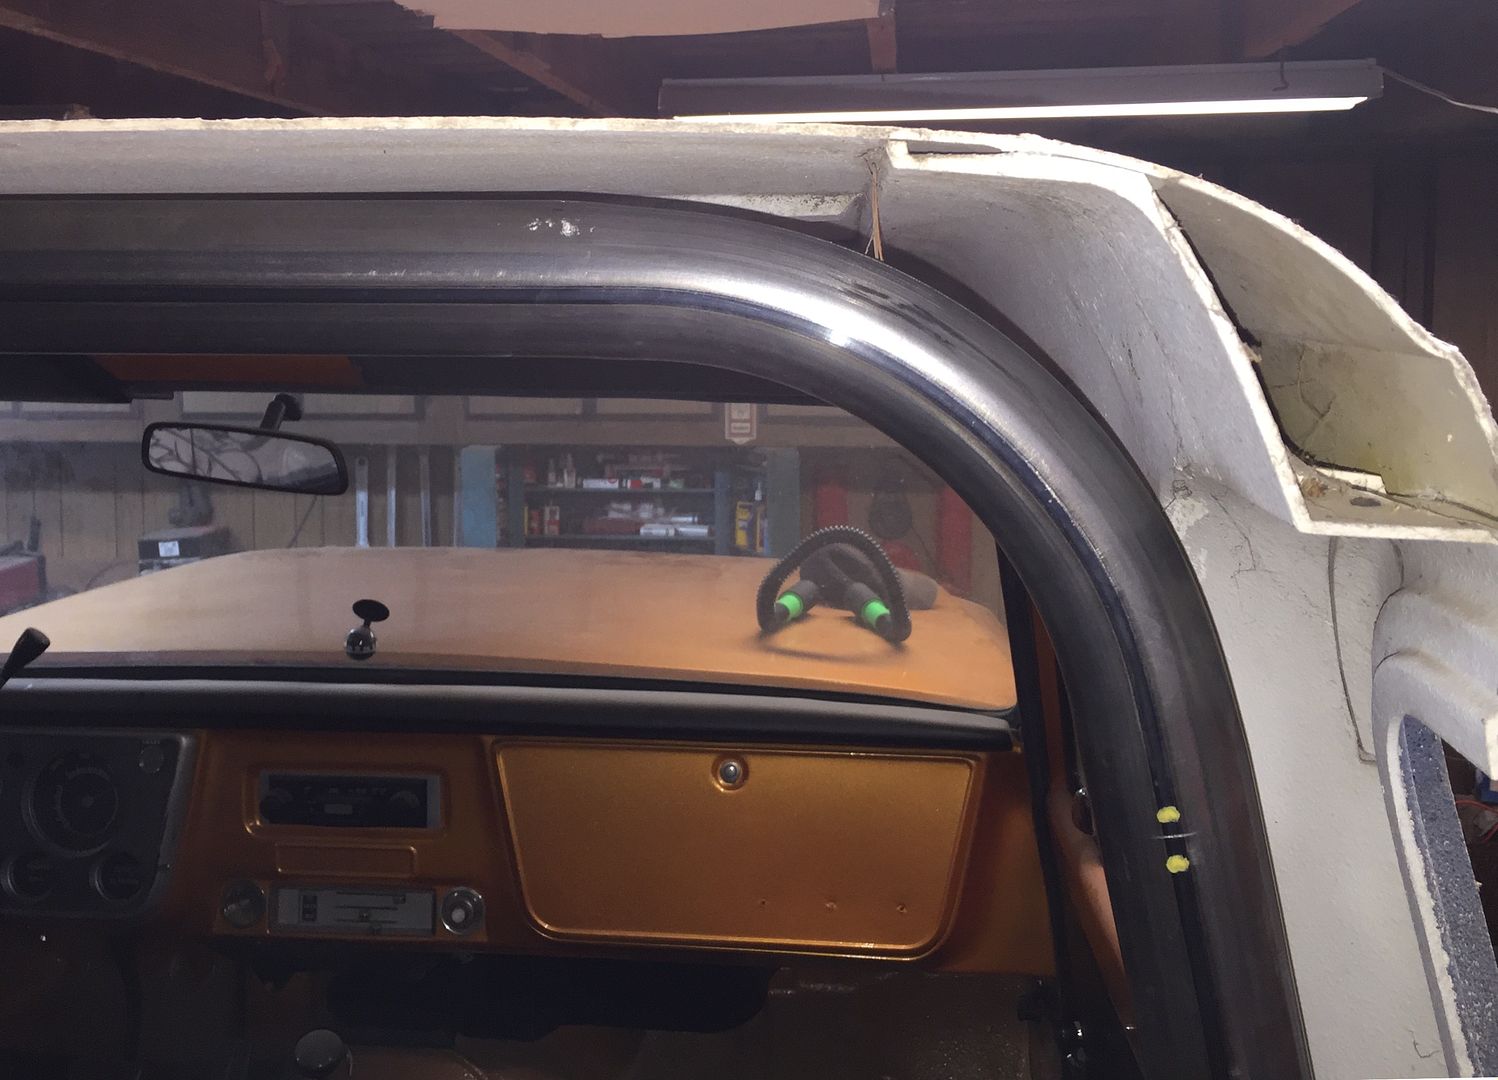 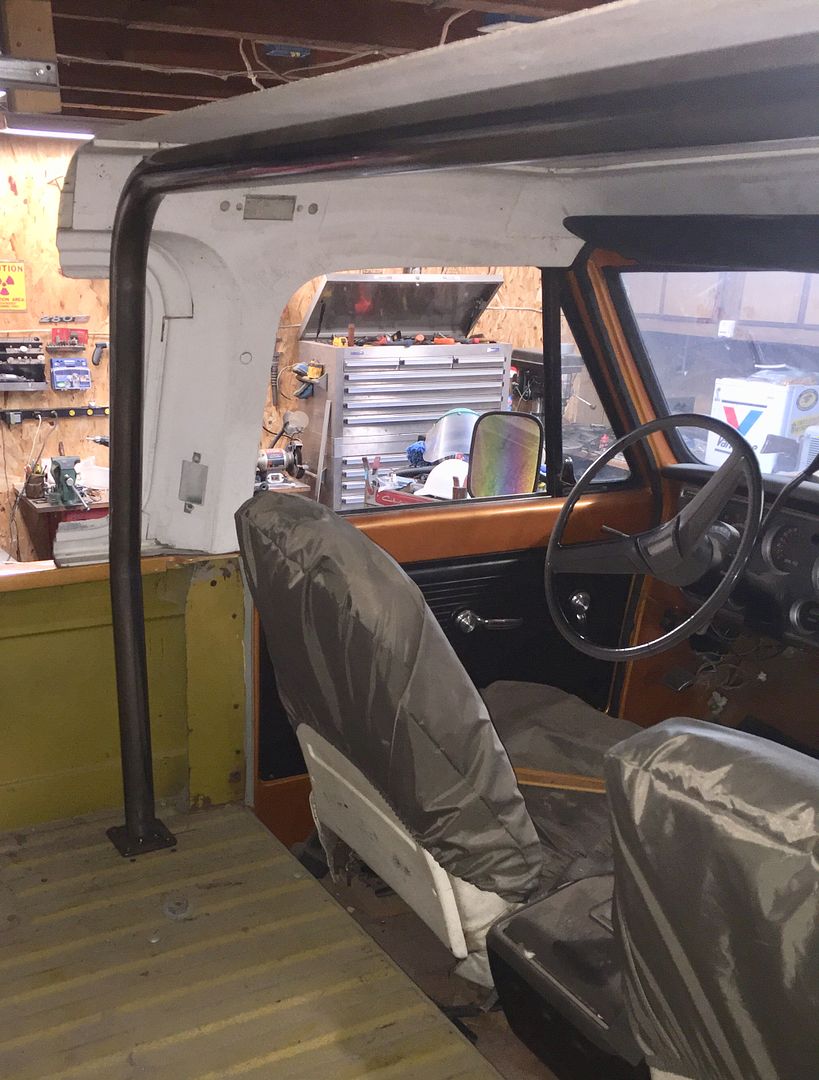 It's set in about the same position as a stock roll bar.  The plates are just tack welded on. My MIG welder is at it's limit for 3/16" plate. Eventually I'll need to upgrade but for now it'll be fine for tacks on those. Tube to tube welds should be fine though, it's less than 1/8" thick tube wall. I need to get some steel for stands, and for some other parts for the cage. And a bunch of bolts to clamp it to the floor as I build. But hey! It's a start!
__________________
If no one knows what you're doing, they can't tell you you're doing it wrong HG's Dream Car Build - Shelby Cobra Kit Build your own adjustable track bar 71  Long Fleet C/10 Long Fleet C/10 72  Jimmy 4x4 (Junkyard Jimmy) Jimmy 4x4 (Junkyard Jimmy)HG's Plow Truck '78  K35 Dually K35 DuallyBigass Farm Truck HG's thread of miscellaneous stuff |
|
|
|

|
|
|
#1378 |
|
6>8 Plugless........
 Join Date: Sep 2007
Location: Prairie City, Ia
Posts: 17,139
|
Re: Junkyard Jimmy Super Low Buck Build Thread
That is a nice new grinder! I burnt mine up a while back and haven't replaced it yet because I had sticker shock when I went to replace it.
__________________
Ryan 1972 Chevy Longhorn K30 Cheyenne Super, 359 Inline 6 cylinder, Auto Trans, Tilt, Diesel Tach/Vach, Buckets, Rare Rear 4-link and air ride option Build Thread 1972 GMC Sierra Grande Longhorn 4x4 1972 Chevy Cheyenne Super K20 Long Step side tilt, tach, tow hooks, AC, 350 4 speed 1972 C10 Suburban Custom Deluxe 1969 Chevy milk truck 1971 Camaro RS 5.3 BTR STG3 Cam Super T10 1940 Ford 354 Hemi 46RH Ford 9" on air ride huge project Tired of spark plugs? Check this out. |
|
|

|
|
|
#1379 | |
|
GEARHEAD
Join Date: Aug 2003
Location: MN
Posts: 6,125
|
Re: Junkyard Jimmy Super Low Buck Build Thread
Quote:
I picked up a bunch of steel today to make some heavy duty stands. That'll give me some welding practice too. I absolutely need it. My boss called today and said I'm getting a big fat raise in the spring. Something to look forward to. More money for tools and truck parts!!
__________________
If no one knows what you're doing, they can't tell you you're doing it wrong HG's Dream Car Build - Shelby Cobra Kit Build your own adjustable track bar 71  Long Fleet C/10 Long Fleet C/10 72  Jimmy 4x4 (Junkyard Jimmy) Jimmy 4x4 (Junkyard Jimmy)HG's Plow Truck '78  K35 Dually K35 DuallyBigass Farm Truck HG's thread of miscellaneous stuff |
|
|
|

|
|
|
#1380 |
|
6>8 Plugless........
 Join Date: Sep 2007
Location: Prairie City, Ia
Posts: 17,139
|
Re: Junkyard Jimmy Super Low Buck Build Thread
That is good to hear on the raise! Is the raise due to the latest corporate tax cuts?

__________________
Ryan 1972 Chevy Longhorn K30 Cheyenne Super, 359 Inline 6 cylinder, Auto Trans, Tilt, Diesel Tach/Vach, Buckets, Rare Rear 4-link and air ride option Build Thread 1972 GMC Sierra Grande Longhorn 4x4 1972 Chevy Cheyenne Super K20 Long Step side tilt, tach, tow hooks, AC, 350 4 speed 1972 C10 Suburban Custom Deluxe 1969 Chevy milk truck 1971 Camaro RS 5.3 BTR STG3 Cam Super T10 1940 Ford 354 Hemi 46RH Ford 9" on air ride huge project Tired of spark plugs? Check this out. |
|
|

|
|
|
#1381 | |
|
Proprietor of Dale's Corner
 Join Date: Nov 2012
Location: Vacaville , CA
Posts: 16,242
|
Re: Junkyard Jimmy Super Low Buck Build Thread
Quote:
__________________
"Some Days Chickens And Some Days Feathers" Dale XNGH ECV Sam Brannan 1004 R.I.P. 67ChevyRedneck R.I.P. Grumpy Old Man R.I.P. FleetsidePaul |
|
|
|

|
|
|
#1382 |
|
GEARHEAD
Join Date: Aug 2003
Location: MN
Posts: 6,125
|
Re: Junkyard Jimmy Super Low Buck Build Thread
Got one of the stands built. Started out just cutting the steel to dimension. I had a brand new blade for my band saw. Started out great but within about 6 cuts it was getting noticeably slower. Got to the next to last cut and it just wouldn't go anymore. Very frustrating. Here's my saw...
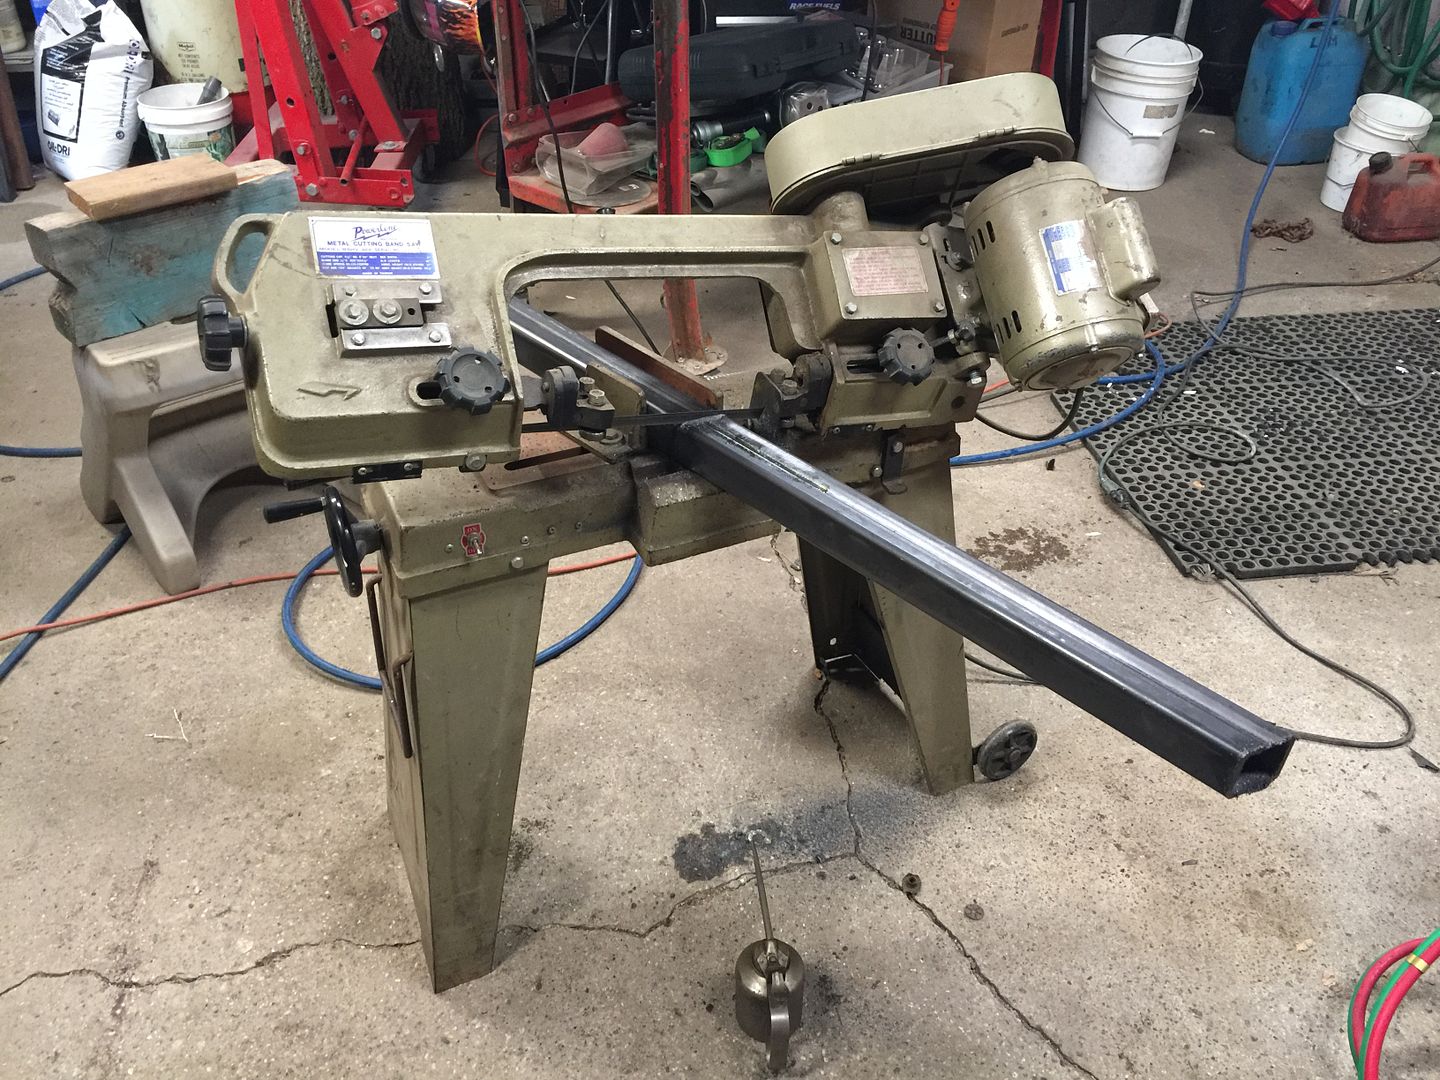 It's not harbor freight, but not really much different. I did a bunch of research online about what people were using for blades, asked a couple friends what they use and ordered a couple different bi-metal type blades for it. Then went to Menards and bought a 24 tpi blade to try. I found out the speed is variable on the saw. Didn't realize that, so I slowed it down to the slowest speed. So far so good. The stands I built using a 2x4" piece across the top. It's 52" long, which is a lot wider than I need for the Jimmy but about the frame width of my 2003 Yukon. Thinking ahead. The legs are 2' long 2x2" tubing. It's all 3/16" thick. I cut the legs at a 110* angle. It makes the base about 18" apart on center. The cross strap is just some scrap I had around. I will be adding some other cross pieces from the legs to the top or gussets. I used my MIG welder and it did alright, decent penetration. I got better as I went along. Not the prettiest welds but should be strong. 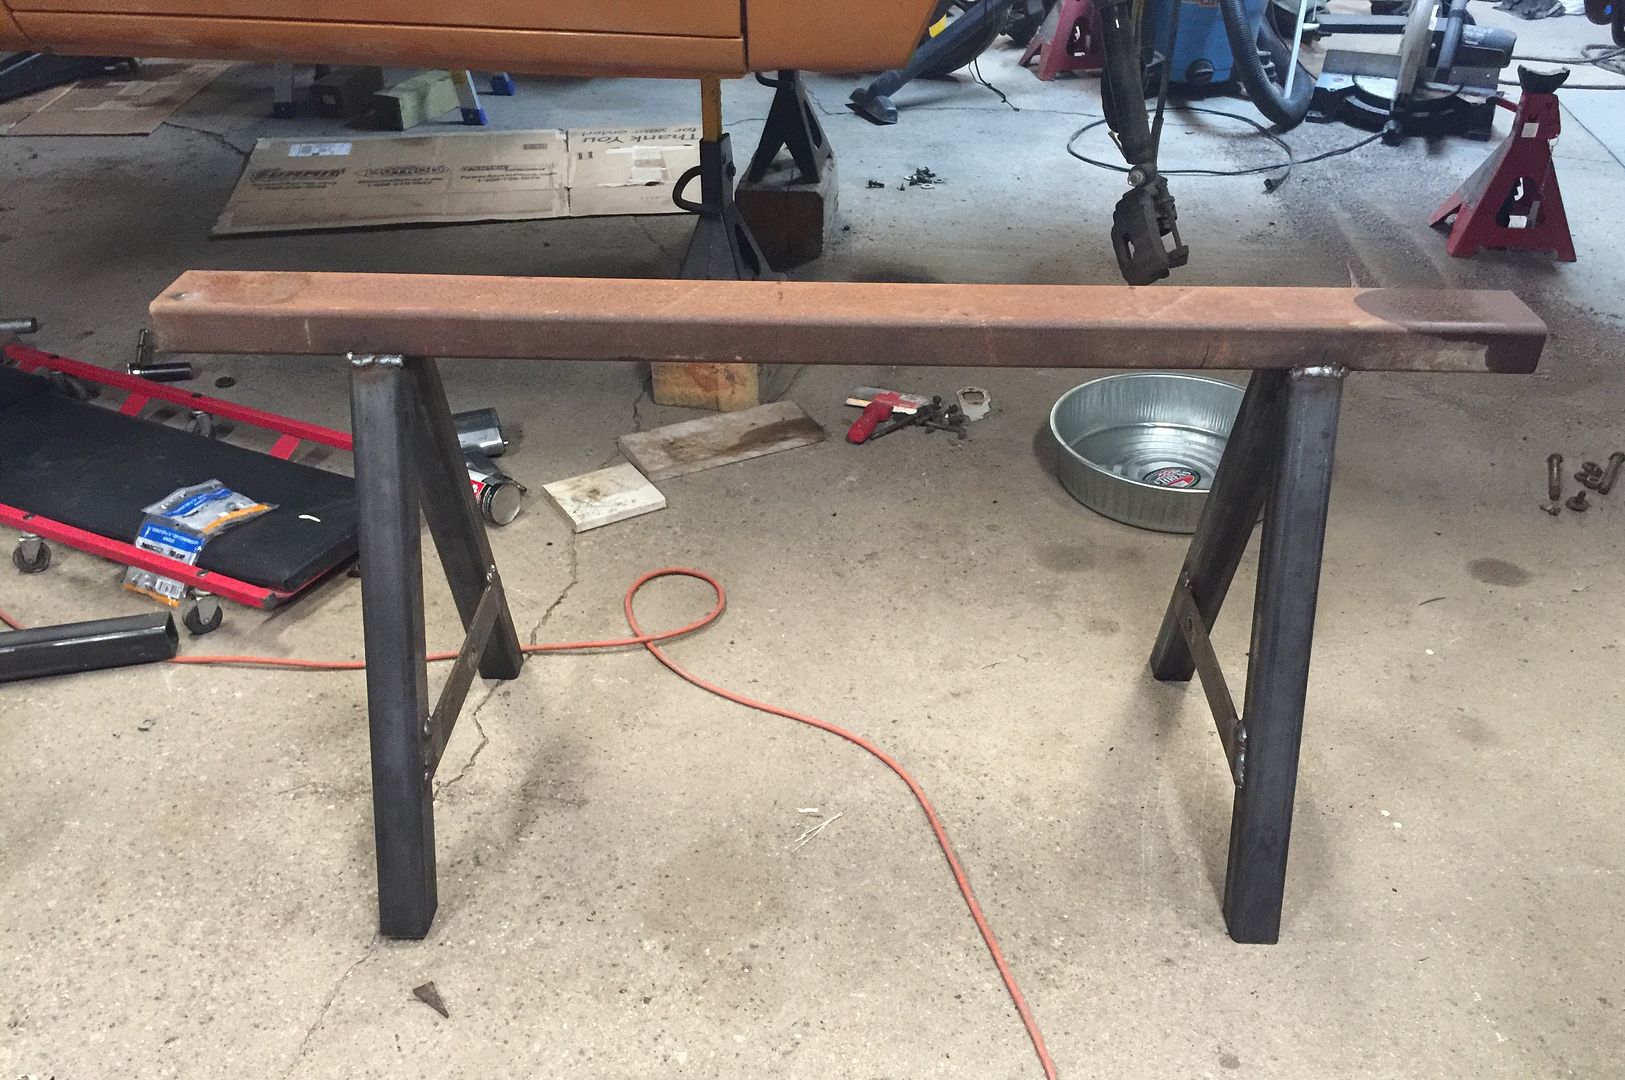 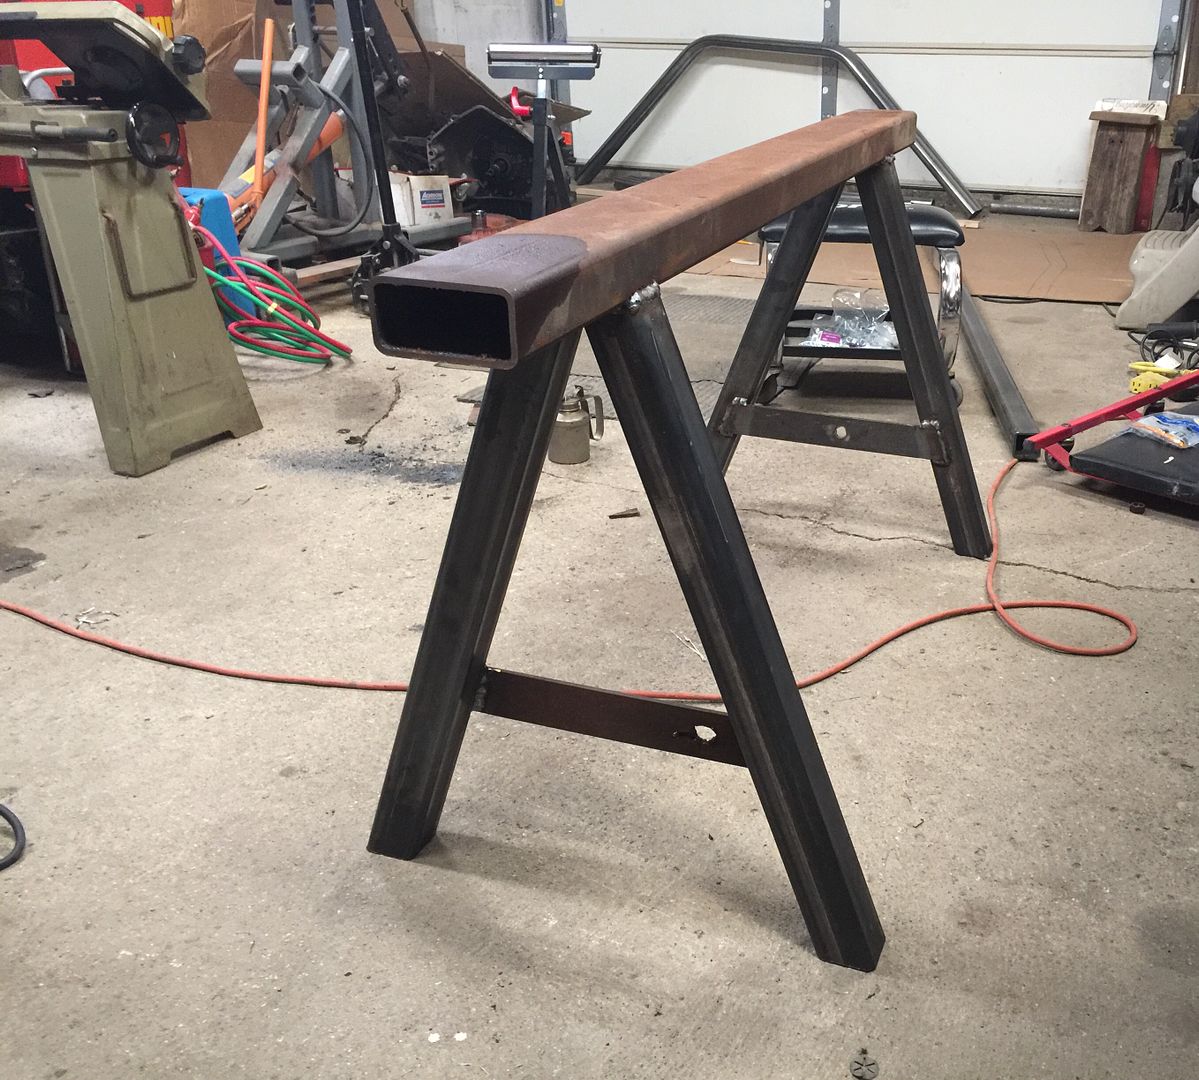 This was the nerve racking part. Lifting the front and hoping the rear jack stands didn't tip. But I took my time to make sure the body didn't swing when it came off the front stands. My hand was shaking a bit while pumping that jack though. Not gonna lie. The sphincter pucker factor was high. 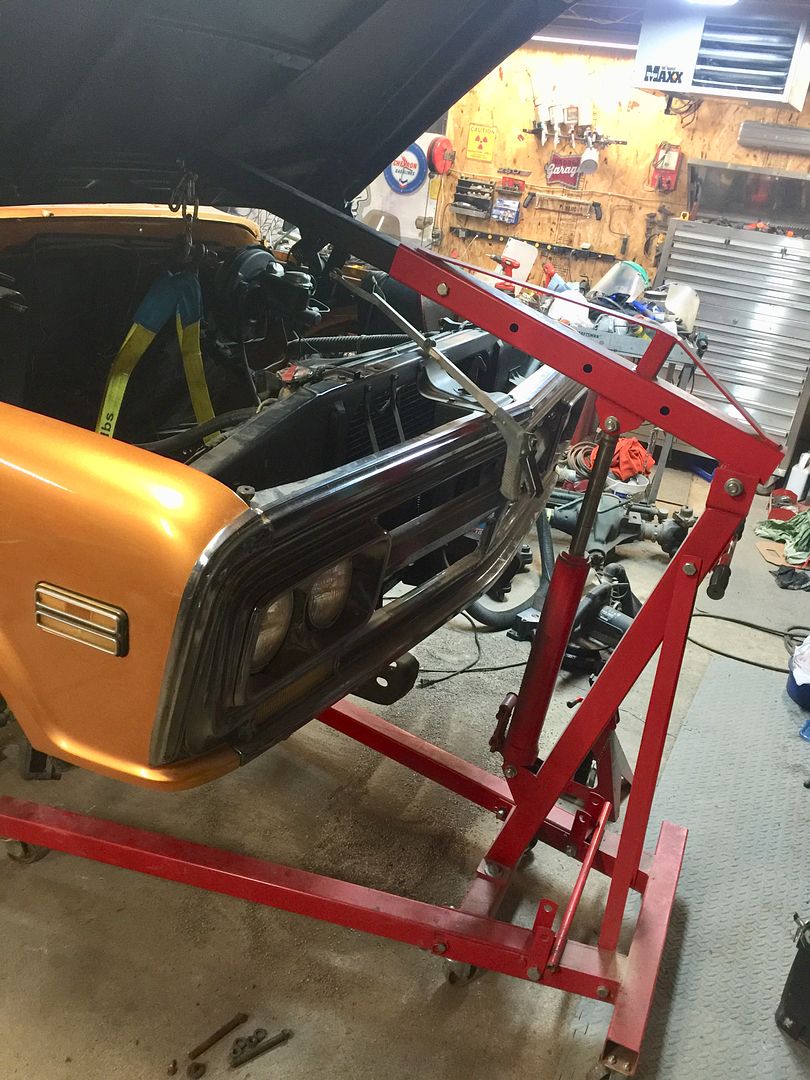 I used a couple chunks of wood 2x4 between the frame and stand so the transmission didn't hit. 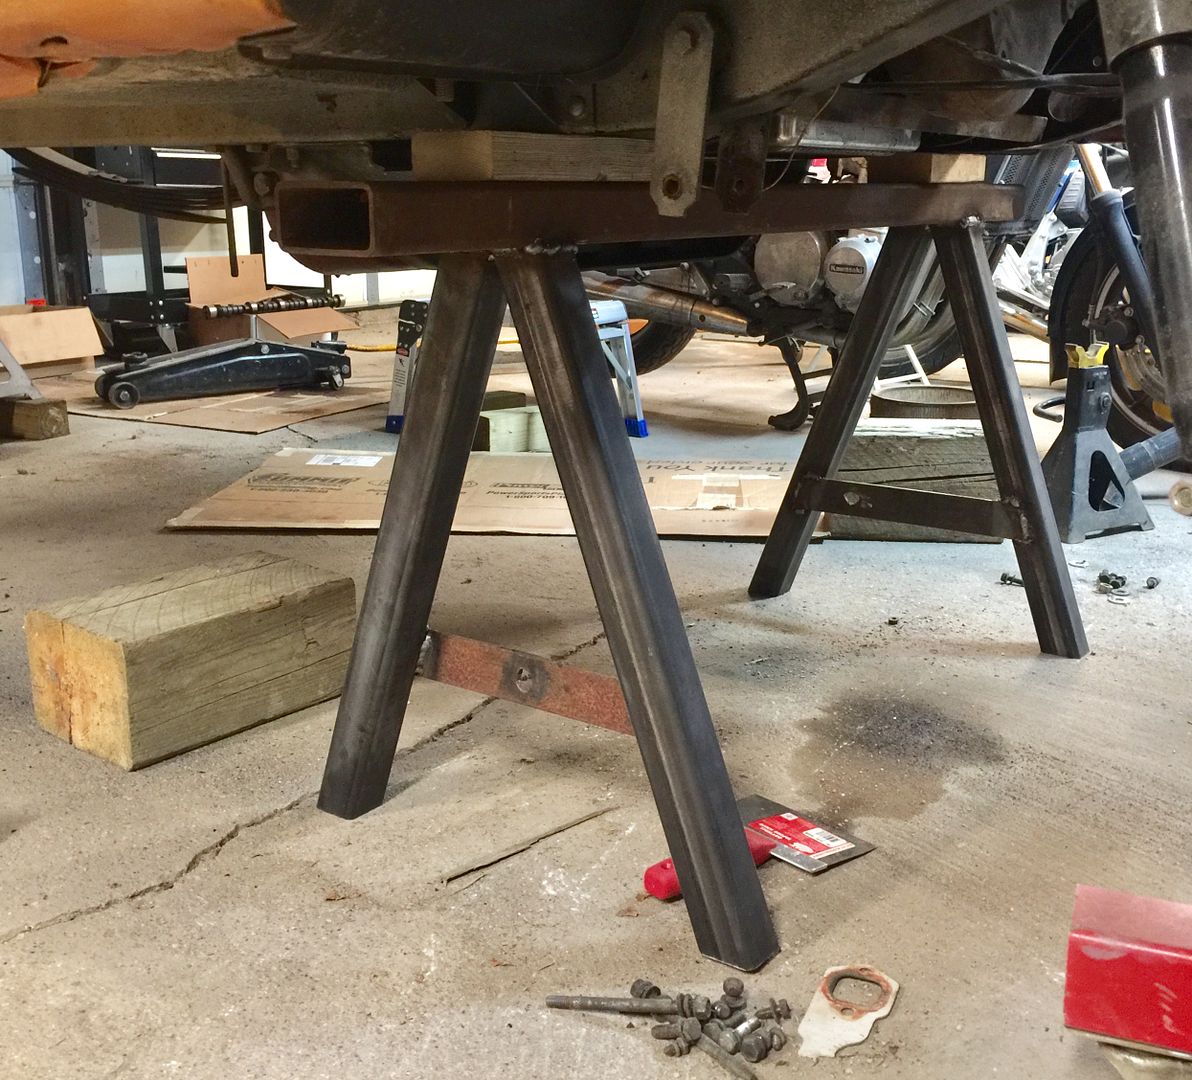 Still need to get the other piece of 2x4 tubing for the second stand. But it should be resting on it next weekend and I'll feel a little safer working on and under it.
__________________
If no one knows what you're doing, they can't tell you you're doing it wrong HG's Dream Car Build - Shelby Cobra Kit Build your own adjustable track bar 71  Long Fleet C/10 Long Fleet C/10 72  Jimmy 4x4 (Junkyard Jimmy) Jimmy 4x4 (Junkyard Jimmy)HG's Plow Truck '78  K35 Dually K35 DuallyBigass Farm Truck HG's thread of miscellaneous stuff |
|
|

|
|
|
#1383 |
|
Proprietor of Dale's Corner
 Join Date: Nov 2012
Location: Vacaville , CA
Posts: 16,242
|
Re: Junkyard Jimmy Super Low Buck Build Thread
Nice stand and a great idea.
__________________
"Some Days Chickens And Some Days Feathers" Dale XNGH ECV Sam Brannan 1004 R.I.P. 67ChevyRedneck R.I.P. Grumpy Old Man R.I.P. FleetsidePaul |
|
|

|
|
|
#1384 |
|
GEARHEAD
Join Date: Aug 2003
Location: MN
Posts: 6,125
|
Re: Junkyard Jimmy Super Low Buck Build Thread
I am almost out of .030" welding wire so I didn't even try. Might have enough to tack the parts together and that's about it. Instead I just cut the legs and a side brace so everything is ready to go when I get the wire.
I ran into a little problem with my band saw though. It's pictured above. It was built in 1987 and I bought it used, I don't remember when, but probably 15 years ago. I think I only paid about $75 for it. I've spent more this week on blades for it. No manual with it. There is nothing on the saw to indicate it needs lubrication anywhere. But on the last leg cut it starts squealing. It would squeal once in a while before but not like this. Something was wrong. There's a cover on what appears to be a gearbox. Before now I really never gave it much thought. I never ran it long enough for anything to get hot before. Sure enough, open the cover and smoke is wisping out and I see a hot worm gear drive. This is after I added oil to cool it down. 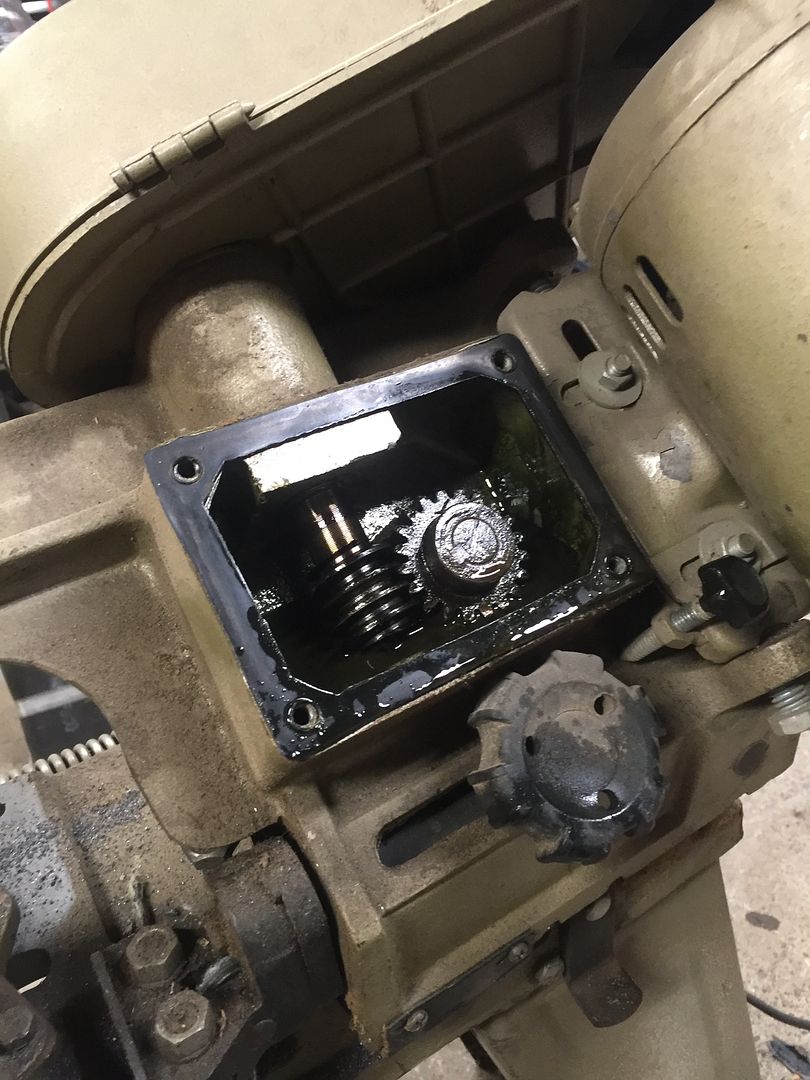 I start squirting oil on them to cool them off. I run it a little and it's better. At this point I'm peeved. At the manufacturer for not at least putting a sticker on the thing but mostly at myself for not paying more attention to it. I've seen the harbor freight saws and know this one is basically the same design. So I look up their saw on my phone, almost identical. I download the manual for it and towards the end I find what I'm looking for. Maintenance and lubrication. There it says, remove the cover and change the oil annually. There wasn't a drop of oil in this. I'm not sure there ever was. The worm gear looks like it's brass and it's pretty worn but usable yet. I cleaned out the shavings and the half teaspoon of pasty gunk that was in there and add some gear oil. It's not as heavy as they recommend but the heaviest differential oil I have. Closed it up, sawed up a couple more pieces of steel and it's working great. So I've learned a bunch in the past few days about the saw I've owned for over a decade. I'm thinking that some replacement parts from the current model HF saw will probably bolt right on. It could use a couple thrust rollers and a new worm gear. Sorry it's not jimmy progress but I hope it helps out someone else with one of these saws. I wish I had known more before now. Time to go buy some welding wire. Later
__________________
If no one knows what you're doing, they can't tell you you're doing it wrong HG's Dream Car Build - Shelby Cobra Kit Build your own adjustable track bar 71  Long Fleet C/10 Long Fleet C/10 72  Jimmy 4x4 (Junkyard Jimmy) Jimmy 4x4 (Junkyard Jimmy)HG's Plow Truck '78  K35 Dually K35 DuallyBigass Farm Truck HG's thread of miscellaneous stuff |
|
|

|
|
|
#1385 |
|
GEARHEAD
Join Date: Aug 2003
Location: MN
Posts: 6,125
|
Re: Junkyard Jimmy Super Low Buck Build Thread
Almost got the second stand built tonight. The last few welds were going like crap because the wire wasn't feeding through the gun at a steady rate. Almost impossible to have a decent weld when that happens. Probably just need to clean or replace the tip, but I'm tired. Been a long day. I'll probably have to grind out those last couple beads. You can see the added braces I put in. I'll do the same to the other one.
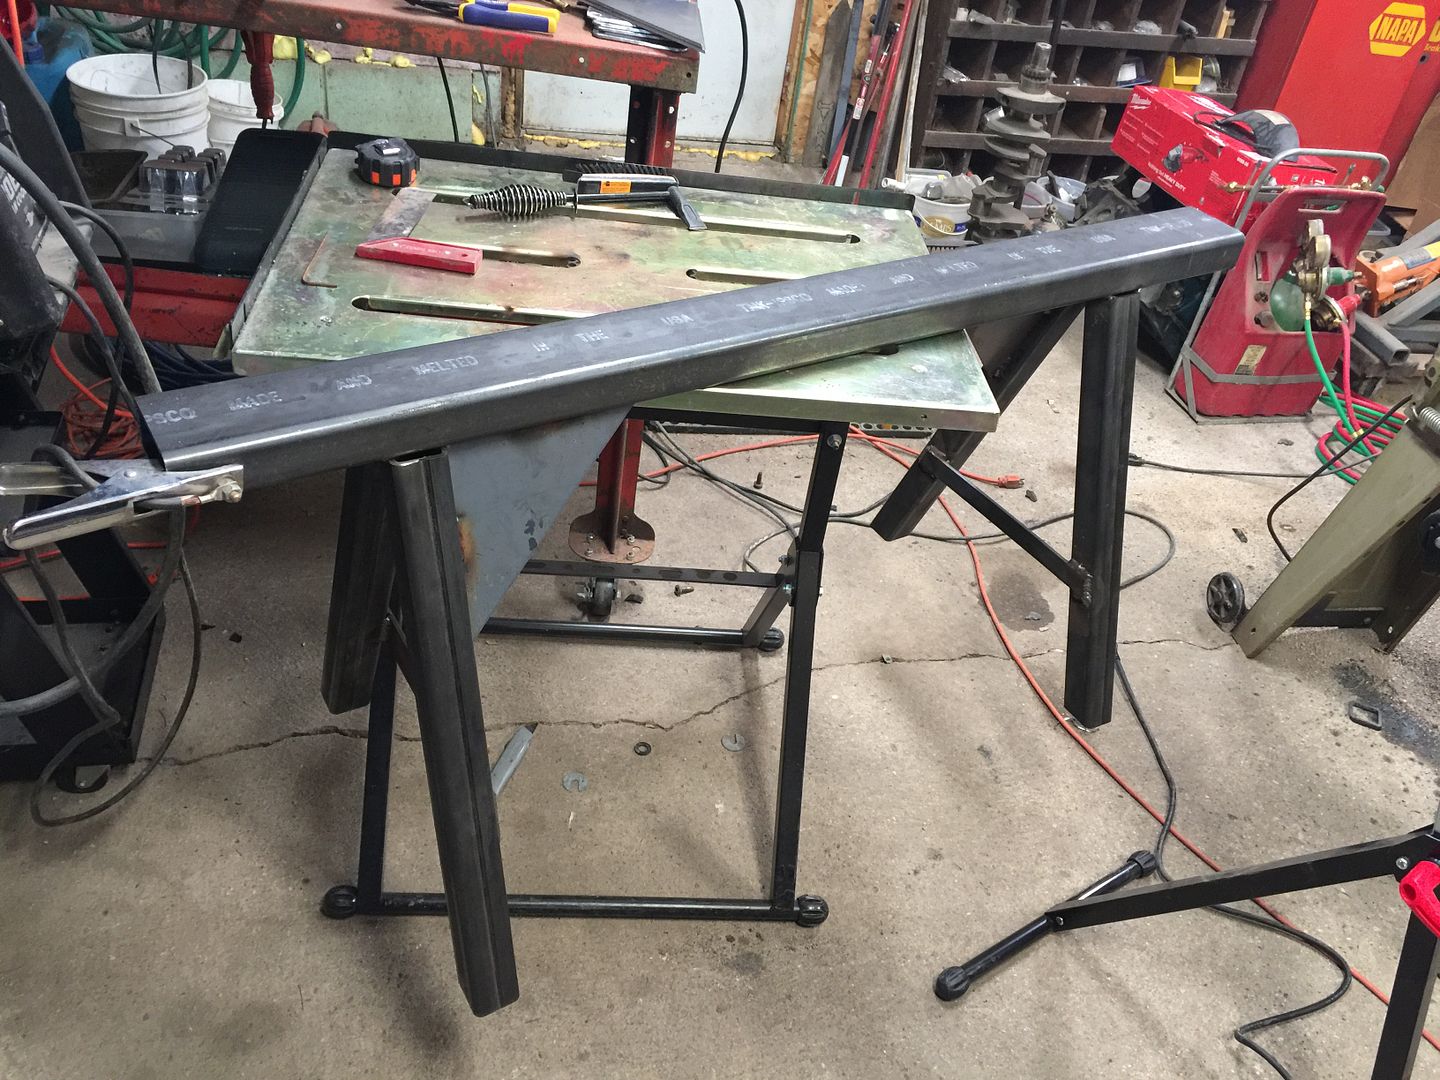 Here's a tip I got from a welder friend. Use a piece of welding rod or wire in a gap to help fill it. It worked pretty good too. It's tucked into the radius or the tube. I could see it melting into the puddle as I welded over it. 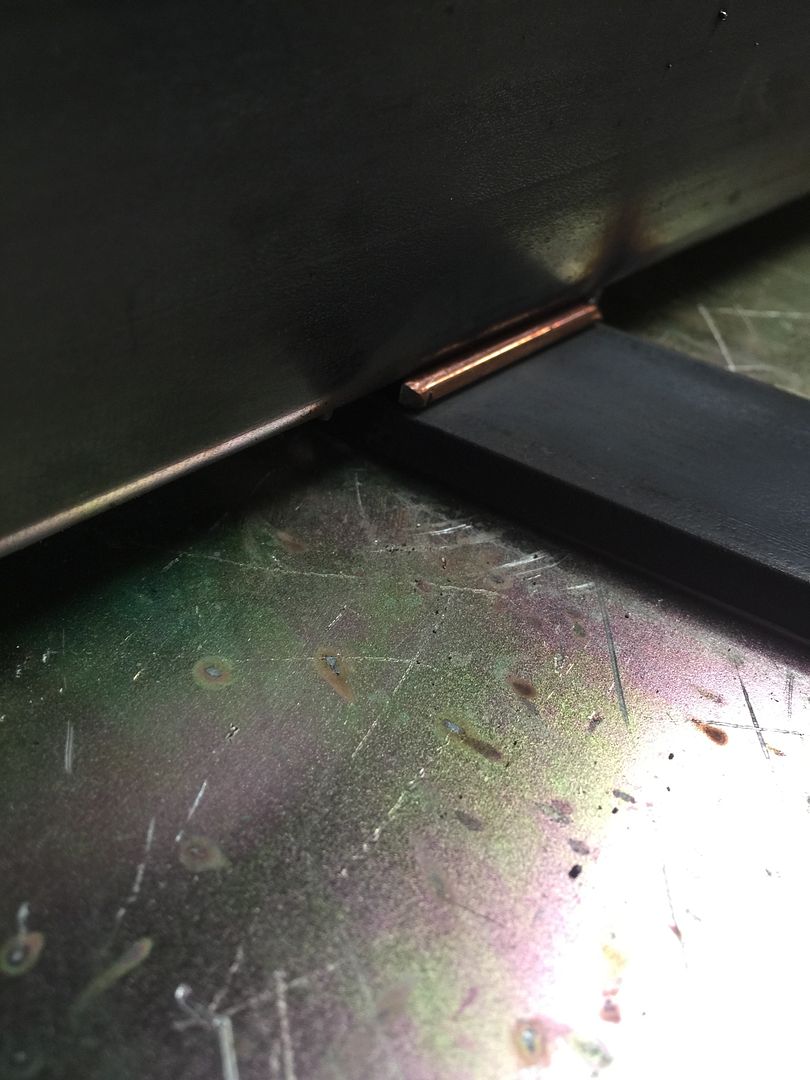
__________________
If no one knows what you're doing, they can't tell you you're doing it wrong HG's Dream Car Build - Shelby Cobra Kit Build your own adjustable track bar 71  Long Fleet C/10 Long Fleet C/10 72  Jimmy 4x4 (Junkyard Jimmy) Jimmy 4x4 (Junkyard Jimmy)HG's Plow Truck '78  K35 Dually K35 DuallyBigass Farm Truck HG's thread of miscellaneous stuff |
|
|

|
|
|
#1386 |
|
Vintage 4x4s
Join Date: Sep 2010
Location: Prior Lake, MN
Posts: 4,305
|
Re: Junkyard Jimmy Super Low Buck Build Thread
Hi Mike, where are you getting your bandsaw blades? I've had pretty good luck with Lenox or the Starret blades. A well running bandsaw is a pleasure to use. I think the last tool in my shop I'd ever sell would be my little old craftsman bandsaw.
__________________
67 GMC K1500 Custom- 305V6 SM420, PTO, Ram Assist, yellow (the outcast) (project period correct upgrades) 67 GMC C2500 351V6 TH400, AC, PS, PB (can't decide what to do with. Update, decided to keep and will restore  ) )86 CHV K30 502 th400, apple red NEW 71 CHV K20 350 SM465, ochre (saved work truck) 71 CHV K20 292 SM465, white, tach, PTO, (future project) 72 CHV K20 350 350th, medium blue (project stocker) 01 CHV K2500hd crew, indigo blue ^3 dont run and the others don't see winter either '86 K30 Cummins "Fireside" thread: http://67-72chevytrucks.com/vboard/s...d.php?t=649649 '71 K20 "get driveable" thread: http://67-72chevytrucks.com/vboard/s...d.php?t=590642 '72 K20 Build Thread: http://67-72chevytrucks.com/vboard/s...=493477&page=6 |
|
|

|
|
|
#1387 |
|
2WD Jimmy
 Join Date: Mar 2005
Location: Davis County, Utah
Posts: 2,565
|
Re: Junkyard Jimmy Super Low Buck Build Thread
Quote:
|
|
|

|
|
|
#1388 | |
|
GEARHEAD
Join Date: Aug 2003
Location: MN
Posts: 6,125
|
Re: Junkyard Jimmy Super Low Buck Build Thread
Quote:
There's a tool section? I should check that out.
__________________
If no one knows what you're doing, they can't tell you you're doing it wrong HG's Dream Car Build - Shelby Cobra Kit Build your own adjustable track bar 71  Long Fleet C/10 Long Fleet C/10 72  Jimmy 4x4 (Junkyard Jimmy) Jimmy 4x4 (Junkyard Jimmy)HG's Plow Truck '78  K35 Dually K35 DuallyBigass Farm Truck HG's thread of miscellaneous stuff |
|
|
|

|
|
|
#1389 |
|
GEARHEAD
Join Date: Aug 2003
Location: MN
Posts: 6,125
|
Re: Junkyard Jimmy Super Low Buck Build Thread
Finished up the second stand last night. I have about $100 into these stands. New steel costs more than scrap pieces by far, but I didn't have scrap pieces.
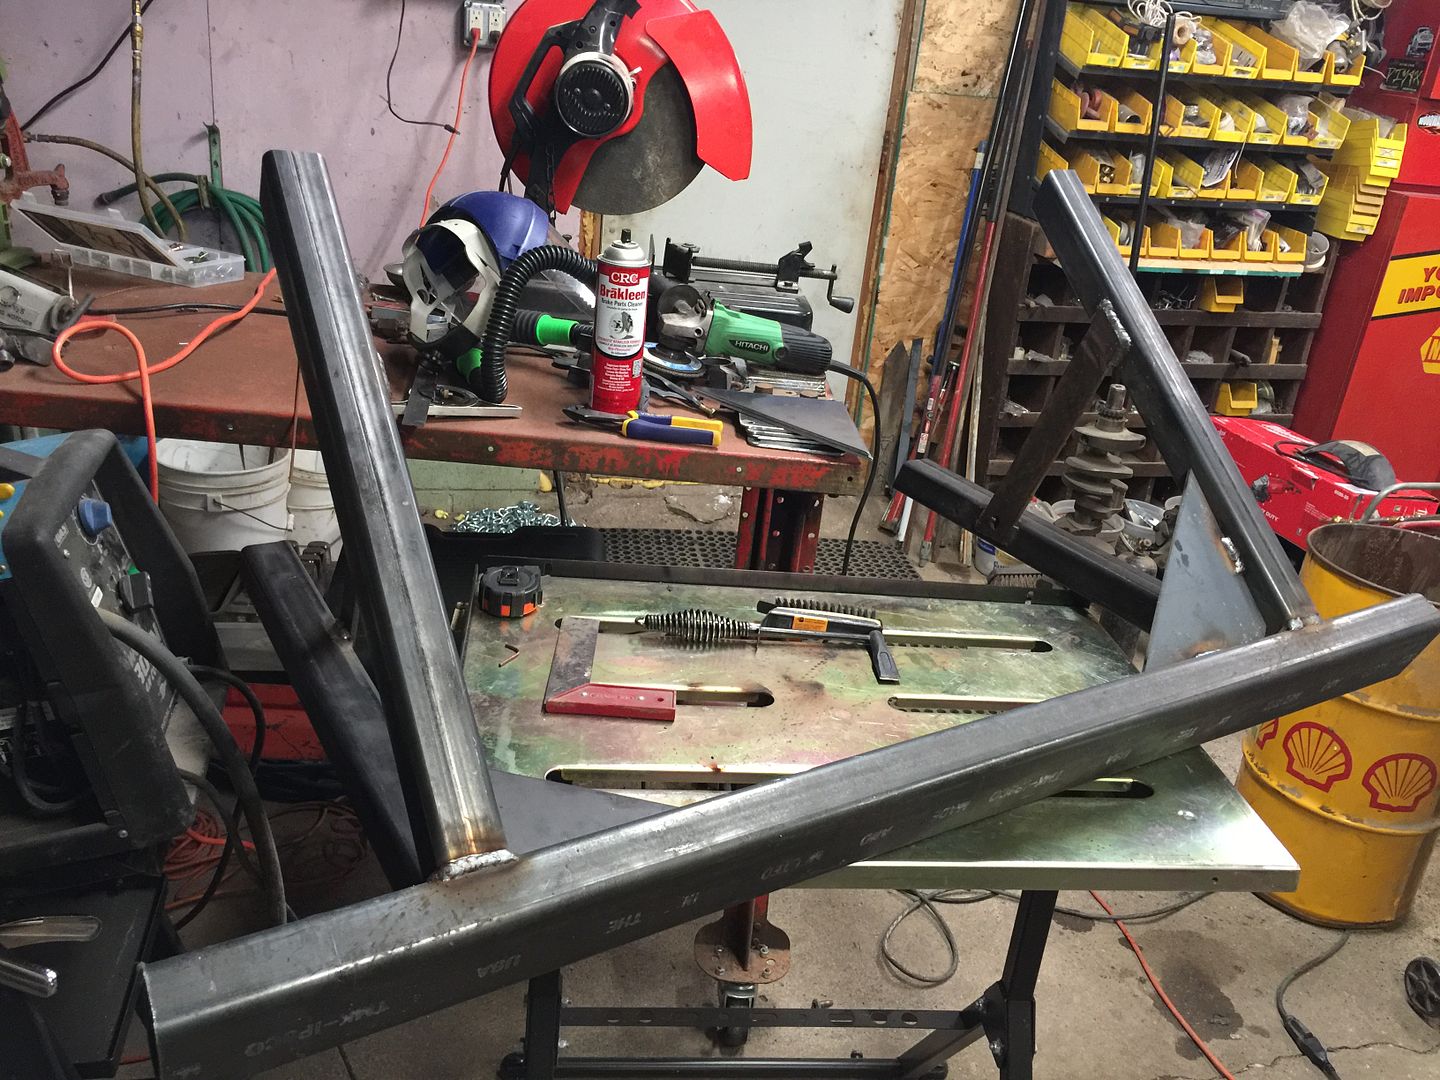 Since I put the new roll of wire in the wire feeder has been inconsistent. Acts like it's dragging. I tighten the roller tension and loosen the nut holding the spool but it's still frustrating watching the melted wire droplet go up into the gun instead of into the puddle for the weld. I need to get that fixed. It's under the jimmy now, just behind the gas tank. The jimmy is sitting pretty level now. Good enough for government work. It's pretty solid now, no worries working on or under it. 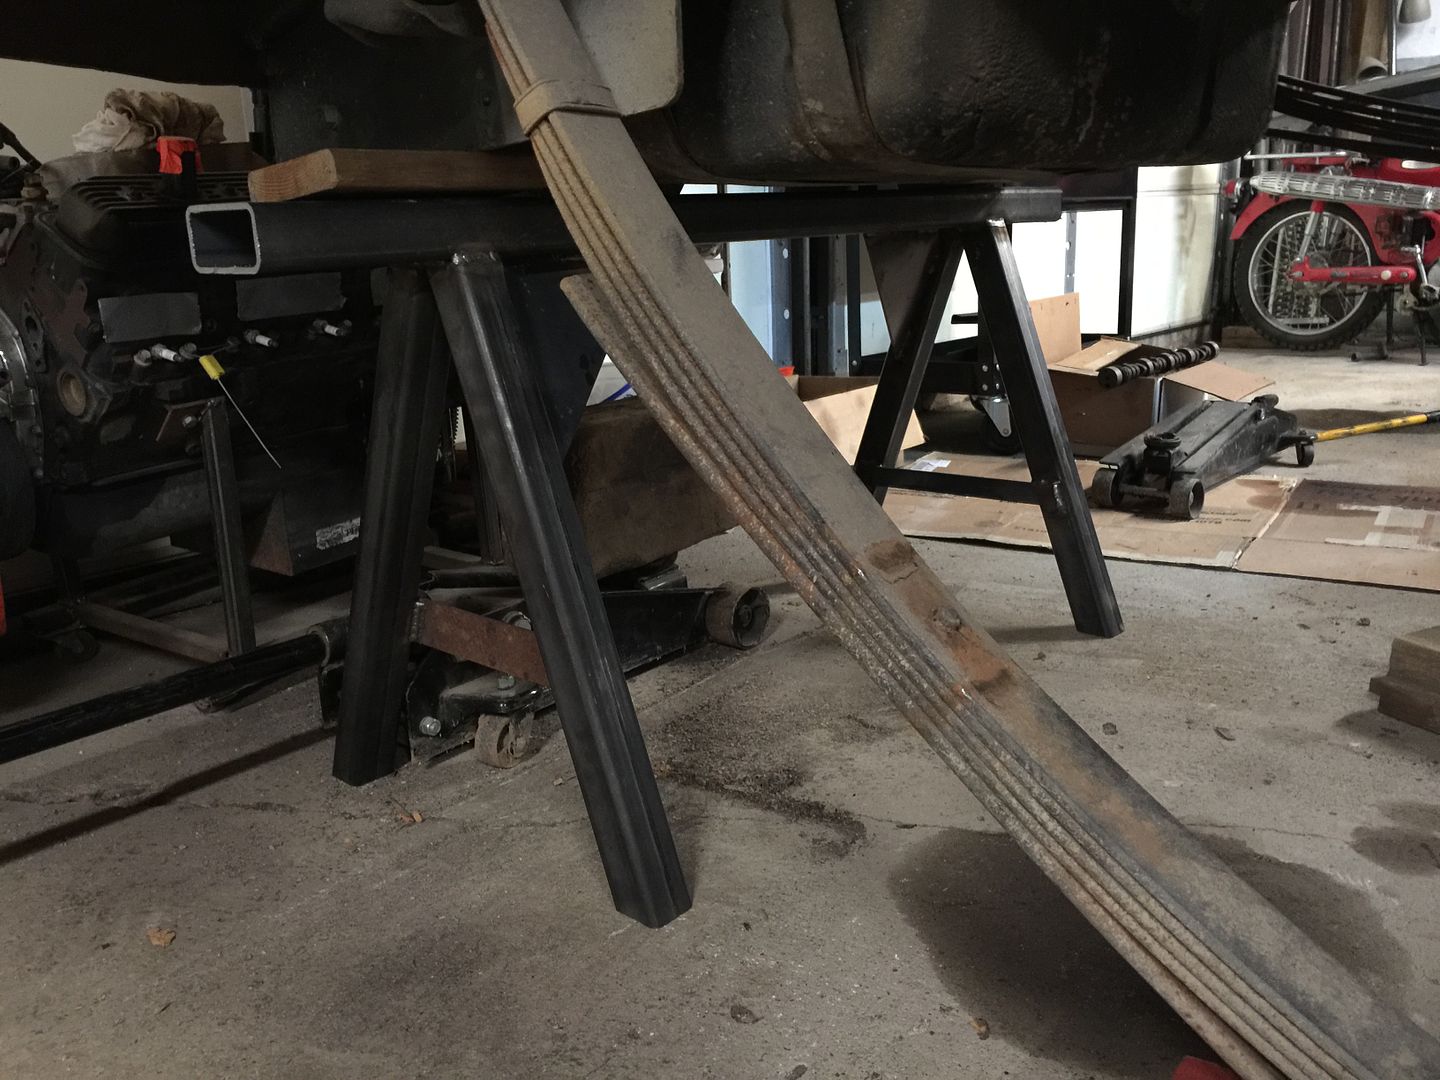 Set up the ladder to go into the upstairs loft... 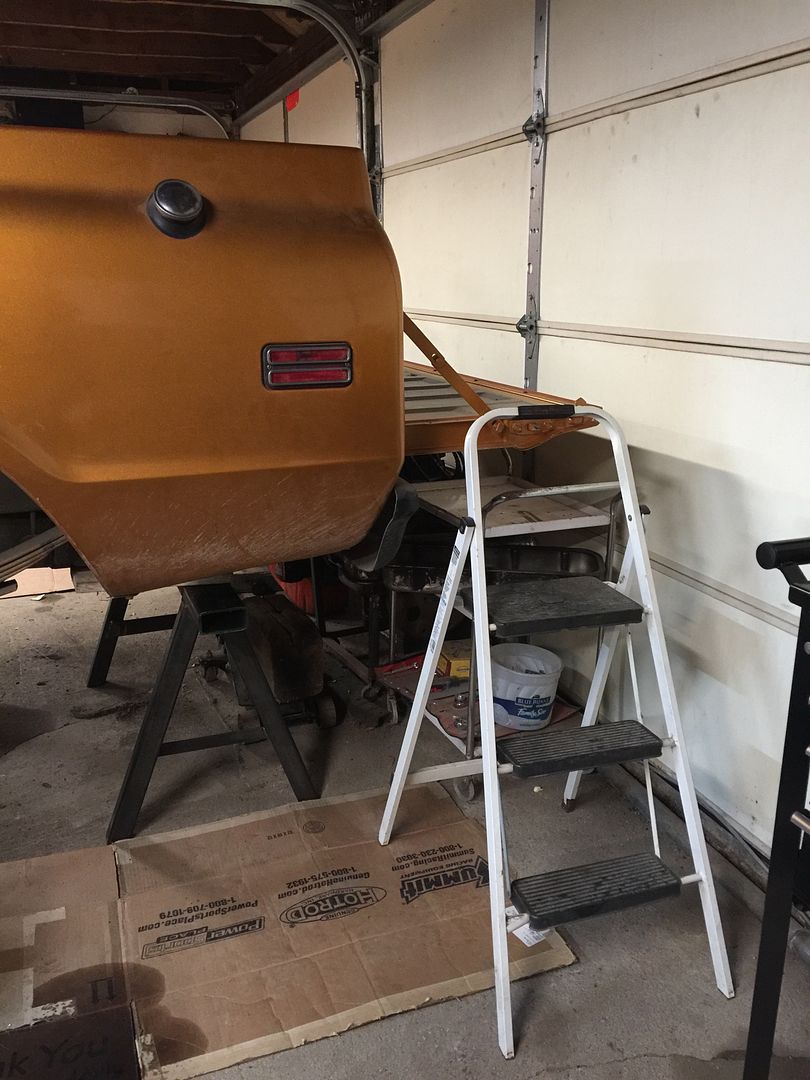 And started getting the rear hoop cut and ready to get mounted. 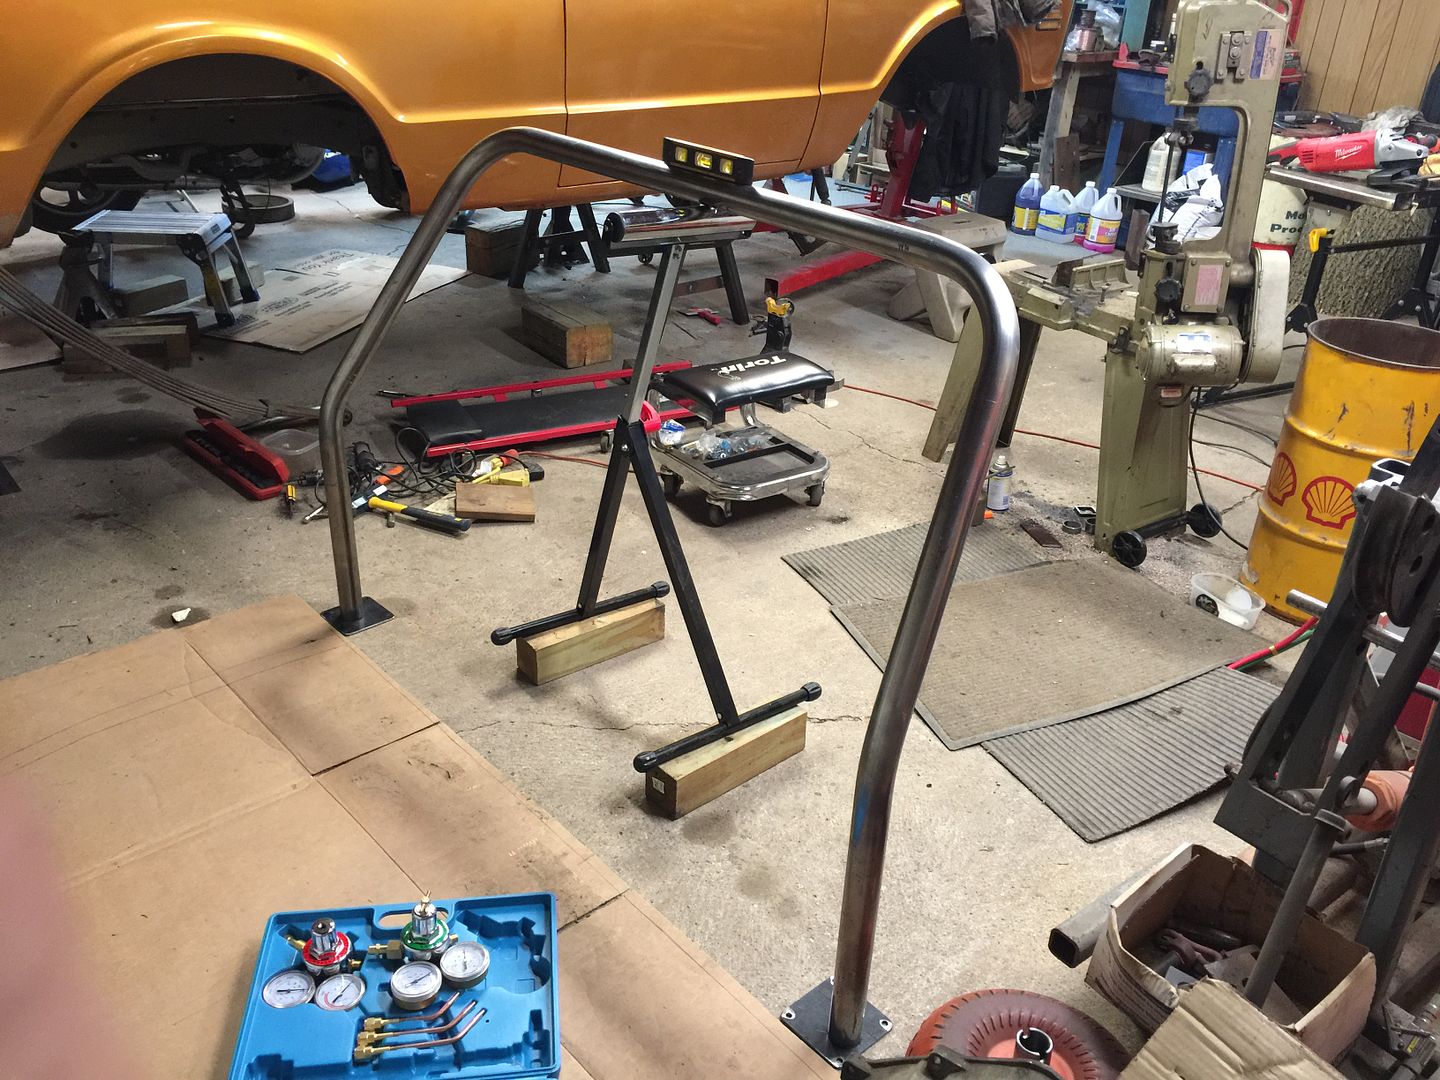 I just need to make sure it's level and plumb and mark where I want the pads welded on. Then I can tack them in place, drill some holes and mount it in the bed. Then the fun begins. I need to learn how to use my tube notcher and hope like hell I dont cut the tubes too short that run between the 2 hoops. And I still need to get the rear leafs removed.
__________________
If no one knows what you're doing, they can't tell you you're doing it wrong HG's Dream Car Build - Shelby Cobra Kit Build your own adjustable track bar 71  Long Fleet C/10 Long Fleet C/10 72  Jimmy 4x4 (Junkyard Jimmy) Jimmy 4x4 (Junkyard Jimmy)HG's Plow Truck '78  K35 Dually K35 DuallyBigass Farm Truck HG's thread of miscellaneous stuff |
|
|

|
|
|
#1390 |
|
GEARHEAD
Join Date: Aug 2003
Location: MN
Posts: 6,125
|
Re: Junkyard Jimmy Super Low Buck Build Thread
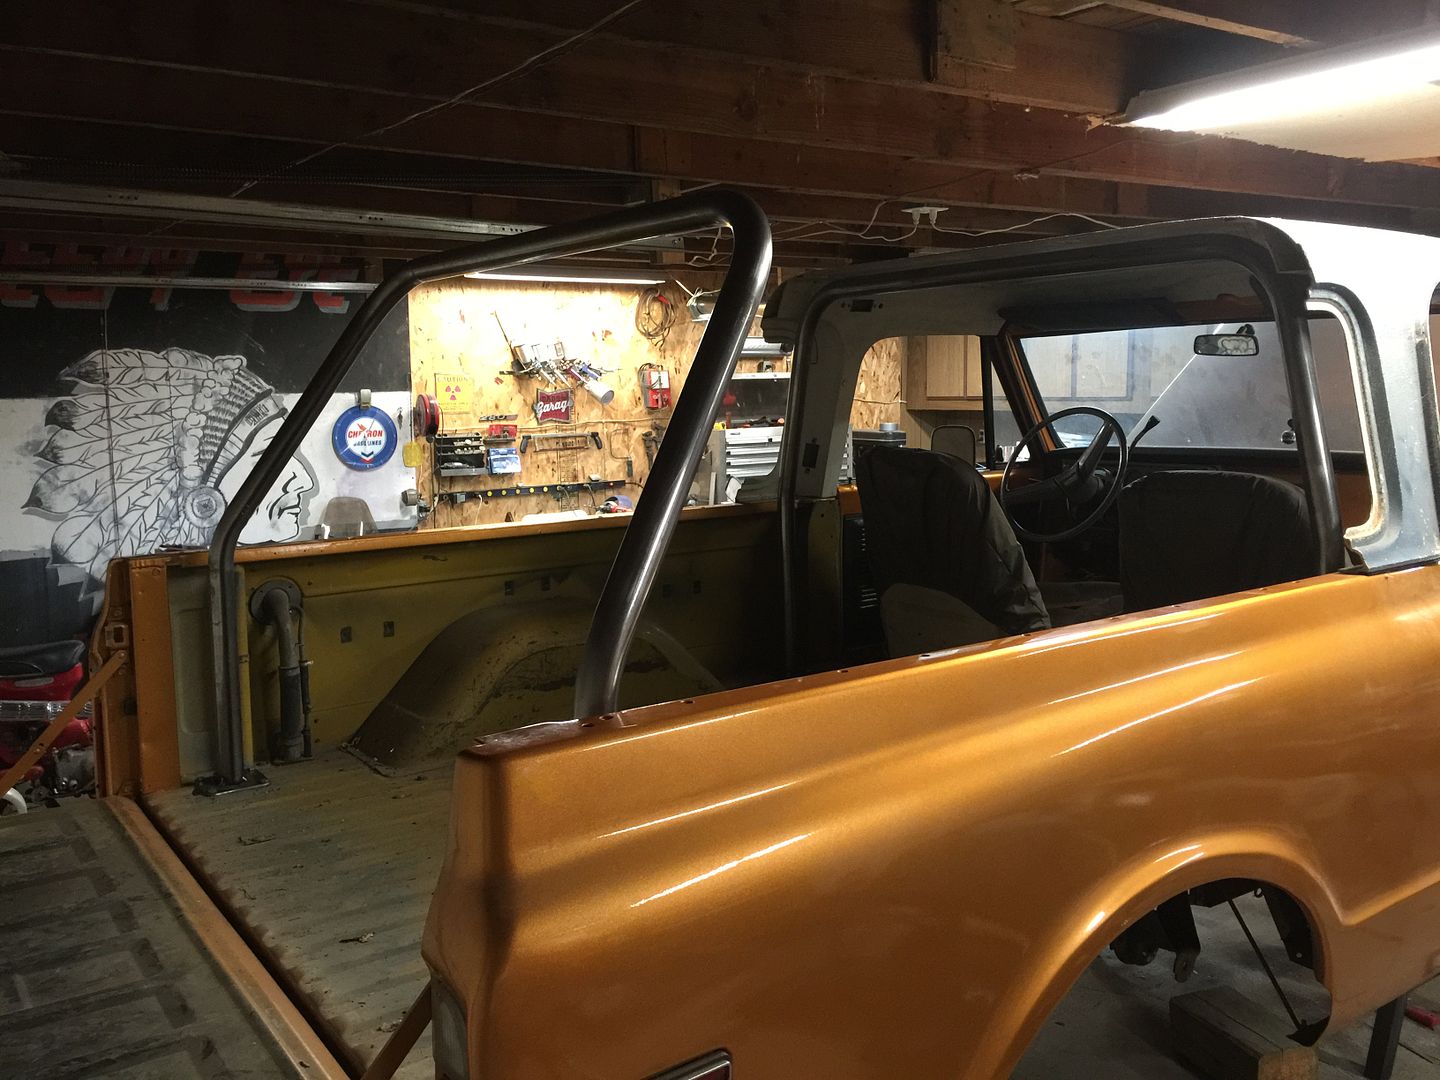
Yesterday I got the rear hoop tacked to the feet and bolted to the bed. Next step is using the tube notcher I bought a couple years ago and haven't tried yet.
__________________
If no one knows what you're doing, they can't tell you you're doing it wrong HG's Dream Car Build - Shelby Cobra Kit Build your own adjustable track bar 71  Long Fleet C/10 Long Fleet C/10 72  Jimmy 4x4 (Junkyard Jimmy) Jimmy 4x4 (Junkyard Jimmy)HG's Plow Truck '78  K35 Dually K35 DuallyBigass Farm Truck HG's thread of miscellaneous stuff |
|
|

|
|
|
#1391 |
|
Proprietor of Dale's Corner
 Join Date: Nov 2012
Location: Vacaville , CA
Posts: 16,242
|
Re: Junkyard Jimmy Super Low Buck Build Thread
Looking good, the notcher should be an awesome tool. I hope the learning curve goes well and is short.
__________________
"Some Days Chickens And Some Days Feathers" Dale XNGH ECV Sam Brannan 1004 R.I.P. 67ChevyRedneck R.I.P. Grumpy Old Man R.I.P. FleetsidePaul |
|
|

|
|
|
#1392 |
|
Countdown Survivor
Join Date: Aug 2007
Location: Bean Station, East Tennessee
Posts: 9,676
|
Re: Junkyard Jimmy Super Low Buck Build Thread
I'm still amazed with this build Mike, keep up the great work!
__________________
93 Yukon 89 Silverado Z71 SWB Sport 91 K 2500 Silverado "Lobuk-Worktruk" A MAN OF HONOR DOES NOT LIE, CHEAT, OR STEAL, NOR TOLERATE THOSE WHO DO. Gettin' old ain't for sissies. |
|
|

|
|
|
#1393 | ||
|
GEARHEAD
Join Date: Aug 2003
Location: MN
Posts: 6,125
|
Re: Junkyard Jimmy Super Low Buck Build Thread
Quote:
Quote:
Today I set up and used the notcher for the first time. The instructions weren't completely useless but a couple more pictures would have been helpful. I even checked Woodward Fabs website and didn't see any help there either. So I used my normal go-to training site, youtube. Found a video of someone using a notcher and I figured it out from there. I initially set it up on my workbench but moved it to the drill press. Technically either will work if you have a 1/2" drill, but the drill press is definitely the better option. 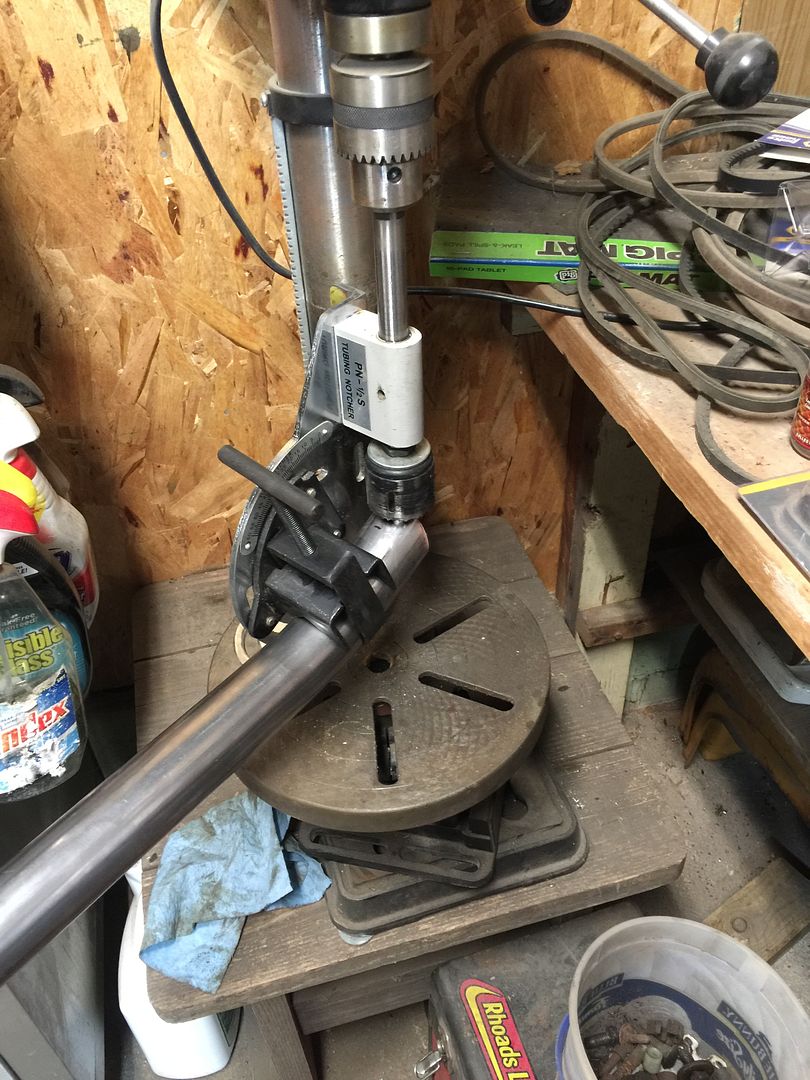 My 2" hole saw was dull and wasn't making any progress, good thing I had another one. Swapped it out and it worked good. I had to take my time though. Setting up the tube was the most time consuming. Got the dimension for length between the two hoops and added 2" to compensate for the notch. Marked out the tube and it was about 4" too long on both ends, so I set up my chop saw to trim down at an angle similar to what was needed for the notches. Straight tubes would be easier to work with. The ones from the kit had an approximately 20* bend on each end. Looks good but probably weakens it. Setting it up in the notchers wasn't bad after giving it some thought. I was worried about getting the angle right but didn't need to because once I had the tube clamped in the jig, I just needed a level to set the tube angle to level. The tube, even though it has a bend in it, still needs to be perpendicular to the main length of the tube, so I ignored the angle marking on the notcher. The drill press was checked for plumbness before hand. Right out of the notcher... 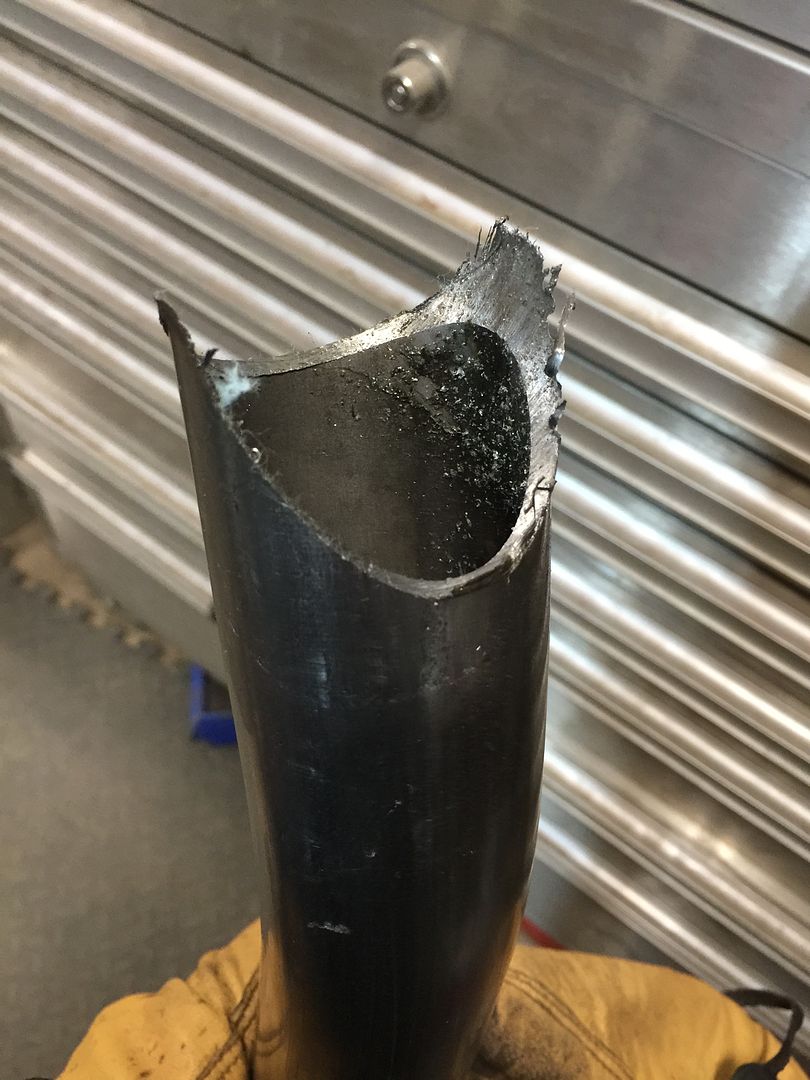 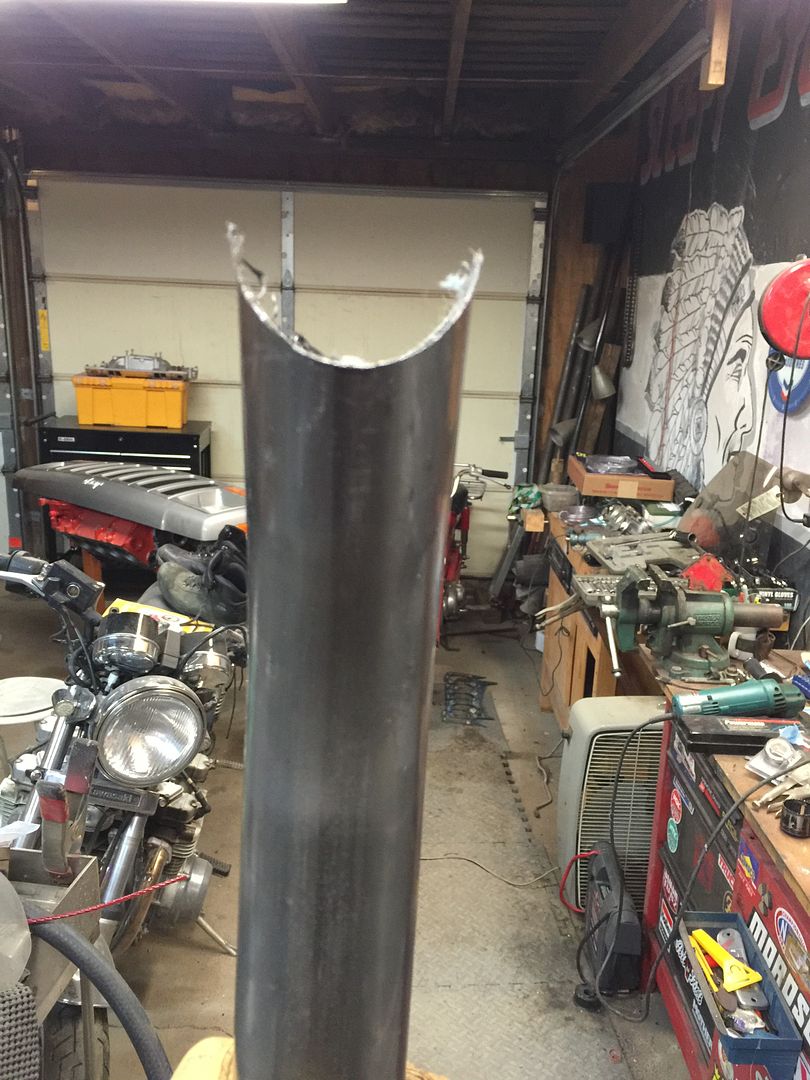 After clean up... 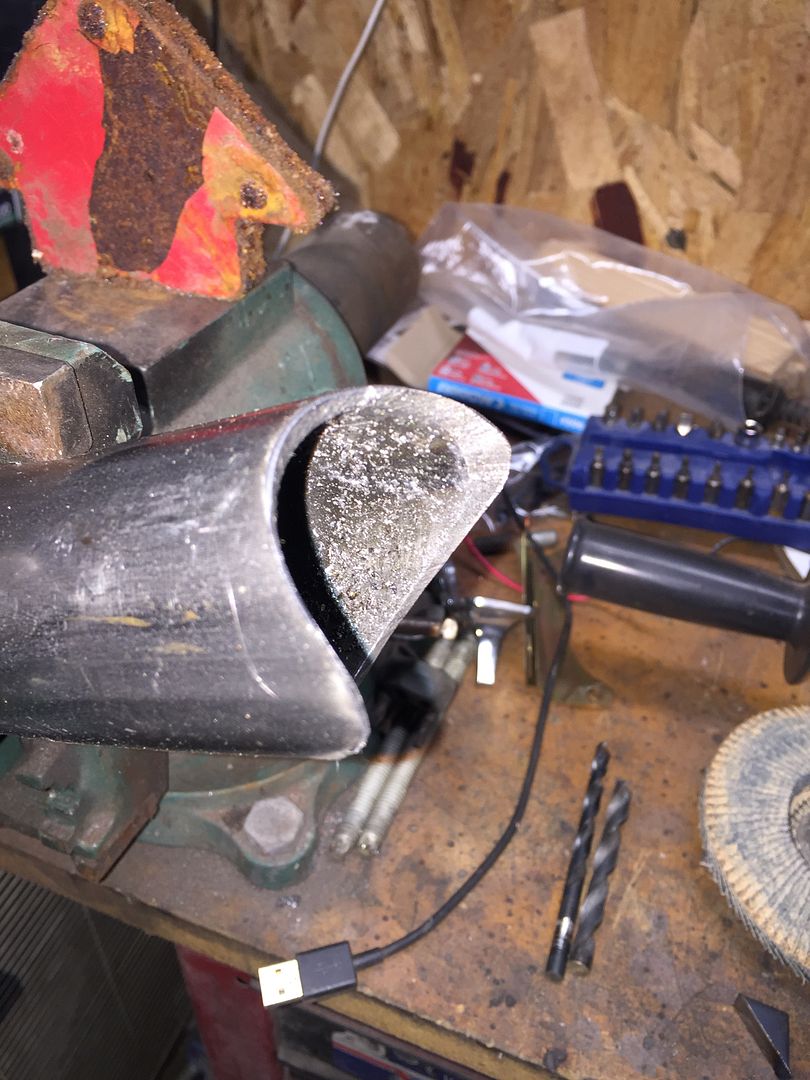 Checking how it fits against another tube... 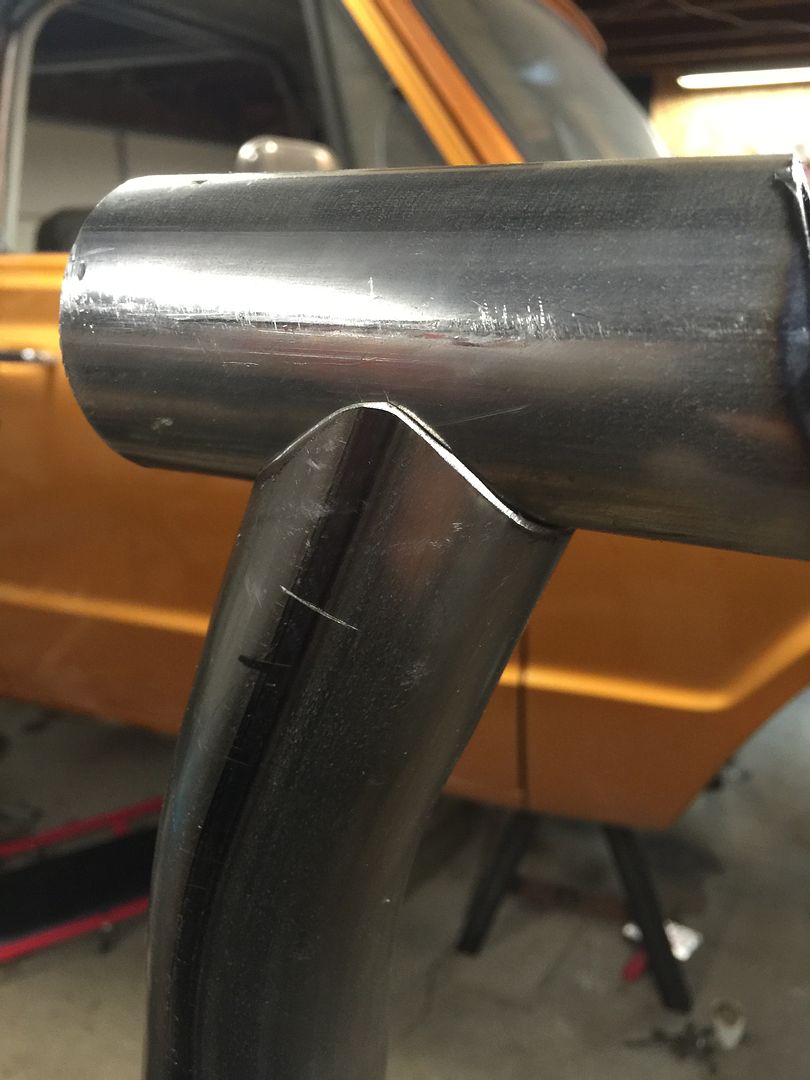 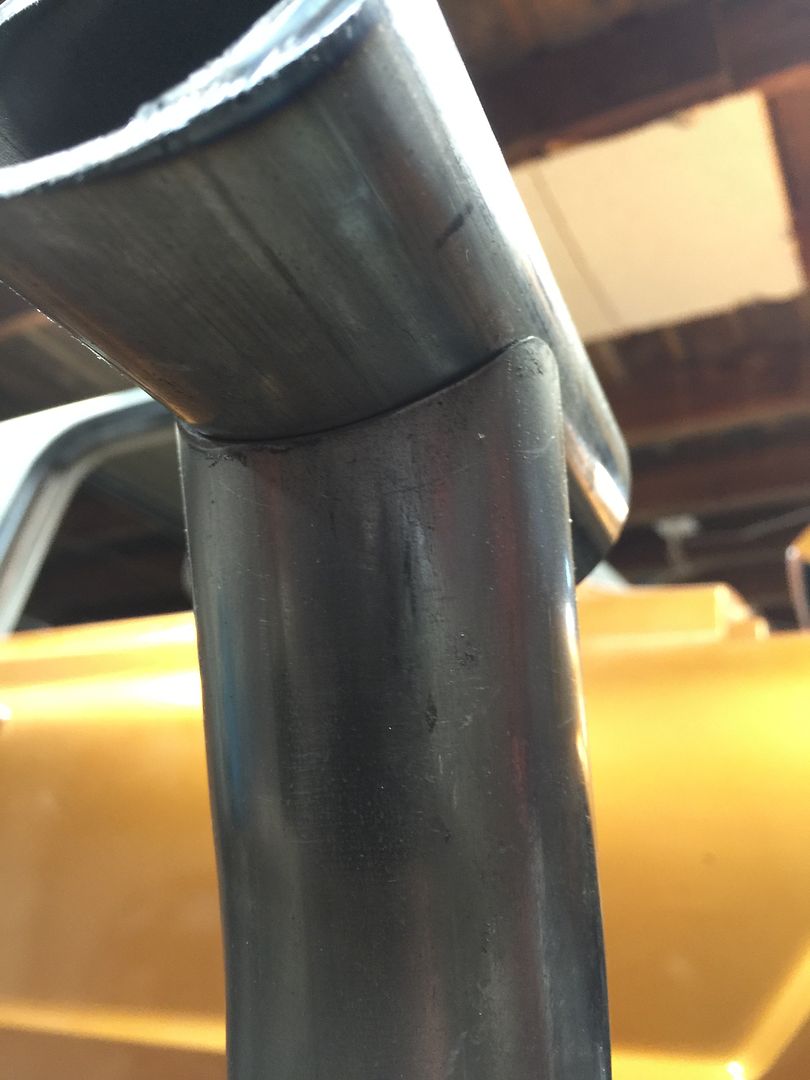 I fit the tube up against the main hoop and marked the rear end with a marker where the deepest part of the notch would be. I trimmed a bit more off on the chop saw and fit it up in the notcher. Now I was concerned with getting the notches in the same alignment. I used the level again, this time on a piece of tube that I fit in the first notch. With everything level it should be correct. 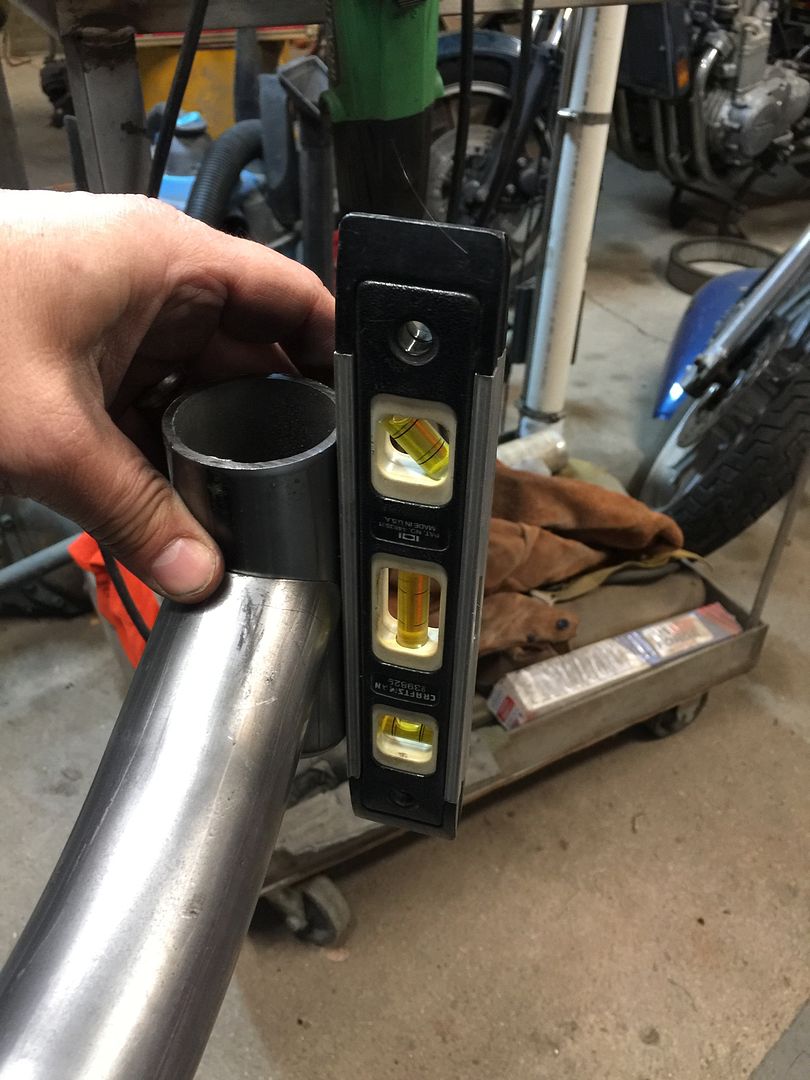 It turned out perfect! Fits right in there, no tacks yet. 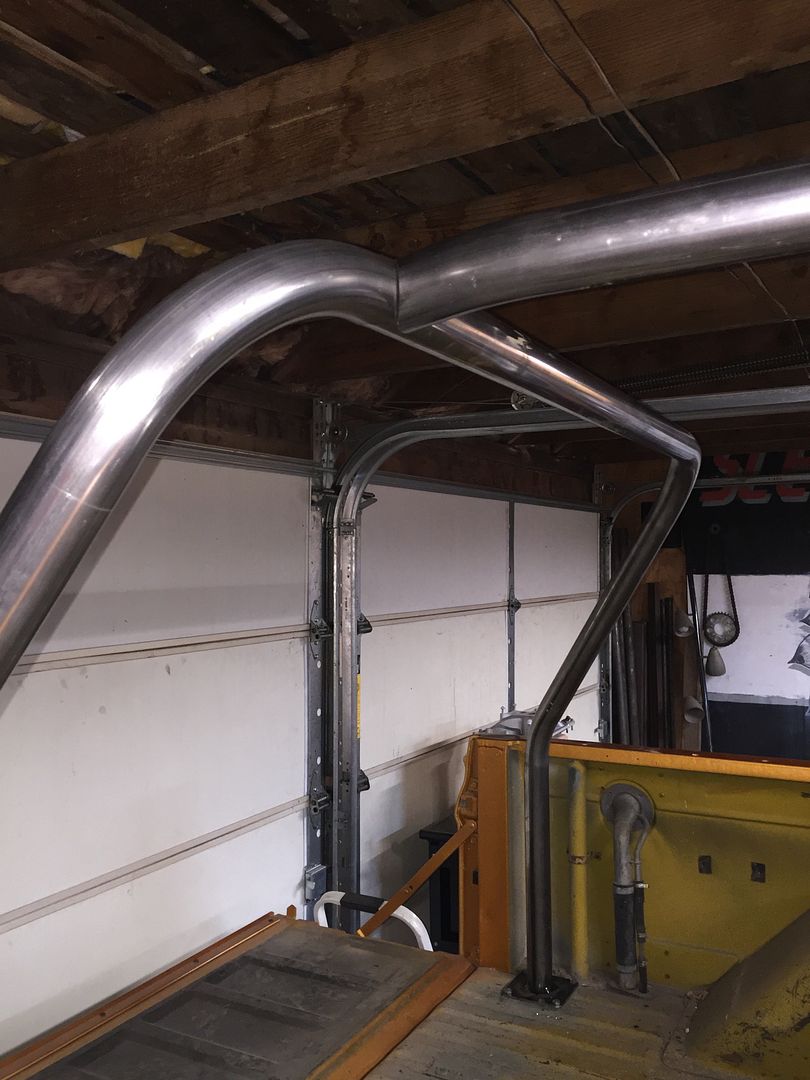 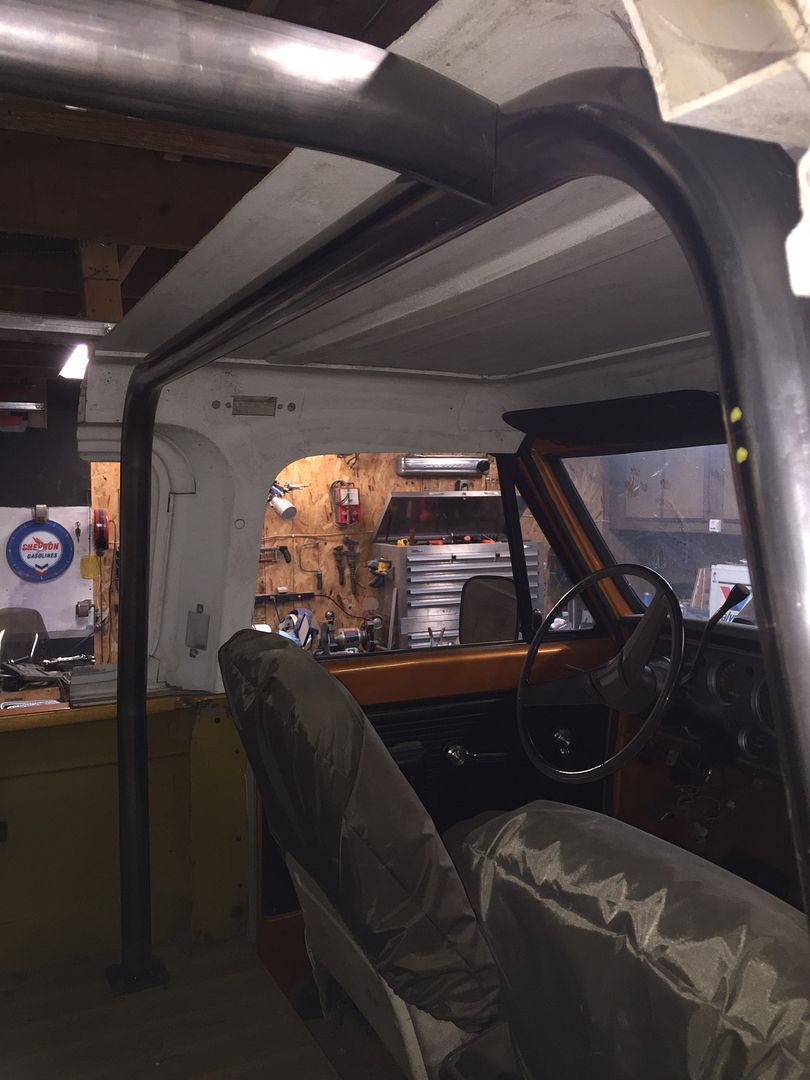 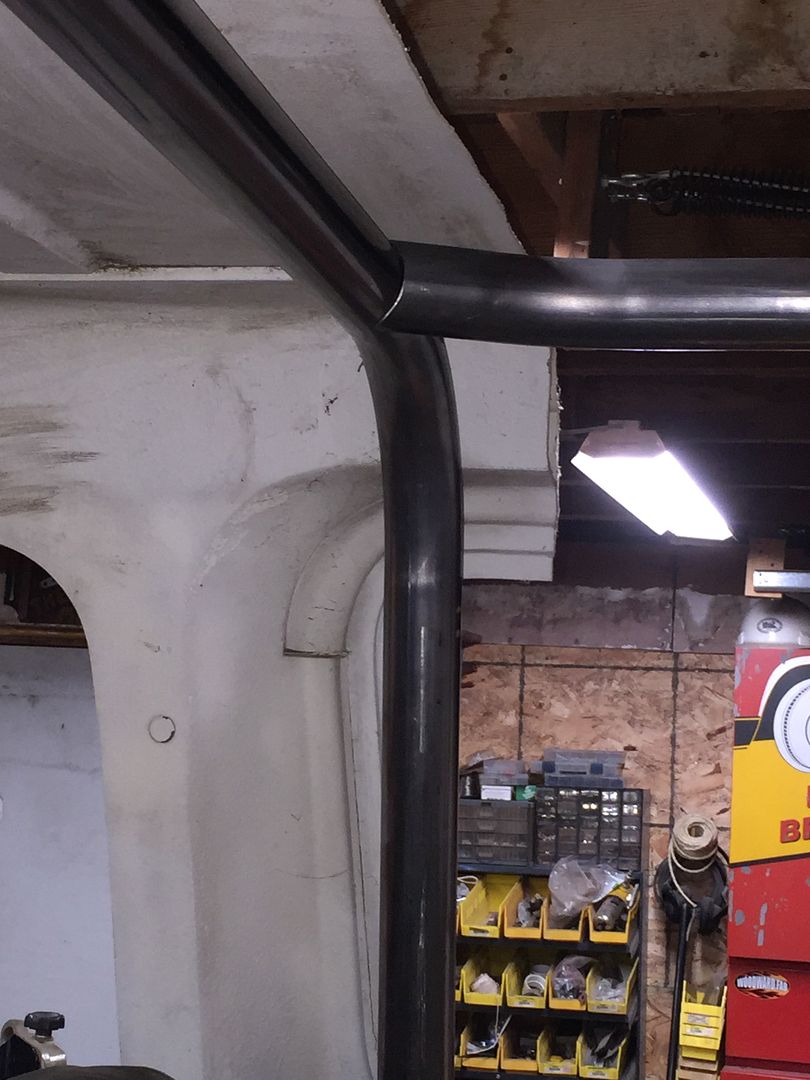 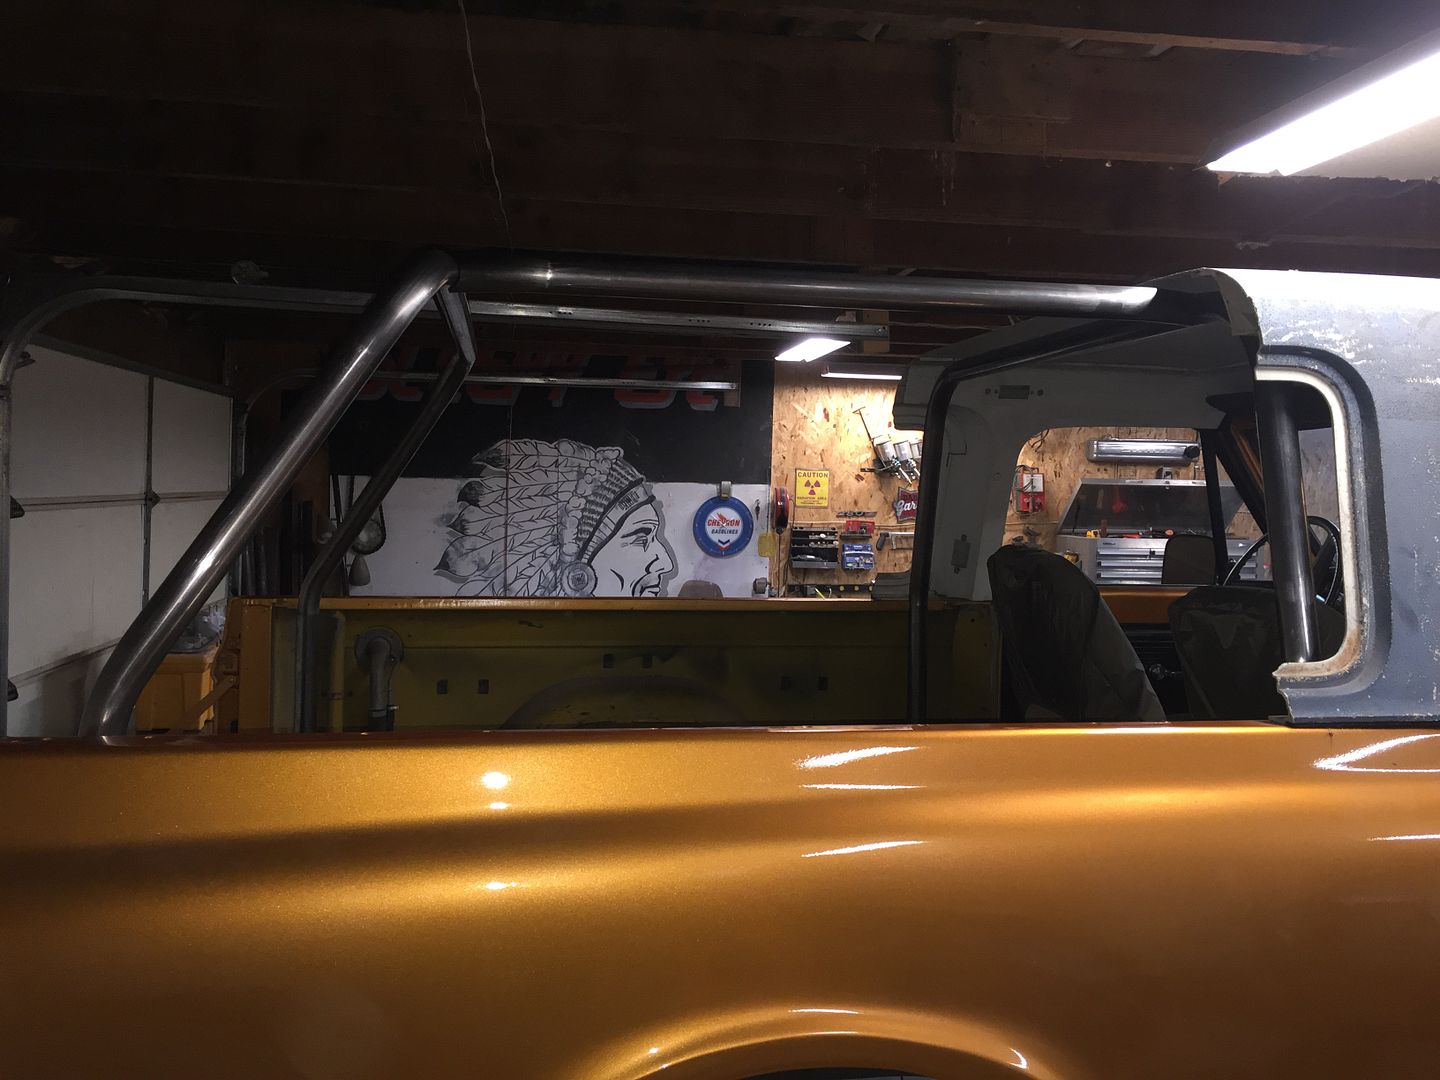 Cool, I can do this.      
__________________
If no one knows what you're doing, they can't tell you you're doing it wrong HG's Dream Car Build - Shelby Cobra Kit Build your own adjustable track bar 71  Long Fleet C/10 Long Fleet C/10 72  Jimmy 4x4 (Junkyard Jimmy) Jimmy 4x4 (Junkyard Jimmy)HG's Plow Truck '78  K35 Dually K35 DuallyBigass Farm Truck HG's thread of miscellaneous stuff |
||
|
|

|
|
|
#1394 |
|
A guy with a truck
Join Date: Sep 2005
Location: Germany, for now
Posts: 5,921
|
Re: Junkyard Jimmy Super Low Buck Build Thread
Very nice work!
__________________
-Chris Instagram _elgringoloco_ '70 Short-Wide How to: Ruin a perfectly good C10 ‘70 Blazer ConversionHow To: Ruin a Perfectly Good 4wd '72 Highlander How To: Ruin a Perfectly Good K/5 (SOLD) '72 Blazer 2WD How to: Ruin a perfectly good Blazer (SOLD) '05 Yukon Daily Driven (not so stock) Yukon (SOLD) ‘07 Yukon Denali (daily) Members met list: SCOTI, darkhorse970, 67cheby, 67cheby'sGirl, klmore, porterbuilt, n2billet, Fastrucken, classicchev, Col Clank, GSFMECH, HuggerCST, Spray-Bomb, BACKYARD88, 5150, fine69, fatbass, smbrouss70, 65StreetCruiser, GAc10boy |
|
|

|
|
|
#1395 |
|
Proprietor of Dale's Corner
 Join Date: Nov 2012
Location: Vacaville , CA
Posts: 16,242
|
Re: Junkyard Jimmy Super Low Buck Build Thread
Very nice!! Congrats on a nice fit
__________________
"Some Days Chickens And Some Days Feathers" Dale XNGH ECV Sam Brannan 1004 R.I.P. 67ChevyRedneck R.I.P. Grumpy Old Man R.I.P. FleetsidePaul |
|
|

|
|
|
#1396 |
|
high-Tech Red Neck
Join Date: Feb 2008
Location: Livingston, MT/On my boat WA/BC/AK
Posts: 2,294
|
Re: Junkyard Jimmy Super Low Buck Build Thread
Mike, I have to say it, I don't know how I missed your build all these years I have been on the site, but damn it came out nice!
I am really looking forward to seeing what she turns into!
__________________
"He used to be a pretty nice feller, now he's a welder!" |
|
|

|
|
|
#1397 | |
|
GEARHEAD
Join Date: Aug 2003
Location: MN
Posts: 6,125
|
Re: Junkyard Jimmy Super Low Buck Build Thread
Thank you
Blind luck LOL Quote:
Yesterday I got the other side bar done between the middle and rear hoops. 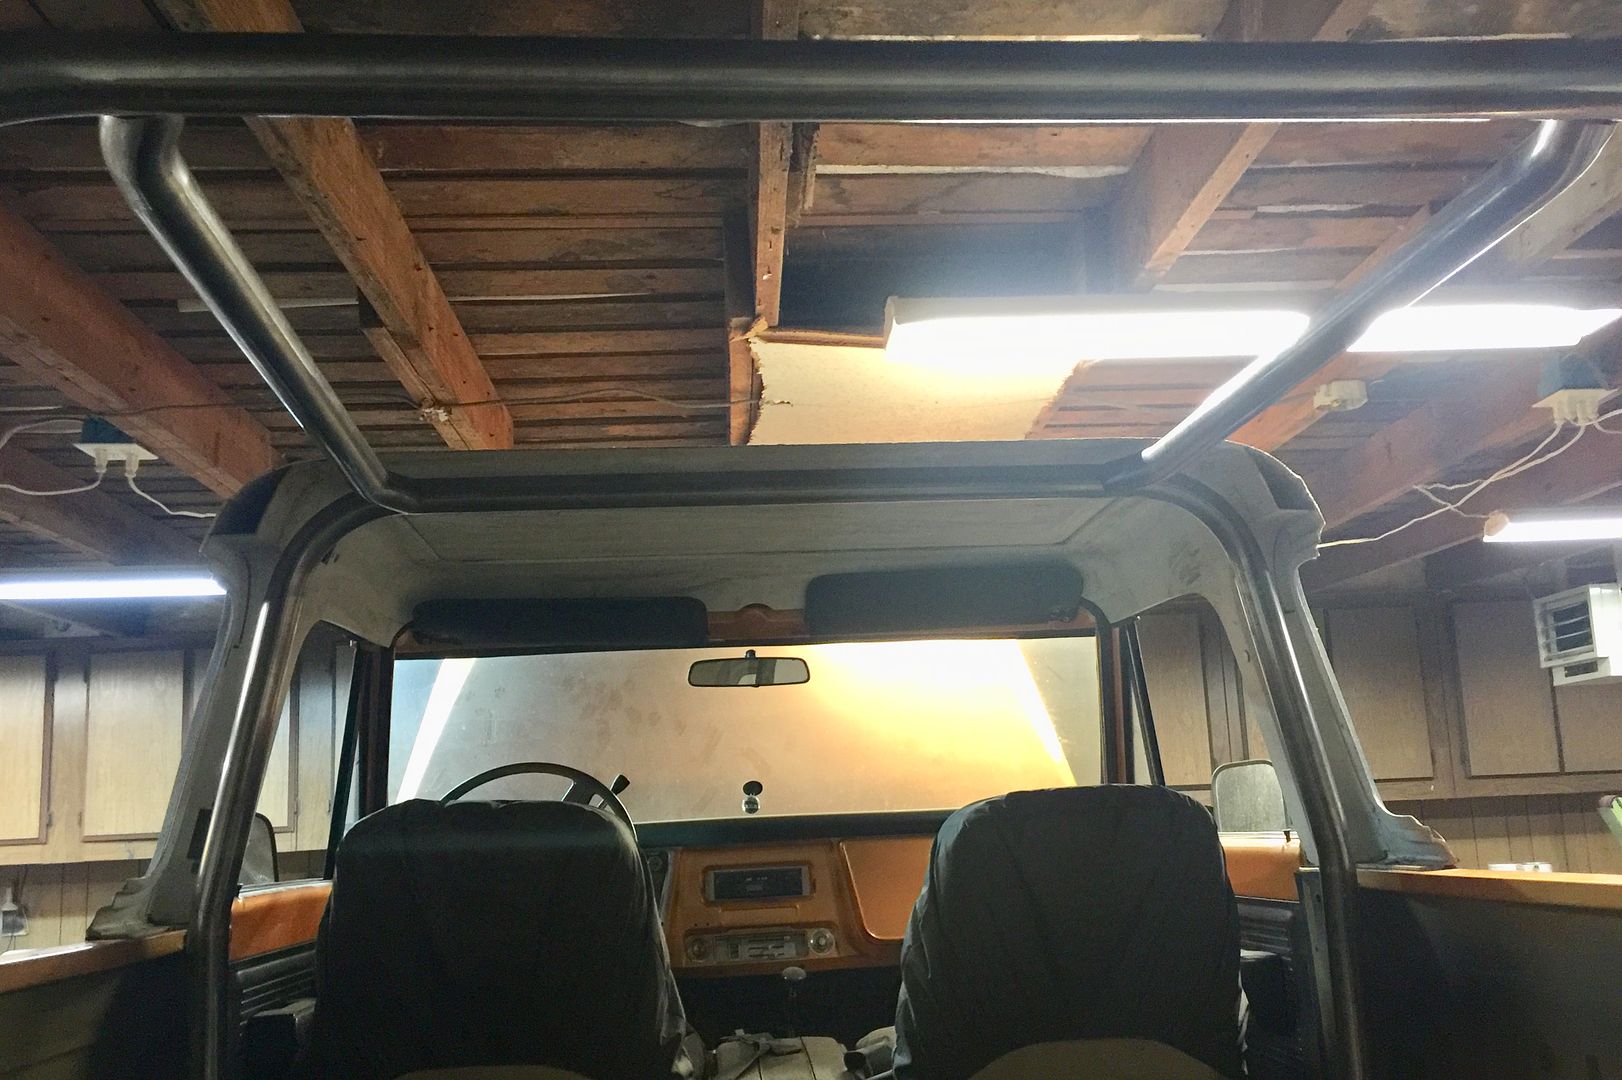 Then the part I have been dreading, those front bars along the windshield post. Sure they are pre-bent, but nowhere near close to fitting. Each end was about 6-8" too long so getting it in to try and mock up was not going to happen without cutting first. I took a bunch of measurements and did a little geometry and got the lower part of the bar cut fairly close without being too short. That gave me an idea of where the bar would mount to the floor. Then more measurements and geometry and using the magnet levels and calibrated eyeball to make an informed guess of the back end where it meets the middle hoop. At that point I could get it in and see where I was at. I was able to get the bottom end angle cut and set the tube in it's final resting spot. Then was able to mark the angle where the tube met the middle hoop. It's got a weird angle because the windshield post angles back and inward but the bar is bent through a single plain. So if the lower part is vertical along the door to the dash, then the bar is turned inward towards the back. Anyway, setting up to notch that back end of the tube was challenging for a noob like me. Eventually I realized that if I set the notch angle, which is perpendicular to the vertical front section of the bar, then I just had to rotate the tube in the notcher until the lower section was level.  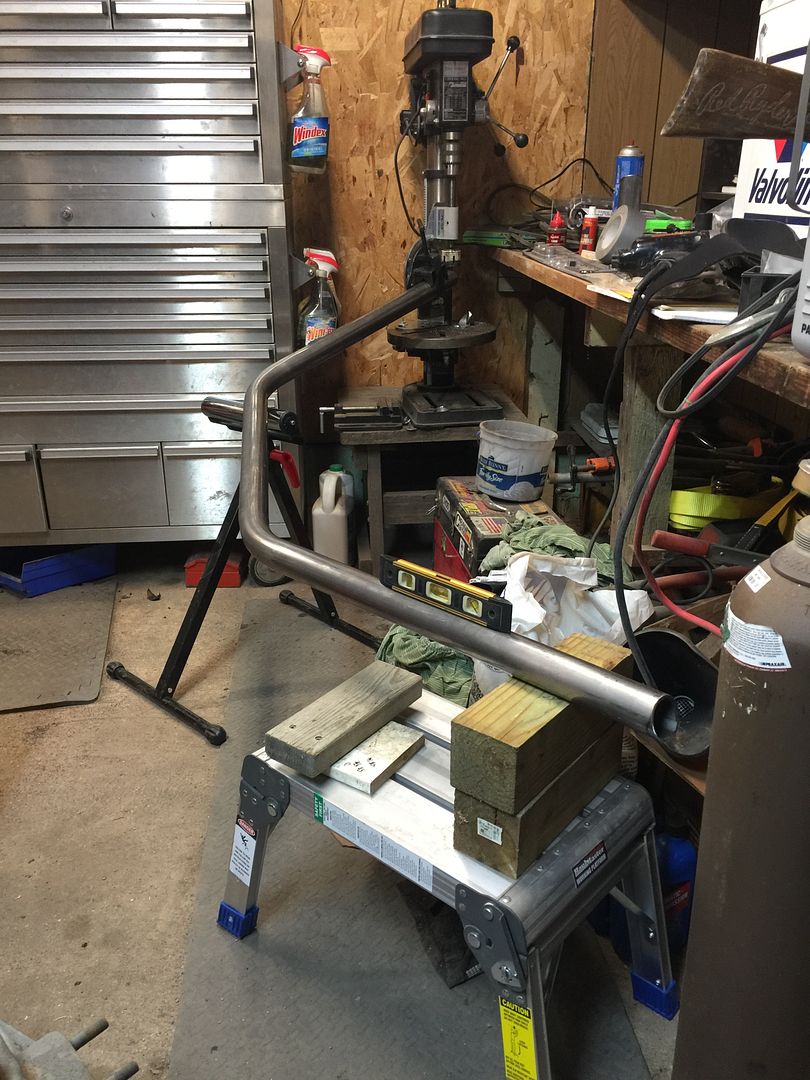 Holy hell it worked!!!       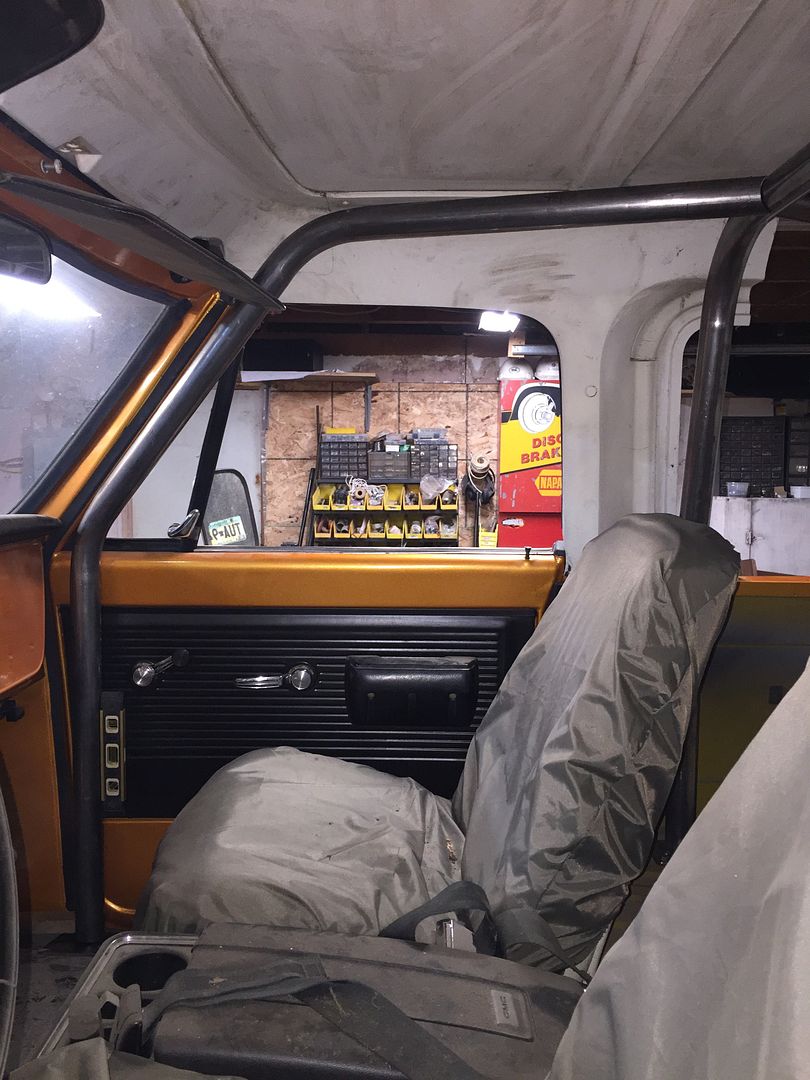 You can really see the angle here... 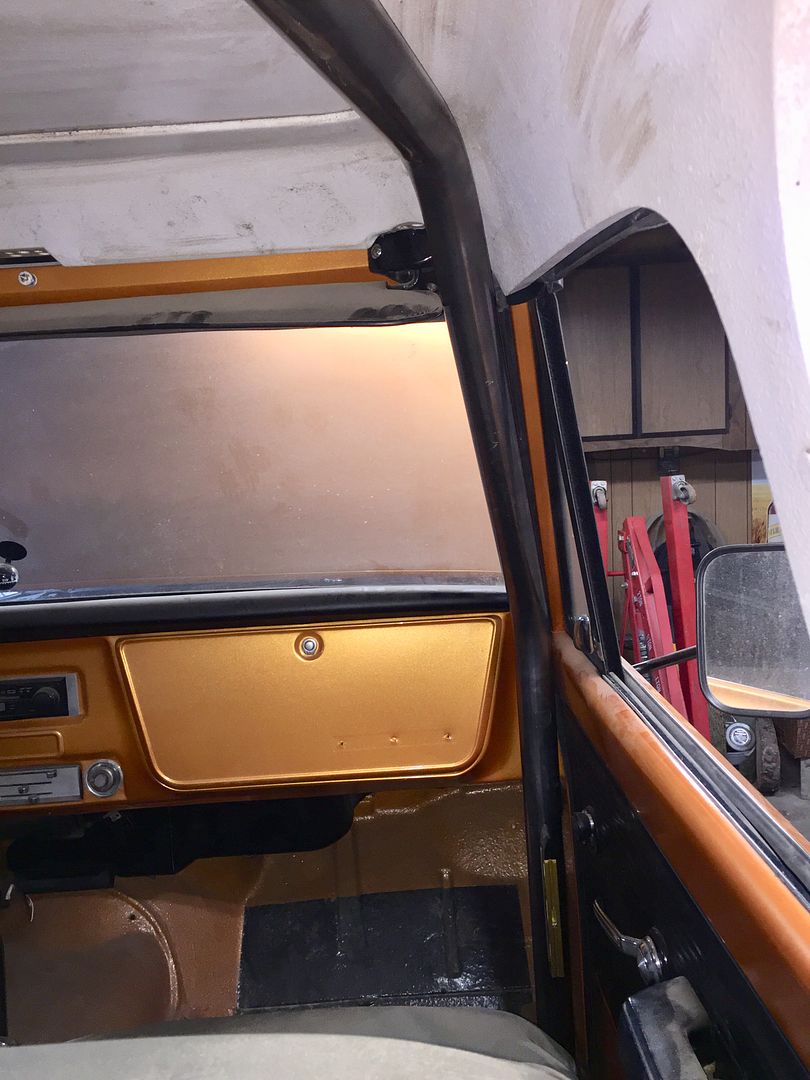 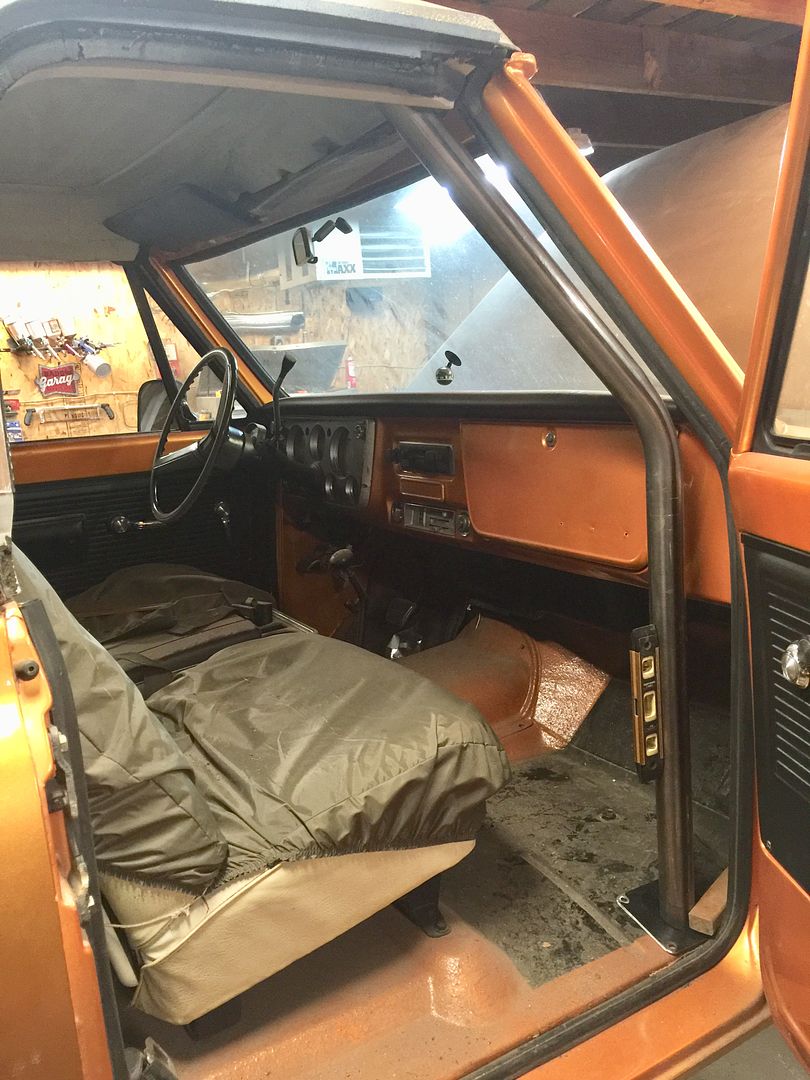 This pic is looking upward at the middle hoop where the front and rear tubes attach. The upper (in the pic) is the rear and the lower is the front tube. 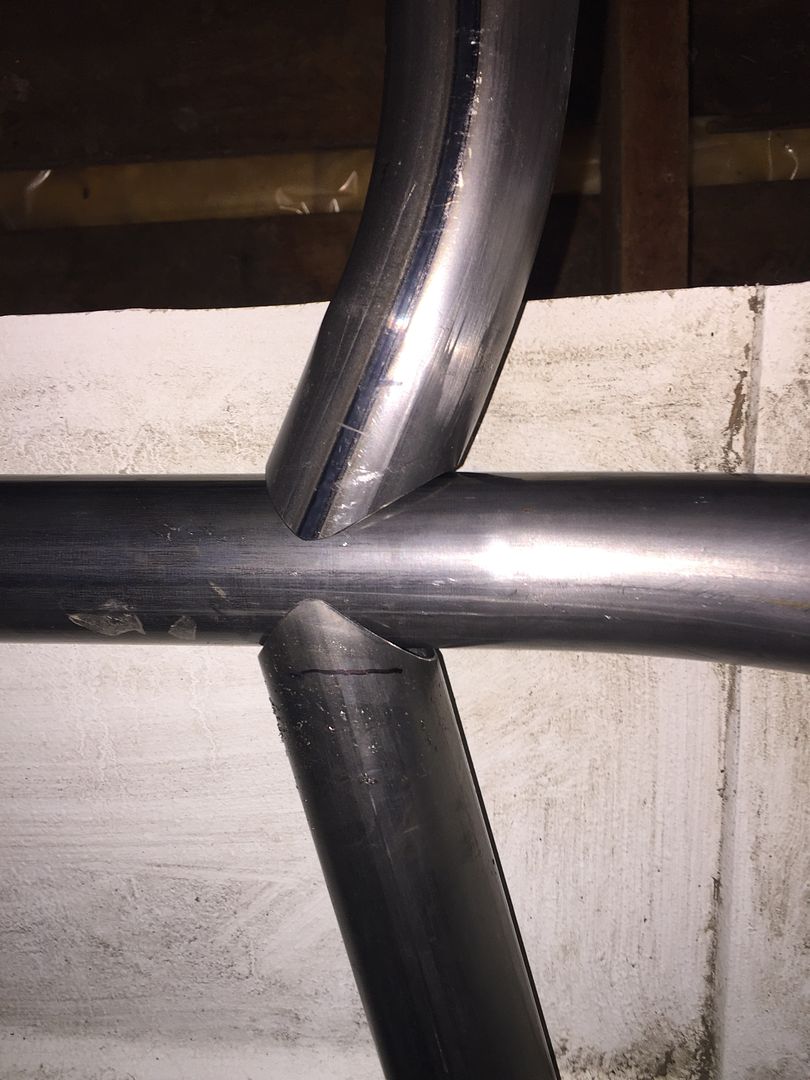 After hyperventilating a bit at my success I pulled the tube back out to use as a pattern for the other side. I just set the uncut driver side tube on the floor and set the cut one on top of it and marked it up for cutting. Just needed to reverse it in the notcher. 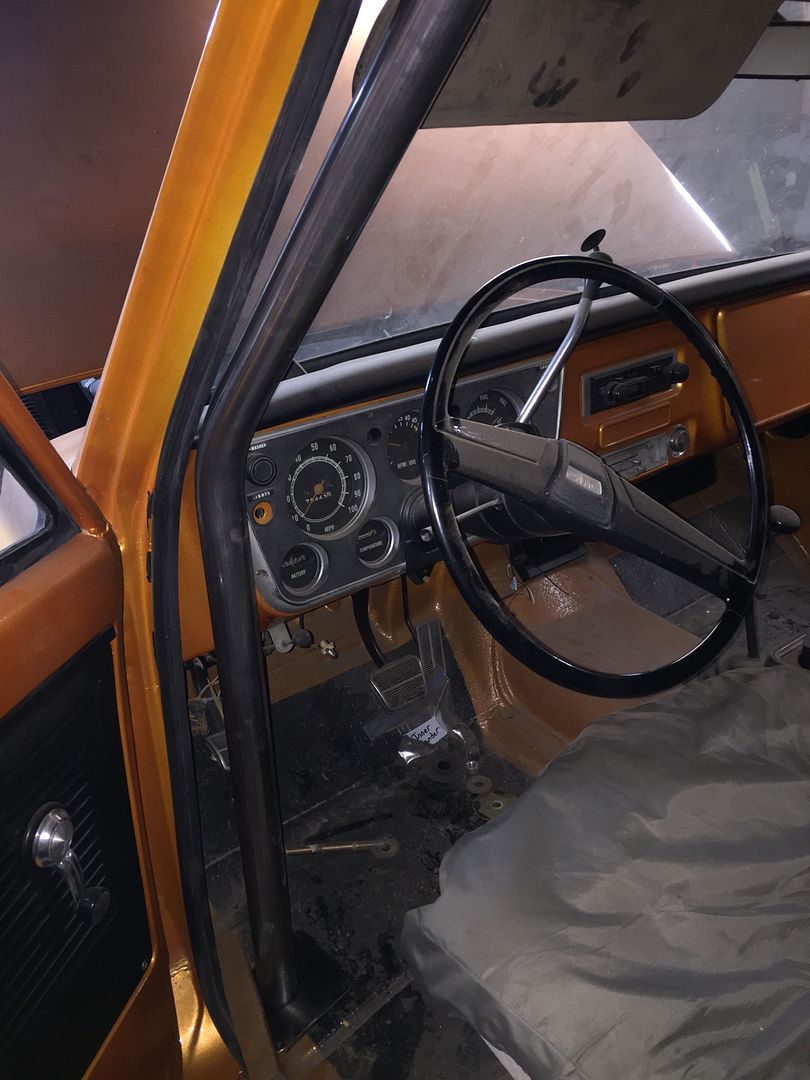 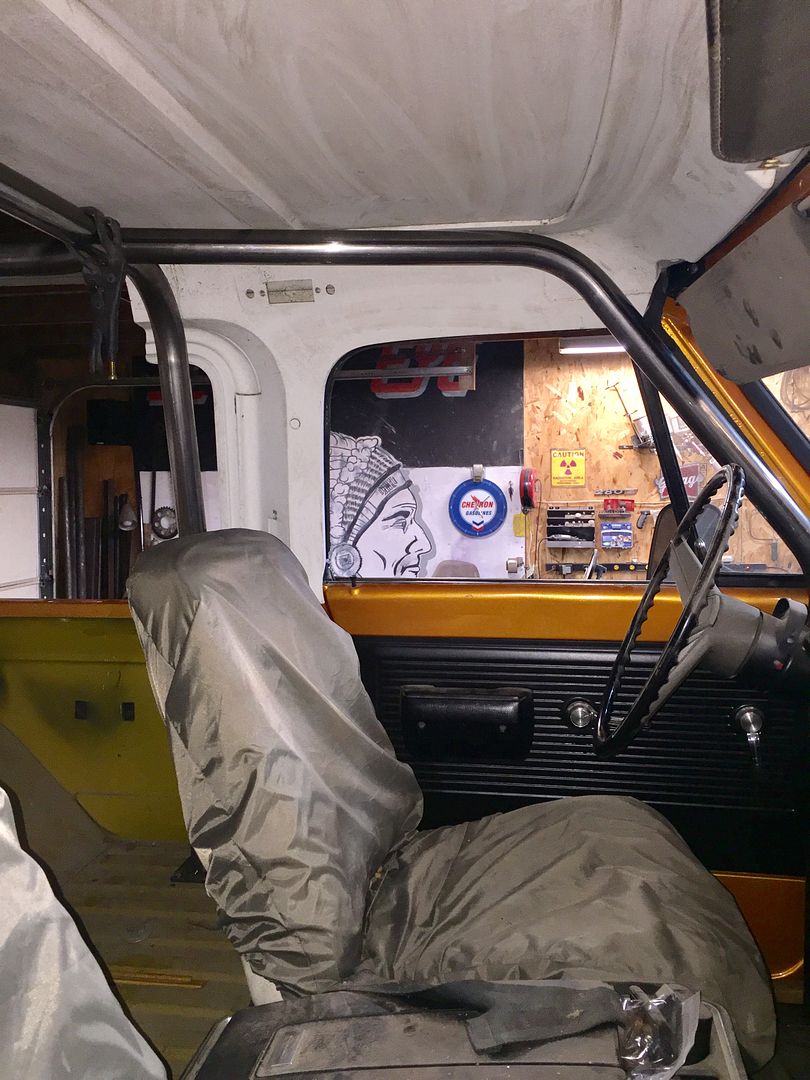 Sweet! It fit. The cross tube wasn't too difficult, although I think I'm going to pull it out for a small adjustment. The angle for the notcher stays the same because math. LOL 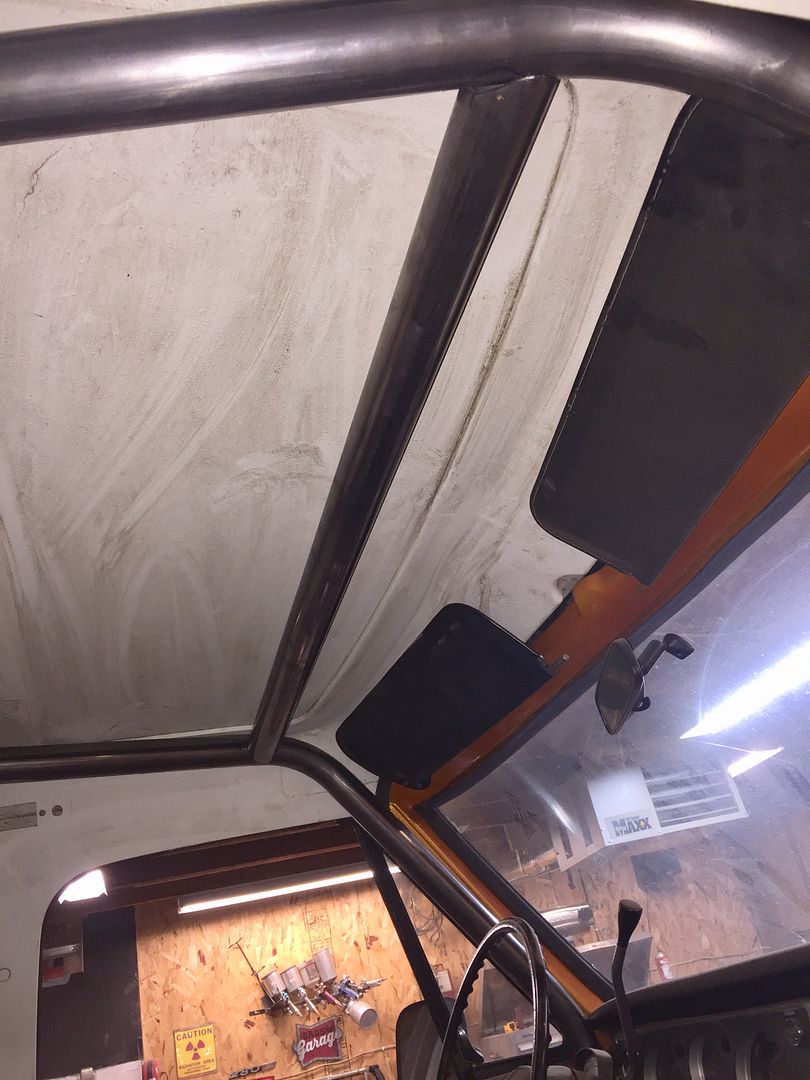 I think I was off a few degrees from one end to the other and I want it to fit back about a half inch from where it is now. 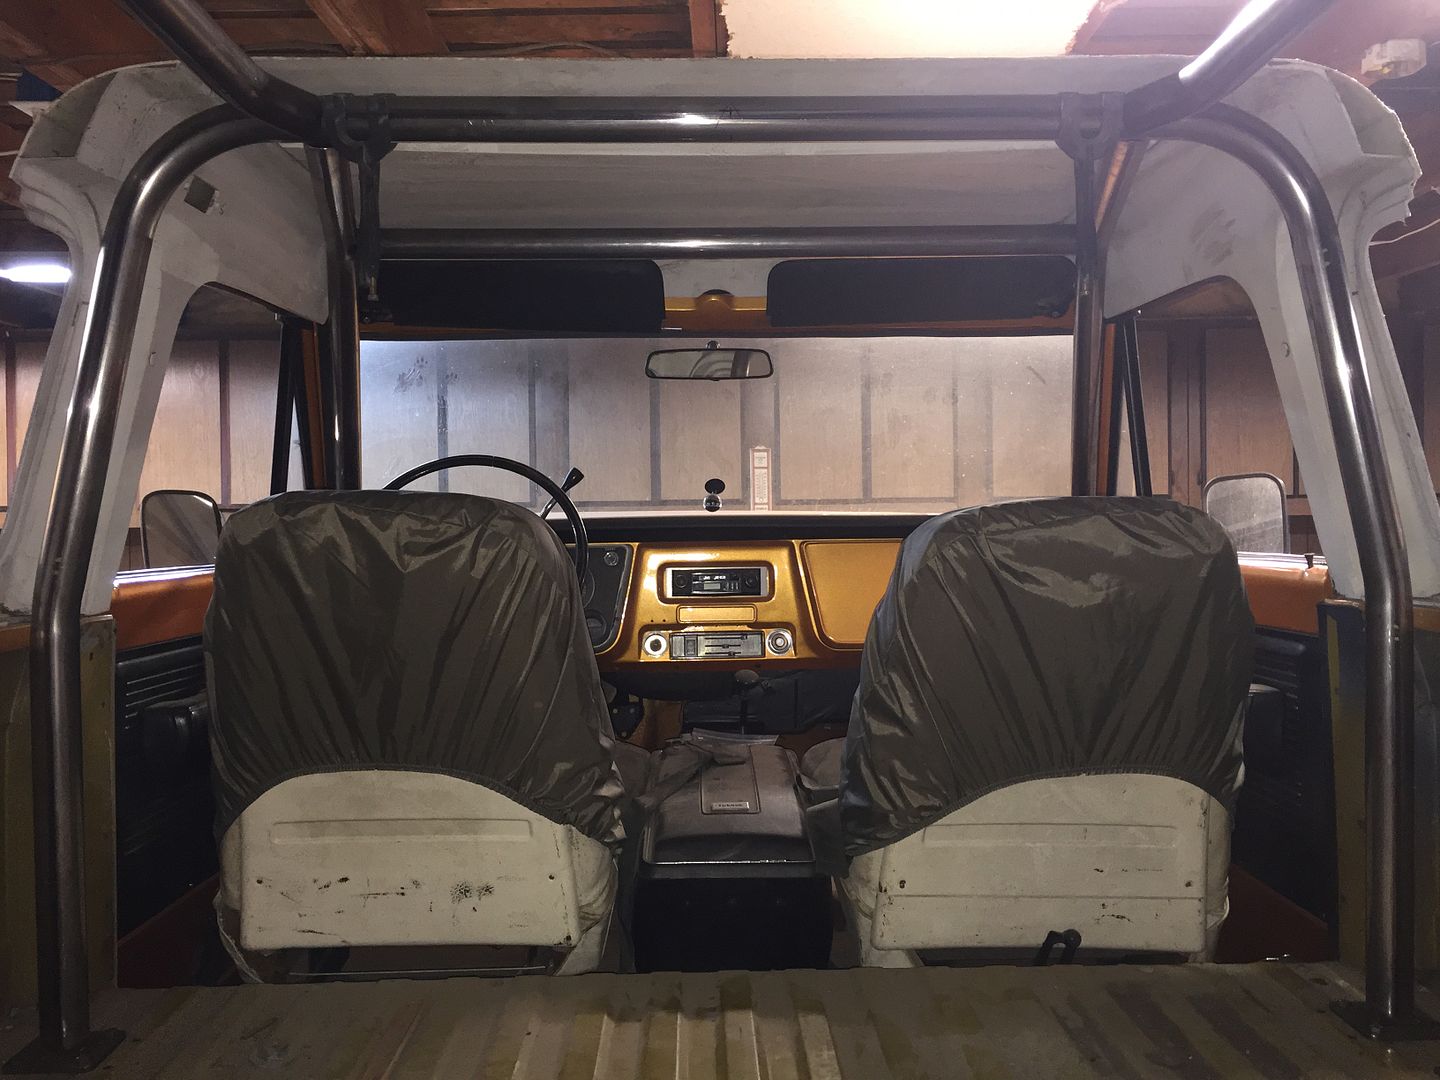 No interference with the doors, the glove box door opens, the visors will move, though they do hit the tubes. They flex enough to work though. None of the tubes are tacked together yet. They just fit good enough to stay in place with a couple locking pliers to keep them from sliding out of place. I'll have to remove the seats and console for room to work. As it is it's a 6 point cage. There are 2 more tubes that are supposed to mount to the rear wheel tubs. I'm not going to do anything with them until I figure out the rear suspension because I'll probably be incorporating upper shock mounts, etc. I'll be adding some triangulation tubes, door area tubes, and tubes through the firewall to the front of the frame. I'll end up with at least an 10 point cage but probably more like 12-14 point when it's all said and done.
__________________
If no one knows what you're doing, they can't tell you you're doing it wrong HG's Dream Car Build - Shelby Cobra Kit Build your own adjustable track bar 71  Long Fleet C/10 Long Fleet C/10 72  Jimmy 4x4 (Junkyard Jimmy) Jimmy 4x4 (Junkyard Jimmy)HG's Plow Truck '78  K35 Dually K35 DuallyBigass Farm Truck HG's thread of miscellaneous stuff |
|
|
|

|
|
|
#1398 |
|
A guy with a truck
Join Date: Sep 2005
Location: Germany, for now
Posts: 5,921
|
Re: Junkyard Jimmy Super Low Buck Build Thread
Super nice! Definitely triangulate. Rarely see anyone prepared for a side rollover
__________________
-Chris Instagram _elgringoloco_ '70 Short-Wide How to: Ruin a perfectly good C10 ‘70 Blazer ConversionHow To: Ruin a Perfectly Good 4wd '72 Highlander How To: Ruin a Perfectly Good K/5 (SOLD) '72 Blazer 2WD How to: Ruin a perfectly good Blazer (SOLD) '05 Yukon Daily Driven (not so stock) Yukon (SOLD) ‘07 Yukon Denali (daily) Members met list: SCOTI, darkhorse970, 67cheby, 67cheby'sGirl, klmore, porterbuilt, n2billet, Fastrucken, classicchev, Col Clank, GSFMECH, HuggerCST, Spray-Bomb, BACKYARD88, 5150, fine69, fatbass, smbrouss70, 65StreetCruiser, GAc10boy |
|
|

|
|
|
#1399 |
|
Registered User
Join Date: Aug 2015
Location: Raynham, MA
Posts: 222
|
Re: Junkyard Jimmy Super Low Buck Build Thread
Looking good! Maybe I missed it, but is this the Bronco Bob family cage? I have the non-family version of the cage, but wish I had more protection out back for the kids.
__________________
My LS Swap: http://67-72chevytrucks.com/vboard/s...d.php?t=718573 |
|
|

|
|
|
#1400 |
|
high-Tech Red Neck
Join Date: Feb 2008
Location: Livingston, MT/On my boat WA/BC/AK
Posts: 2,294
|
Re: Junkyard Jimmy Super Low Buck Build Thread
Quote:
 I am worried about how far inboard your side bars come in, they are almost directly overhead, if you wind up in the situation you need the roll bar, this could be fatal because it would be like having a baseball bat dropped right on top of your noggin! It would be better to tie the bars in at the corner of the bend (shown in green) keeping the bars as close to the edge of the shell as possible! (orange) I know it would probably mean having to buy more material at this point, but a couple of sticks of tubing are a lot cheaper than a serious injury or even loss of life! Especially if it is someone you love and you are left holding the regret bag. Tying into the corner of the bend is pretty easy, you make a kicker bend that is at a 45° angle to the side tube, then make the notch perpendicular to that, and it will fit right in!  Also I strongly suggest putting an offset bend in the post going to the floor show in orange here, the reason for this is, when getting in and out of the truck it will make it a lot easier with your feet, get your foot wrapped around that bar as you are getting out and go Alpha Sierra Sierra over tea-kettle face first onto the pavement and you will understand why!  Also do install grab handles up at the front corner of the cage, but make sure that handle is inboard enough in its arc that if the truck were laying on its side and the cab crushed in, that who ever's hand is holding that handle will not be crushed! Because if the truck goes over the first thing someone is going to do is grab that handle! And don't forget if you install 5 point harnesses, make sure the shoulder bar is above the shoulders because if you have an accident and they are below the shoulders it can cause compression injuries to the spine! I don't want to sound like a downer, I just have some experience with this and know someone who got killed when his jeep flipped and the cage dimpled his noggin. That being said I have high hopes you never need to use the cage because it would be a shame to mess up a truck you have done such nice work on, but better to have it and not need it than need it and not have it! P.S. and by the way, PVC pipe is great for mocking up cages as it is a lot cheaper than steel, heat it up and bend it in your bender just as you would the steel tube. if you are unhappy with how a piece came out, get a butt connection, cut off the bad part, stick a fresh piece of pipe on, and keep mocking up!
__________________
"He used to be a pretty nice feller, now he's a welder!" |
|
|

|
 |
| Bookmarks |
|
|