
 |
|
|
#176 | |
|
K5Camper
 Join Date: Mar 2004
Location: Pueblo, CO
Posts: 1,513
|
Re: My K5 Blazer Story.
Quote:
__________________
Rob Z. 1975 K5 350/465/205/D44/12b 4" lift on 35's- RIP 1991 K5 8.1L/NV4500/241/D44/14b FWC Camper |
|
|
|

|
|
|
#177 |
|
K5Camper
 Join Date: Mar 2004
Location: Pueblo, CO
Posts: 1,513
|
Re: My K5 Blazer Story.
Paid a visit to the Bigassgas Garage on the way home today. Had to drop off a brake line we made at work to replace the pinched one Larry found on the rear axle. I also got to survey my stupidity on the t-case.
Talked to Larry when I got there and between him and the research I did this morning I'm pretty sure he's right. I managed to get a 32 spline 241. He's going to pull it Monday and I'll take both 241's to work with me and get the 27 spline input installed in the good 241. The 32 spline input will NOT be tossed. We'll keep it for the possible change to a nv4500 if the budget were to allow it.
__________________
Rob Z. 1975 K5 350/465/205/D44/12b 4" lift on 35's- RIP 1991 K5 8.1L/NV4500/241/D44/14b FWC Camper |
|
|

|
|
|
#178 |
|
K5Camper
 Join Date: Mar 2004
Location: Pueblo, CO
Posts: 1,513
|
Re: My K5 Blazer Story.
Well it's confirmed. Larry pulled the t-case today. It's a 32 spline for sure. So it's loaded in the back of the S10 for a ride to work with the broken one to swap inputs. For anybody who cares I snapped a pic of both to show the difference. The 32 spline is on the left, 27 spline on the right.
 In the one step forward, two steps back mode...We attempted to bleed the brakes tonight when I stopped by to pick up the t-case. Starting with the rear, I'm pumping and Larry is working the bleeders. Not much of anything coming out of either side with multiple attempts. We move to the front and we have lots of fluid flow and get the air out. Move back to the rear and still nothing. Larry inspects the combination valve further and we find fluid leaking out of the valve on the end where one of the buttons are. Time to start looking for a combination valve. So to keep some positive vibe going here's a couple of pics I didn't post last week. The reworked driveshaft. Very nicely done.  Bringing the big baloneys home. 
__________________
Rob Z. 1975 K5 350/465/205/D44/12b 4" lift on 35's- RIP 1991 K5 8.1L/NV4500/241/D44/14b FWC Camper |
|
|

|
|
|
#179 |
|
Windy Corner of a Dirty Street
Join Date: Jun 2003
Location: Pueblo West, Colorado
Posts: 2,926
|
Re: My K5 Blazer Story.
Well, what an absolute pain in the dick the last few days have been! So after the transfercase debacle Rob came by the other night to pick it up in order swap the input we tried to bleed the brakes while he was here only to discover we had no fluid going to the rear axle. Come to find out the proportioning valve was dead and badly leaking out of the rear section of the prop block with the valve hanging out. I tried to recenter the valve but there was no go….the prop was shot. This must be a common theme with these as my dad’s 90 G-van did the same thing a few years ago.
The best part about this is this particular stinking prop valve is a 2 year only valve use on RWAL equipped 90-91 square bodies, while the GMT400 trucks used a completely different prop valve. After studying my K10 and Suburban for a while I determined it wouldn’t be too painful just to convert it over to the earlier style and retrofit the earlier prop valve back down on the crossmember where it belongs. I tell ya, I would rather shave an angry Badgers balls than go through this again. So this is the mess before. The Red Arrow is the rear brake portion of the prop block. It was badly leaking from here. 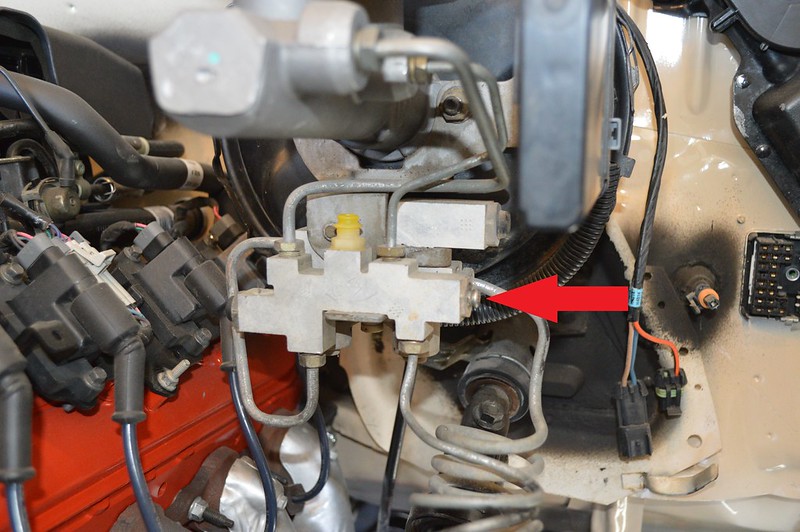 This is the spot on the crossmember where the prop valve would be on older rigs. The lines looked like they would almost line up close enough to an older prob valve. Well, this isn’t horseshoes or hand grenades…. And of course, the ORD steering box brace must come back off that I conveniently installed when the engine was OUT! 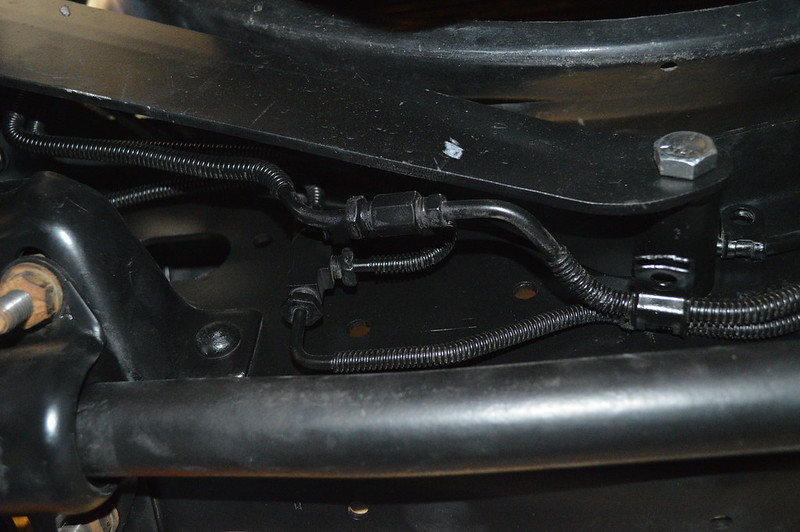 This here is what the 73-89 proportioning valves look like. This one happened to come off a ’82 C20 or something like that. 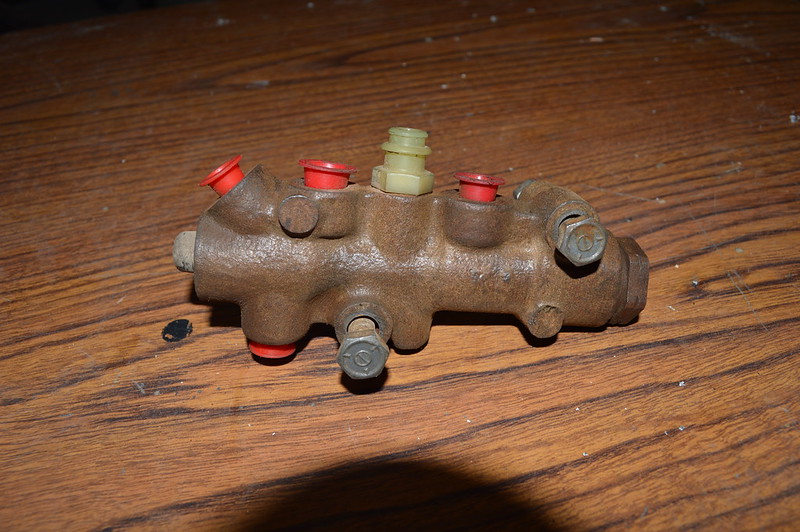 For the most part, the lines did almost line up with the older prop valve with the exception of two issues. First issue being the lines from the master cylinder to the prop valve must be changed as it would practically be impossible to bend them around to fit the valve and still clear the ORD steering brace. Second, the brake line to the rear is too long and has the wrong size tube nut. I don’t know what size tube nut is the right one but it doesn’t exist in any part store! So, Rob had to grab the M/C to prop valve lines and rear brake line tube nut from the boneyard. The line must be cut and double flared at the red line. Doing double flares is not my favorite thing to do and I’ve never been good at them but I never had a good flare kit either so I made a trip to Sears for a fresh Craftsman Double Flare kit. It worked great! I’m a double flaring building mofo now! 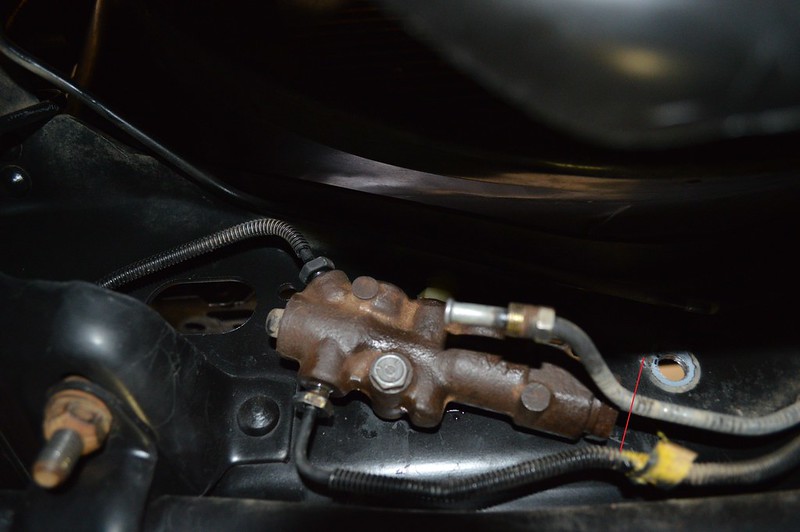 These were the original lines for the RWAL. Just no way to cleanly bend them to fit the older prop valve 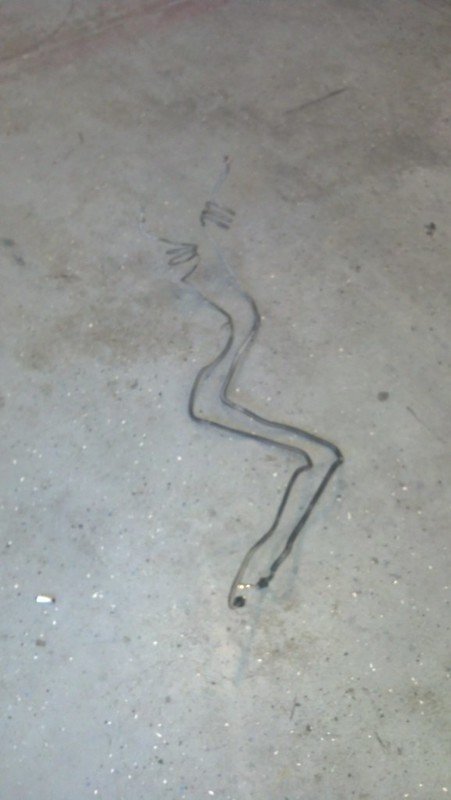 End result…prop in place and ORD steering box reinstalled/torqued. Hope it doesn’t leak once we bleed the brakes! 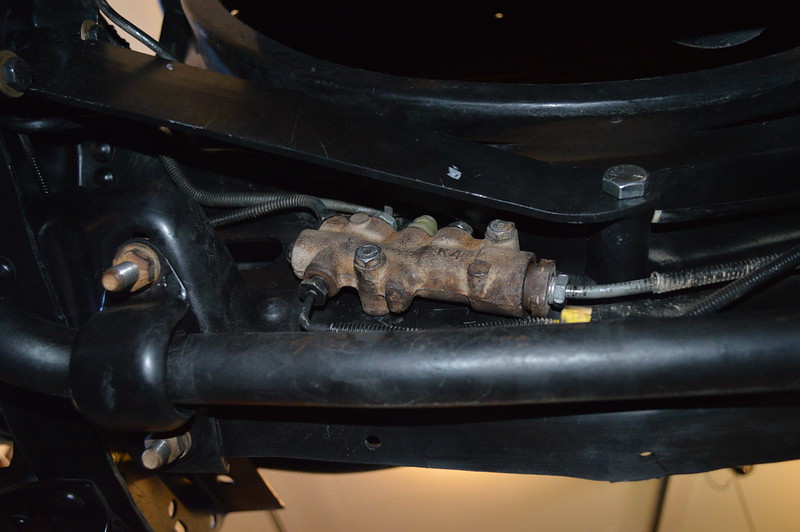 Looks better with less congestion now too. Vacuum brakes will do for a while until a hydroboost swap finds its way into the budget 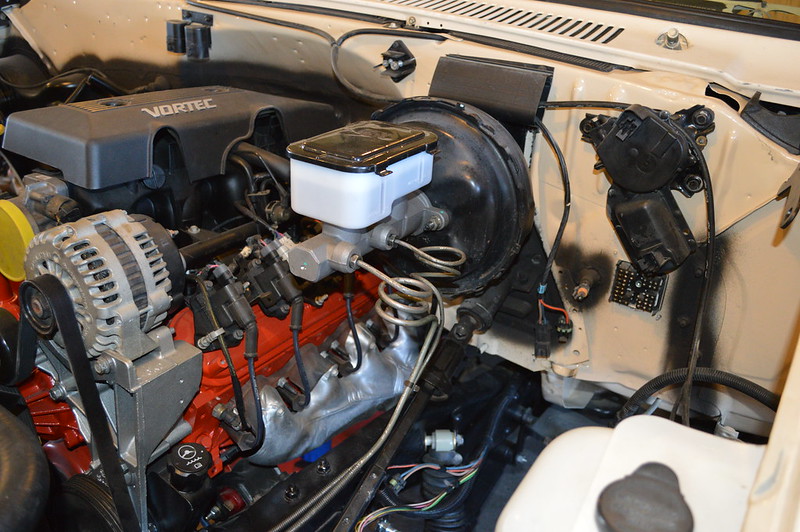 Also got the battery trays sand blasted and squirted this week as well. It seems I painted them on the windiest day of the week so they’re not perfect. 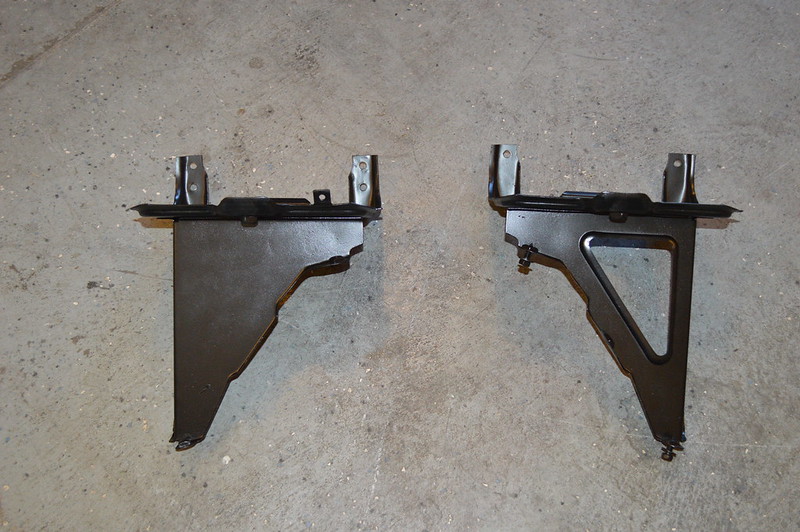 Oh, and I had to cut 2 F150’s worth of aluminum weight out of the 700R4 dust cover to fit behind the Gen III oil pan. 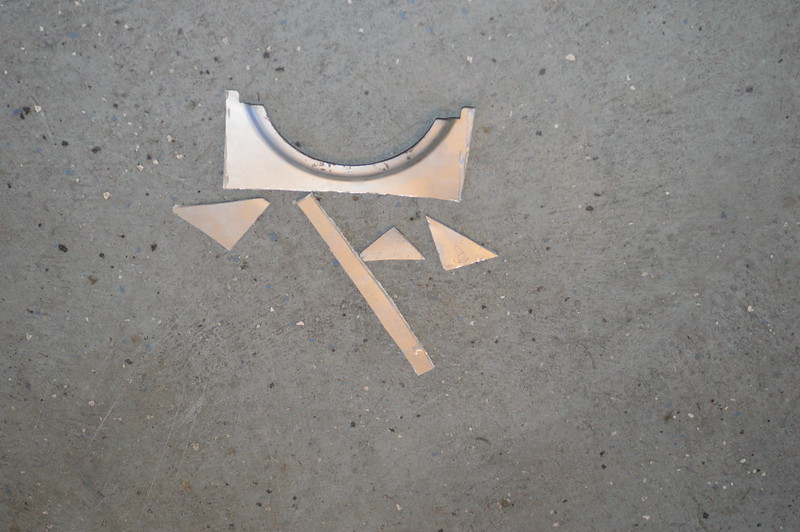 Now, I can finally get back on wiring where I had hoped to start this week!
__________________
Current vehicle collection: 1978 Chevrolet K10, 8.1L, NV4500, NP205 1989 Chevrolet Suburban, 8.1L, NV4500, NP241 1993 Chevrolet C1500 Sportside, TBI 7.4L, 4L60E 2001 Chevrolet K2500HD, Ext Cab, SWB, 8.1L, ZF 6 speed 2014 Chevrolet Impala LTZ 3.6L Vortec 8.1L because life is too short to tolerate underpowered vehicles
|
|
|

|
|
|
#180 |
|
K5Camper
 Join Date: Mar 2004
Location: Pueblo, CO
Posts: 1,513
|
Re: My K5 Blazer Story.
Yeah this week sucked as far as progress goes. Thank goodness I was able to secure the prop valve and lines from the local yard. Looking at work and online NOBODY sells that stupid valve for the 90-91 RWAL systems. Even more thanks for Larry's smart thinking to figure a way to retro-grade the unobtainable ABS system out of the truck and get back to stone simple reliable basic non-abs brakes. That being said, look out for a complete ABS module and dump valve going up on Craigslist.
The transfer case is getting it's operation tomorrow at work. So by the afternoon we can get back on track.
__________________
Rob Z. 1975 K5 350/465/205/D44/12b 4" lift on 35's- RIP 1991 K5 8.1L/NV4500/241/D44/14b FWC Camper |
|
|

|
|
|
#181 |
|
K5Camper
 Join Date: Mar 2004
Location: Pueblo, CO
Posts: 1,513
|
Re: My K5 Blazer Story.
So the transfer case is done. As expected the one we pulled out was beyond junk. Lots of metal on the magnet and more crap clogging the pump pickup.
 It's just nasty inside.  Pile-o-junk. Nothing here is worth reusing. Bearings are rough to spin and the chain is stretched.  So here's the only sore spot. Shown below is the dog teeth for the low range gear, this is on the 27 spline input. This has to be reused so it will couple up to the trans. It's not as clean as what the 32 spline teeth are, but it's what I'm going to run.  Inside the 2nd t-case. The blue RTV says somebody has been here recently. Shift fork pads were all complete and in place. We did replace the 4 short ones as they were brittle, but the two blue long pads were just fine. Chain is nice too. No crap anywhere inside the case.  A mainshaft that isn't bent. Amazing.  Brakes are still being a pain. Larry and I thought it would take a short time to bleed now with the ABS out and it turned into a full afternoon of banging our head on the truck. No flow to the rear. Need to regroup. I did bring the DRAC module home to recalibrate it for the axle ratio change and bigger tires.
__________________
Rob Z. 1975 K5 350/465/205/D44/12b 4" lift on 35's- RIP 1991 K5 8.1L/NV4500/241/D44/14b FWC Camper |
|
|

|
|
|
#182 |
|
Registered User
Join Date: Dec 2010
Location: Visalia, Ca
Posts: 707
|
Re: My K5 Blazer Story.
On my 74 I had to use a vacuum bleeder at the wheels to get it to finally bleed correctly and it then would put your head in the windshield if you weren't careful but I had to remove the breeders and put some thread sealant on them to keep air from coming around them and giving me a false reading of air in the line I had tried a power bleeder on the master and got them to work but never were quite right until I tried the other bleeder
Fyi: it was my rear brakes as well and I had to keep pushing the button on the prop valve to get it to bleed
__________________
<Brandon> 1974 Chevrolet K5 Blazer 350sbc/SM465/NP205, dana44 front, corp 14bolt rear with 4.10s and a powertrax locker, custom rear bumper 400sbc in the works.  1981 GMC C1500 stepside 250i6, 3spd, 12bolt with 3.08s 2.5/4drop on 15x10 with 275/50r15 81 GMC C3500 cab-chassis dually with utility bed 350sbc, Sm465, 14bolt with 4.10s nv4500 getting ready to go in 1979 Chevrolet K5 R.I.P. http://67-72chevytrucks.com/vboard/s...d.php?t=434096 1976 Chevrolet C10 R.I.P. http://67-72chevytrucks.com/vboard/s...d.php?t=434195 |
|
|

|
|
|
#183 |
|
K5Camper
 Join Date: Mar 2004
Location: Pueblo, CO
Posts: 1,513
|
Re: My K5 Blazer Story.
I got a little bit done this morning. I went ahead and made the changes needed to have the Drac module read correctly with the tire size and gearing we have. I used the info found on this page http://tbichips.com/drac/ which was very helpful.
Here's the Drac module.  Here it is opened up. The straight jumpers are what need to be altered, here it is before.  Here it is after. I had to remove one jumper and add 3 more in different spots. We'll see if it's accurate or not! 
__________________
Rob Z. 1975 K5 350/465/205/D44/12b 4" lift on 35's- RIP 1991 K5 8.1L/NV4500/241/D44/14b FWC Camper |
|
|

|
|
|
#184 |
|
Registered User
Join Date: May 2008
Location: Alta Loma, Ca.
Posts: 930
|
Re: My K5 Blazer Story.
Looks good, sorry to hear the brakes are being a pain. I was going to suggest an adjustable valve from Summit or Jegs.
In the old days the guys would drill holes in the backing plates to keep the brakes cool and the early NASCAR drums had a bracket that practically exposed the entire rear of the braking assembly. That was for cooling on a race car. Not so great on an off road vehicle where your big problem is water retention inside the drum. That was solved by drilling small holes in the drums between the cooling fins to let heat and water out. Probably more trouble than it is worth, just some old tech and education. Keep up the good work and posting up the progress. |
|
|

|
|
|
#185 |
|
Registered User
Join Date: Nov 2000
Location: Huntsville Ontario Canada
Posts: 4,052
|
Re: My K5 Blazer Story.
Why did you choose to use a factory valve ? Any reason not to just remove the valve and replace with a adjustable one in the rear line only ? I am having problems with my 1990 suburbans valve. nearly positive its what is making my brake calipers stick on.
__________________
1968 Suburban numbers matching all original truck now equipped with 6.0/4L80 on Accuair http://67-72chevytrucks.com/vboard/s...d.php?t=625017 1967 C/20 6.0/4L80 Roofing Truck 1990 V2500 Suburban "Plow Truck" 2005 TAHOE DD |
|
|

|
|
|
#186 | |
|
Windy Corner of a Dirty Street
Join Date: Jun 2003
Location: Pueblo West, Colorado
Posts: 2,926
|
Re: My K5 Blazer Story.
Quote:
 . Removing RWAL and retrofitting to the factory OEM design of 73-89 squares seemed like the clean and most logical way of going about removing RWAL. If you notice, I am not a big fan of aftermarket crap. If anybody ever saw this Blazer they would think the 5.3L and 8 lug axles were installed at the factory and it never had RWAL in its life. . Removing RWAL and retrofitting to the factory OEM design of 73-89 squares seemed like the clean and most logical way of going about removing RWAL. If you notice, I am not a big fan of aftermarket crap. If anybody ever saw this Blazer they would think the 5.3L and 8 lug axles were installed at the factory and it never had RWAL in its life.
__________________
Current vehicle collection: 1978 Chevrolet K10, 8.1L, NV4500, NP205 1989 Chevrolet Suburban, 8.1L, NV4500, NP241 1993 Chevrolet C1500 Sportside, TBI 7.4L, 4L60E 2001 Chevrolet K2500HD, Ext Cab, SWB, 8.1L, ZF 6 speed 2014 Chevrolet Impala LTZ 3.6L Vortec 8.1L because life is too short to tolerate underpowered vehicles
|
|
|
|

|
|
|
#187 |
|
K5Camper
 Join Date: Mar 2004
Location: Pueblo, CO
Posts: 1,513
|
Re: My K5 Blazer Story.
Keeping in line with the KISS principle. Stock in this case works. We don't need the ability to adjust the rear bias. Keeping it stock limited the plumbing changes we needed to make. One less thing to fail 60 miles off pavement.
Our problem was a master cylinder that wasn't pushing fluid to the rear. Even new parts can be crap right out of the box. So I had my local NAPA store warranty the master cylinder and we installed it tonight. Even the bench bleeding went quicker, less air. I borrowed a miti-vac from one of my techs and vacuum bled the rears. We got fluid back there finally. It's not perfect, but we'll revisit after we get it running and get a feel for it.
__________________
Rob Z. 1975 K5 350/465/205/D44/12b 4" lift on 35's- RIP 1991 K5 8.1L/NV4500/241/D44/14b FWC Camper |
|
|

|
|
|
#188 |
|
K5Camper
 Join Date: Mar 2004
Location: Pueblo, CO
Posts: 1,513
|
Re: My K5 Blazer Story.
Small progress report. Larry's kicking ass with the wiring. I swear he is getting better with every truck he's done. The wiring is turning out way cleaner and neatly routed than any UAW guy back in the day would have ever done. No pics as I'll let him take better shots than ones from a cell phone. It's just very tidy and tucked away blending into the background letting the engine be the focal point under the hood. He's got fresh battery cables and money for some fuel I dropped off tonight, so getting this thing lit off isn't far from happening. He's got more wiring to do, but should be done soon. Getting exciting.
__________________
Rob Z. 1975 K5 350/465/205/D44/12b 4" lift on 35's- RIP 1991 K5 8.1L/NV4500/241/D44/14b FWC Camper |
|
|

|
|
|
#189 |
|
Registered User
Join Date: Dec 2009
Location: Fairbanks, AK
Posts: 1,830
|
Re: My K5 Blazer Story.
Exciting - getting close.
__________________
-Marcus 1991 V3500 L29 454 4L80E NP205 D60/14 Bolt 4.56's 1984 K30 292 TH400 NP205 D60/14 Bolt 4.56's flat bed 7'6" Meyer Plow 2022 Silverado 3500 L8T Project Daily Driver Project Heavy Hauler Project Plow Truck |
|
|

|
|
|
#190 |
|
Windy Corner of a Dirty Street
Join Date: Jun 2003
Location: Pueblo West, Colorado
Posts: 2,926
|
Re: My K5 Blazer Story.
Wiring updates…
As with the Polar Bear 8.1L swap, I had to dig deep into the harness hord for GM proper connector and wire colors/size to keep the wiring GM logical. Any dumchit that knows GM logic could work on this rig 25 years down the road. 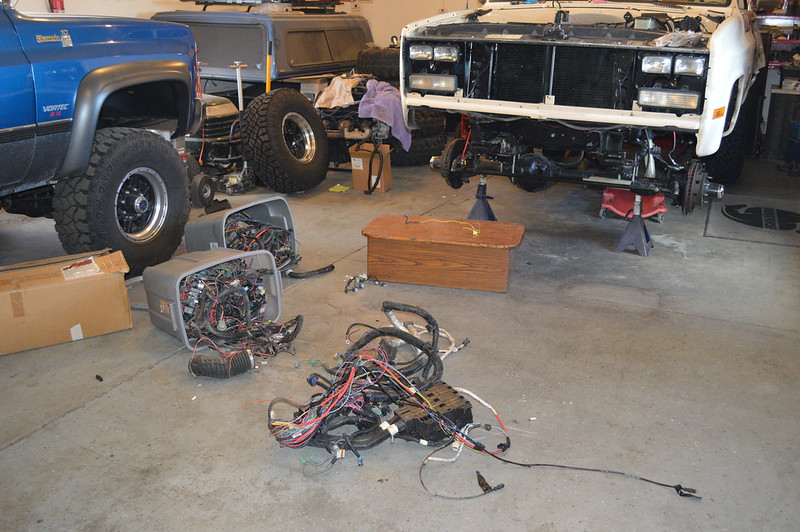 Bulk head wiring done. Working my way to the ECM and Fuel Pump relay 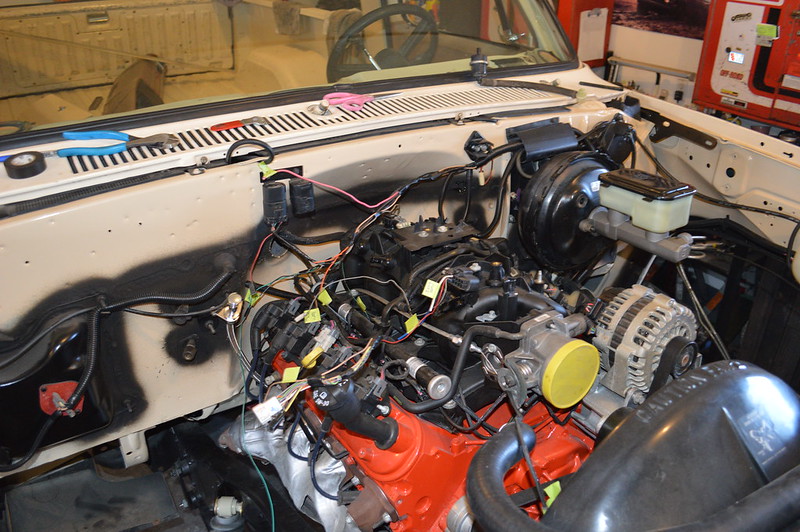 Got the MEFI-4 ECM mounted snugly under the dash. MEFI ECM’s are funny in that there are only a 2 power wires (key on and constant hot) but there are tons of grounds. I found it cleaner and easier to create a ground junction block on the ECM mounting bracket in an effort to clean up the engine bay of all the ugly grounds. There is a huge ground cable going from this junction block to the transmission bolt/stud then another going from the mounting bracket to the body. Seems like a good grounding solution. We’ll see! Also labeled everything for ease of service down the road. 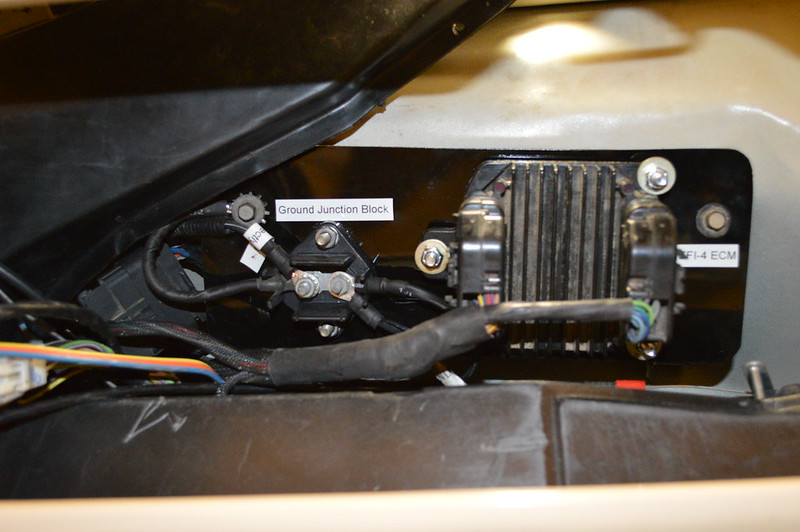 Further back shot. I test fitted the glove box to make sure the door swing would clear the ECM. Passed with flying colors! 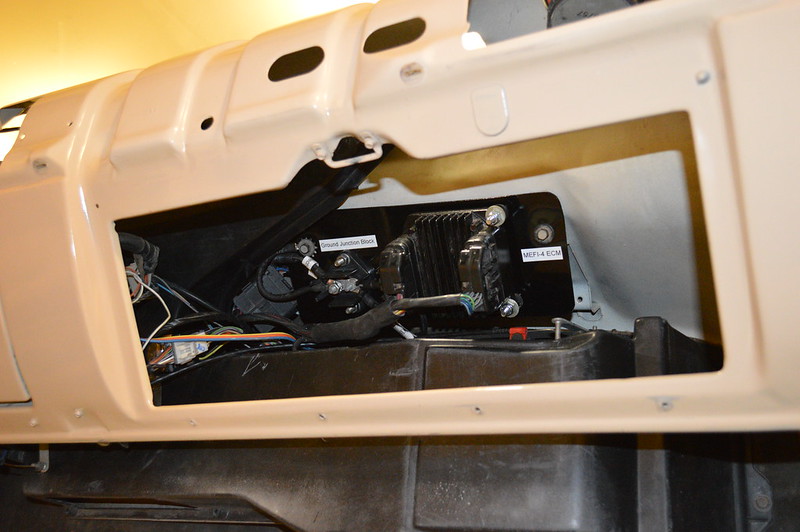 This is where I ended tonight. I plan on leaving this much exposed until after the initial fire up to make sure everything is wired correctly. The only thing left to wire up is the coolant temp sender and fuel pump. Might be able to crank this beeotch up before Thanksgiving after all! 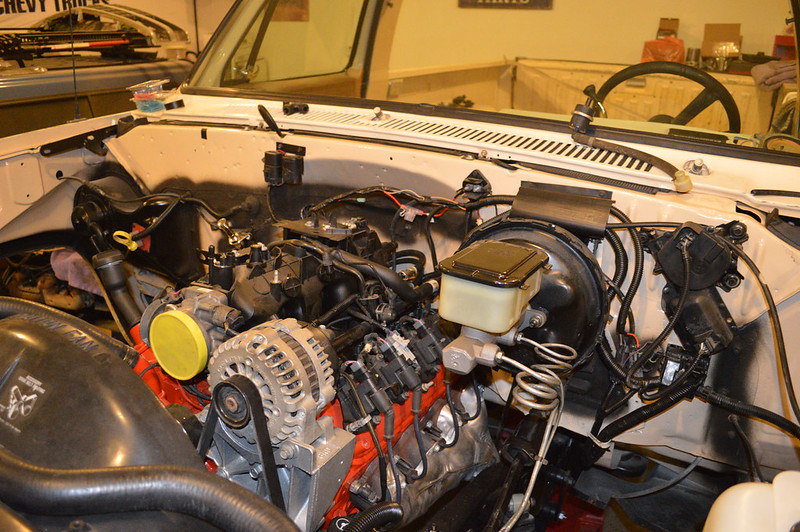 
__________________
Current vehicle collection: 1978 Chevrolet K10, 8.1L, NV4500, NP205 1989 Chevrolet Suburban, 8.1L, NV4500, NP241 1993 Chevrolet C1500 Sportside, TBI 7.4L, 4L60E 2001 Chevrolet K2500HD, Ext Cab, SWB, 8.1L, ZF 6 speed 2014 Chevrolet Impala LTZ 3.6L Vortec 8.1L because life is too short to tolerate underpowered vehicles
|
|
|

|
|
|
#191 |
|
Senior Member
Join Date: Apr 2004
Location: sw colorado
Posts: 2,720
|
Re: My K5 Blazer Story.
Looks amazing, as always.
|
|
|

|
|
|
#192 |
|
K5Camper
 Join Date: Mar 2004
Location: Pueblo, CO
Posts: 1,513
|
Re: My K5 Blazer Story.
Thanks Ryan. Larry is getting into the zone now. Wiring used to be something he dreaded but now after doing 4 trucks with complete powertrain change overs he's really good at it now. Using GM schematics will help troubleshooting if something does go wrong later. He's had no trouble on any of his other builds so I'm pretty confident this will be no different.
I did drop off some more goodies on Saturday after work. One of which was a coolant temp sensor needed for the gauge to work. There was some back and forth discussion on this subject Friday. The stock gauge uses a single wire sender that is just providing a resistance to ground for the gauge to work. The stock 5.3 sensors (which we have 2, one for the gauge and one for the ECM) use a 2 wire hookup. Reviewing the factory schematics for the 5.3 the ground is just returned back to the ECM. Now we could have used this with the right connector and ground the 2nd wire. The question was if the resistance values were the same from the old to the new for gauge accuracy. Next option was surfing the web and finding a conversion sensor on ebay or elsewhere. No time for that option as Larry needs it to be able to fill the cooling system soon. Web surfing found two more options, drill the head to a larger hole for the 3/8 npt pipe fitting needed for the 91 gauge sender or machine down the 91 sensor to the 12m x 1.5 metric hole that the head has. Talking with my ace tech at work about it, knowing he's got a metalworking lathe we hatched a plan. Now he as well as Larry was skeptical about machining the sensor down, but after what I had found online this had been done many times with good success. I ordered a new sensor from Napa and handed off to my tech to take home Friday night. Later on he sent me a text with the finished product. Seen Here:  Larry threaded it in Sat and found the correct single wire connector to hook it up with. So to all LS swapper's out there, you can use your factory gauges with your swap. We are using a stock 5.3 oil pressure sensor, just like Larry did with the 8.1's in his and with one minor adjustment, the stock coolant temp sensor too. The ECM doesn't need to see an oil psi signal and since each head has a hole for a coolant sensor, the drivers side will get the ecm sensor and the pass side gets the gauge sensor. Looking at Larry's work on the wiring is just beyond words. As his pics show everything is neat and tidy and using GM logic every step of the way. We are a couple of wire hookups and topping off fluids away from hitting the ignition.
__________________
Rob Z. 1975 K5 350/465/205/D44/12b 4" lift on 35's- RIP 1991 K5 8.1L/NV4500/241/D44/14b FWC Camper |
|
|

|
|
|
#193 |
|
Registered User
Join Date: May 2010
Location: Florissant, CO
Posts: 97
|
Re: My K5 Blazer Story.
Y'all better post a video of the initial start up. I follow all of Larry's builds as he includes an awesome amount of tech detail. Maybe I'll see you guys around since I live up in Florissant, an hour north of you.
Posted via Mobile Device |
|
|

|
|
|
#194 |
|
K5Camper
 Join Date: Mar 2004
Location: Pueblo, CO
Posts: 1,513
|
Re: My K5 Blazer Story. It's ALIVE!!
It's a little behind our self imposed timeline, but then again getting right knows no timeline. We were able to get the 5.3 lit off for the first time today. This is where Larry's attention to detail pays off. His wiring and setup of the ECM calibration allowed it to fire up on the first twist of the key. Larry took a video with his Gopro that he'll probably post up later tonight. If I know him, he's back out in the garage right now cleaning up the wiring.
So I took a quick video with my phone when I cranked it up. It's loud without the exhaust, but it settled into a nice idle. Without further delay here's the quick video I took: We really got a lot accomplished. The alternator wasn't charging so I had done some research on wiring the connector and found an issue. Larry had the bright idea to take the alternator back off and run over to autozone and get it tested since this one was never run and it came from and old co-worker at Workhorse. So I pulled it off and ran it over and it passed the test. I came back and put it back on and studied the schematics a little more. Turns out I got the pins reversed at the alternator. Swapped them around and tried it out and bingo it's charging. Other vitals on the electrical checked out, gauges started coming up and all the lights were working except the dash lighting. While Larry finalized the alternator wiring by looming it up I pulled the cluster out and figured out what I did wrong on the dash lighting. I checked for voltage with the lights on at the pin on the connector for the cluster and had power where I needed it. Turns out my LED bulbs were in backwards. Since LED bulbs are polarity sensitive I popped them out one by one and reversed them and they each came on. Still got a lot of little stuff to do, but it was sweet hearing the 5.3 rumble to life for the first time in the Blazer. Major kudo's to Larry for busting his tail to get it this far. Watch for Larry to post the better quality video of the first fire.
__________________
Rob Z. 1975 K5 350/465/205/D44/12b 4" lift on 35's- RIP 1991 K5 8.1L/NV4500/241/D44/14b FWC Camper |
|
|

|
|
|
#195 |
|
Registered User
Join Date: Dec 2009
Location: Fairbanks, AK
Posts: 1,830
|
Re: My K5 Blazer Story.
Nice work, fellas! Sounds great.
__________________
-Marcus 1991 V3500 L29 454 4L80E NP205 D60/14 Bolt 4.56's 1984 K30 292 TH400 NP205 D60/14 Bolt 4.56's flat bed 7'6" Meyer Plow 2022 Silverado 3500 L8T Project Daily Driver Project Heavy Hauler Project Plow Truck |
|
|

|
|
|
#196 |
|
Windy Corner of a Dirty Street
Join Date: Jun 2003
Location: Pueblo West, Colorado
Posts: 2,926
|
Re: My K5 Blazer Story.
Albeit a week after our target startup date of Thanksgiving, we finally got her fired up. As Rob said, the ZooK5.3L took her first big breath this afternoon. Pretty uneventful really, but I cheated and already had flashed in a 6.0L Bin file and already had it run for a second or two (literally a rotation or two) before this video was shot. Up until this video, we really didn’t know how well it would start, build oil pressure or anything. We did have some challenges getting the alternator to charge and the dash lights to work but Rob got all that sorted out.
Still got some little stuff to do before it goes to the exhaust shop. Once it comes back from the exhaust shop we can fine tune things after we can hear ourselves think……… Fire in the hole! (Don't know how to imbed videos on this forum). Never understood why posting videos here has to be to G.D. difficult. https://www.youtube.com/watch?v=9oY7WrHn0vk Zoomad himself fiddling with something. Never mind the wiring, got a lot of fine routing and clipping yet to do. 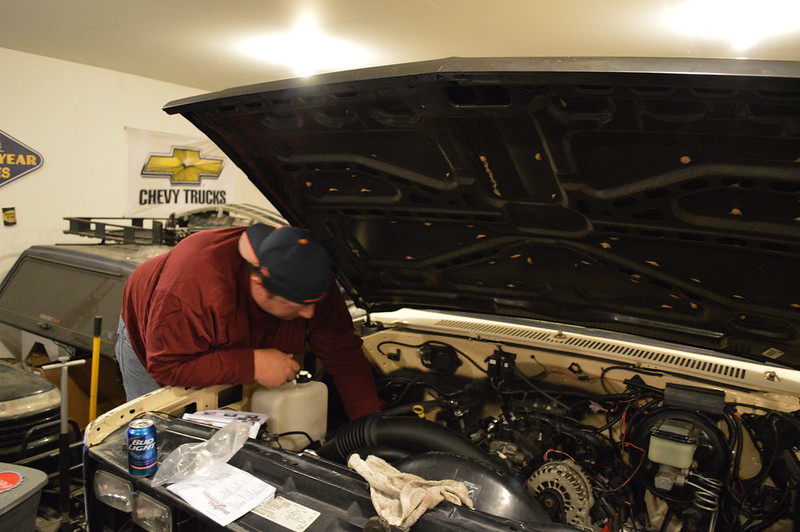 Got some wiring clean up to do, fabricate the E-brake brackets and route the cables then haul it to the exhaust shop to quieten the thing down. Once we can hear ourselves thing we can start on the fine tuning.
__________________
Current vehicle collection: 1978 Chevrolet K10, 8.1L, NV4500, NP205 1989 Chevrolet Suburban, 8.1L, NV4500, NP241 1993 Chevrolet C1500 Sportside, TBI 7.4L, 4L60E 2001 Chevrolet K2500HD, Ext Cab, SWB, 8.1L, ZF 6 speed 2014 Chevrolet Impala LTZ 3.6L Vortec 8.1L because life is too short to tolerate underpowered vehicles
|
|
|

|
|
|
#197 |
|
K5Camper
 Join Date: Mar 2004
Location: Pueblo, CO
Posts: 1,513
|
Re: My K5 Blazer Story.
Long time coming. I'm glad we made some great progress today!

__________________
Rob Z. 1975 K5 350/465/205/D44/12b 4" lift on 35's- RIP 1991 K5 8.1L/NV4500/241/D44/14b FWC Camper |
|
|

|
|
|
#198 |
|
Registered User
 Join Date: Oct 2011
Location: Wildomar, CA
Posts: 466
|
Sounds good guys! Larry you look freakin hilarious sitting in that thing with no seat! Almost like cheech in Up in Smoke. Nice work guys.
Posted via Mobile Device |
|
|

|
|
|
#199 |
|
Registered User
Join Date: May 2008
Location: Alta Loma, Ca.
Posts: 930
|
Re: My K5 Blazer Story.
Nice work! The video looks great!
I recall you did a TVS cable on this. Now I think I know why. The MEFI ecm is a marine ecm correct? So it only controls the engine and has all the same engine controls a complete car or truck ecm has but not the ABS or body control stuff right? Loading the 6.0 bin file does what actually? Increase injector on timing, timing curve or ??? How is it done and what is the advantage? I see you are reading the live scan feed on the laptop, do you use a cable or one of those Bluetooth plugins into the OBDII diagnostic port? Love the progress, thanks for posting the build pictures and videos guys! |
|
|

|
|
|
#200 | |
|
K5Camper
 Join Date: Mar 2004
Location: Pueblo, CO
Posts: 1,513
|
Re: My K5 Blazer Story.
Quote:
Keep in mind in most OEM applications the ECM does not control the ABS or body functions. That being said the main difference from the MEFI4 system to the OEM systems is the simplification. MEFI4 lacks any emissions or security system like the factory Passlock, nor does it control an automatic transmission like the stock systems do. Due to not having as many functions the MEFI wiring harness is much less cumbersome allowing Larry to "hide" it much easier than you could with the OEM harness after pruning it of the unneeded circuits. The 6.0 bin file is our baseline setup. Only reason is it's what we have. We don't have a 5.3 file. I'll be able to datalog while driving and see where the system needs tweaked. I'm betting I'll have to pull some fuel out, but if the idle quality is any indication it may not be too much. The system has great potential as you can tune and tweak to ones heart content. We plug in the system using a connector to the data link under the hood. The cable then connects via a USB port on the laptop.
__________________
Rob Z. 1975 K5 350/465/205/D44/12b 4" lift on 35's- RIP 1991 K5 8.1L/NV4500/241/D44/14b FWC Camper |
|
|
|

|
 |
| Bookmarks |
|
|