
|
Register or Log In To remove these advertisements. |
|
|
|
|||||||
 |
|
|
Thread Tools | Display Modes |
 02-24-2005, 12:25 AM
|
#1 |
|
Registered User
Join Date: May 2004
Location: Williston, North Dakota
Posts: 469
|
all I see for pictures are red Xs
__________________
Always looking for a 2wd blazer |

|

|
|
02-24-2005, 05:18 AM
|
#2 |
|
Got Blazer?
Join Date: Oct 2004
Location: Newcastle, California
Posts: 76
|
02 Silverado Seat Install
Ok Here's my install. I started with a simple task. Take 1 Blazer...fit myself and wife and 4 kids. Piece of cake. The first thing is to fit 3 across the front. I wanted to put in newer Silverado seats. I found some at a wrecker and $550 later I was on my way. Next I decided to install the seats using only the stock holes in the floor. Not a piece of cake. But fun. Anyhow, this is my first post with pics so I hope this goes ok. By the way I just bought an 02 Astro rear seat for the back. Fits perfect between the wheel wells. I'll try again to post pics of that one too.
Tell me what you think... Here is a pic of the brackets I made to mate the seats to the stock holes. 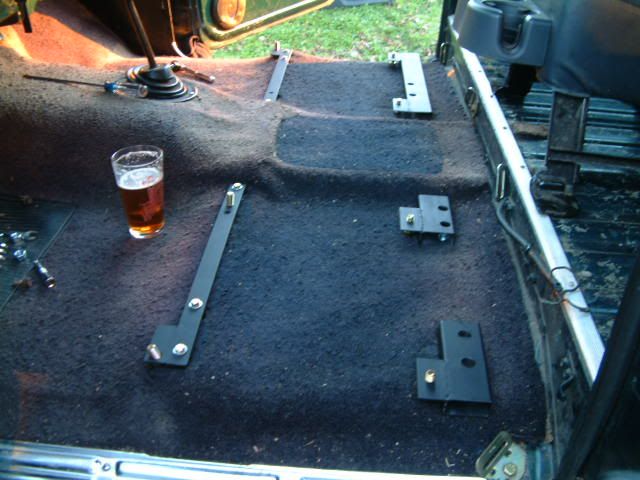 Here is a side shot of the drivers side and how it sits on the brackets. 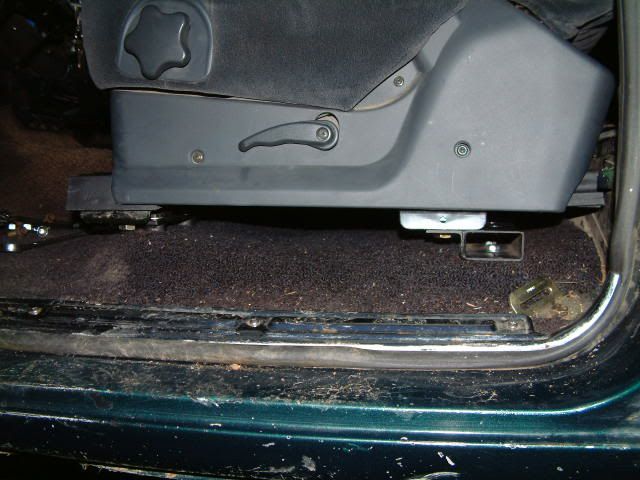 Here is a shot with the passage to the back. I can fit through well. I'm 6'1'' 190. Oh and if you're taller than I am I'd do something different. These may sit you up too high. 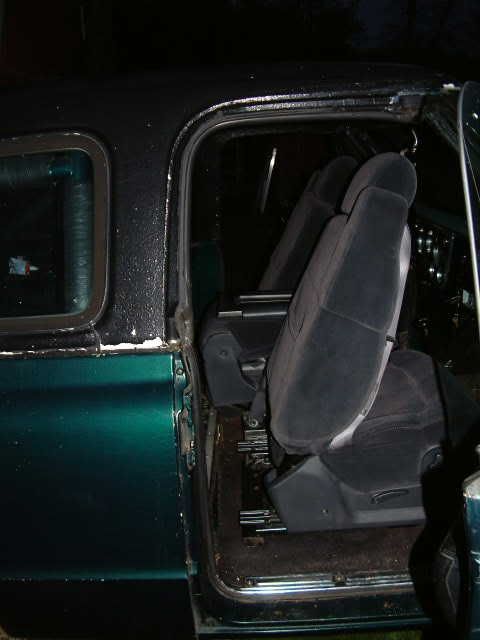 Here are a couple of shots with them in. They are so very comfortable. Sholder belts too. And lumbar supports. NOT electric. 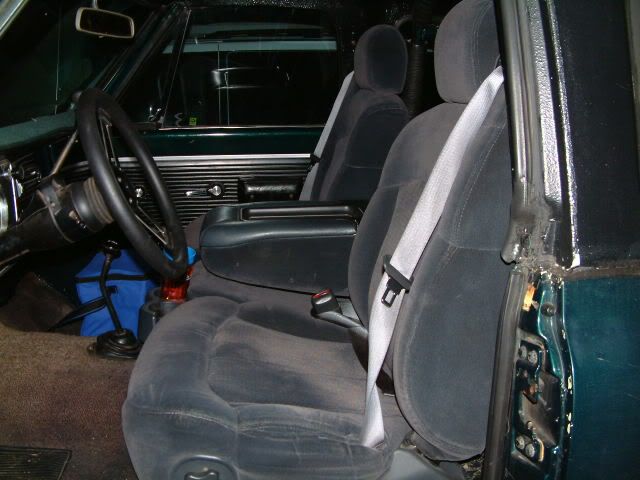 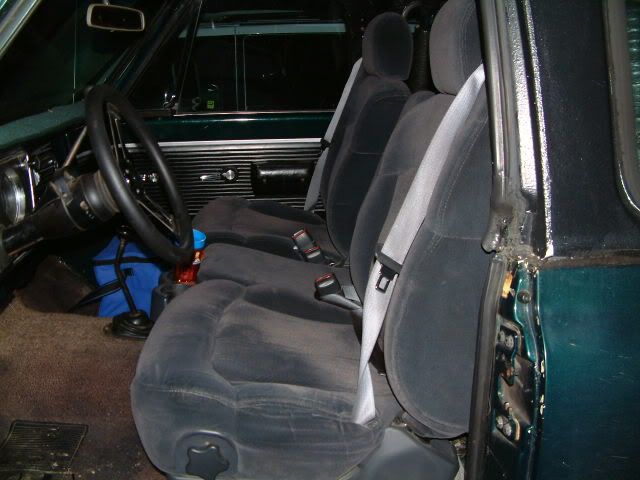
Last edited by DruBlazer; 02-24-2005 at 11:00 AM. |
|
|
|
|
02-24-2005, 05:50 AM
|
#3 |
|
C10 Club Tennessee
Join Date: Mar 2003
Location: White House, TN 37188
Posts: 8,281
|
Pics didn't make it. If you can try again I'd appreciate it. I have some out of a 2000 Silverado and I'm going to tackle this job in the coming weeks.
__________________
Bryan www.gmtruckshow.com Project "Andes"-Halen's First Truck Project: Patina Burb for he is Gods servant for your good. But if you do wrong, be afraid, for he does not bear the sword in vain. For he is the servant of God, an avenger who carries out Gods wrath on the wrongdoer. Romans 13:4 |
|
|
|
|
02-24-2005, 11:02 AM
|
#4 |
|
Got Blazer?
Join Date: Oct 2004
Location: Newcastle, California
Posts: 76
|
Pics reloaded
Ok. So then what you're telling me is that I actually need to read the pic posting instructions. Doh! Here they are. Reload.
|
|
|
|
|
02-24-2005, 11:20 AM
|
#5 |
|
Designated A-hole!
Join Date: Mar 2003
Location: South Mississippi
Posts: 36,448
|
Thanks for the inspriation!
__________________
"If it ain't broke, fix it 'til it is!" Being stupid ain't illegal. ") We're Still Debt Free Except for the House!!! www.daveramsey.com 70 GMC SWB Stepside project "Green Booger" soon to be 6.0l/4l80e 93 S-10 "Poppaw's Truck" |
|
|
|
|
02-24-2005, 11:24 AM
|
#6 |
|
SKINNY TIRES RULE!
Join Date: Sep 2001
Location: Bothell, WA
Posts: 11,038
|
That looks good. Are you going to put two rows of seats in the back? I'd think there would be room if you move the first row forward of the stock position (kids don't need much leg room) and one all the way to the back.
Welcome to the board from the Pacific Northwest. Post some exterior pics of your rig when you get a chance.
__________________
bouncytruck 1972 K5 The Hauler 1994 K1500 Suburban The Daily2010 Kia Soul Wife's Ride2014 Fiat 500L |
|
|
|
|
02-24-2005, 11:31 AM
|
#7 |
|
Got Blazer?
Join Date: Oct 2004
Location: Newcastle, California
Posts: 76
|
Rear seats
I'm just going to do the one seat. I'd like to keep the cargo room. Plus the kids are little so they can fit three across and be comfortable.
|
|
|
|
|
02-24-2005, 12:00 PM
|
#8 |
|
Registered User
Join Date: Mar 2004
Location: Sacramento, CA
Posts: 1,083
|
Nice job on the brackets, the seats look great.
Welcome from Fair Oaks.
__________________
'71  Jimmy, 350, SM465, NP205, 2in Tuff Country lift, 33s on rallies, TBI, softtop and hardtop Jimmy, 350, SM465, NP205, 2in Tuff Country lift, 33s on rallies, TBI, softtop and hardtop"If life was fair you'd be able to afford one of each and a garage large enough to house them all." |
|
|
|
|
02-24-2005, 01:56 PM
|
#9 |
|
Registered User
Join Date: May 2004
Location: Williston, North Dakota
Posts: 469
|
Is that a beet in the first picture?
nothing like working on a car, and having a nice cold beer with it 
__________________
Always looking for a 2wd blazer |
|
|
|
|
02-24-2005, 01:57 PM
|
#10 |
|
Got Blazer?
Join Date: Oct 2004
Location: Newcastle, California
Posts: 76
|
Yes, it does help the process.
|
|
|
|
|
02-24-2005, 07:08 PM
|
#11 |
|
C10 Club Tennessee
Join Date: Mar 2003
Location: White House, TN 37188
Posts: 8,281
|
Where did you get the brackets?
__________________
Bryan www.gmtruckshow.com Project "Andes"-Halen's First Truck Project: Patina Burb for he is Gods servant for your good. But if you do wrong, be afraid, for he does not bear the sword in vain. For he is the servant of God, an avenger who carries out Gods wrath on the wrongdoer. Romans 13:4 |
|
|
|
|
02-24-2005, 11:14 PM
|
#12 |
|
Got Blazer?
Join Date: Oct 2004
Location: Newcastle, California
Posts: 76
|
I made all of the brackets.
|
|
|
|
|
02-24-2005, 11:49 PM
|
#13 |
|
Registered User
Join Date: May 2000
Location: Petrolia,Ontario,Canada but working in Port Huron,Mi.
Posts: 1,772
|
Awesome work man!
Better get some templates made up because your gonna get a TON of requests for them. Again,nice job,great pic's
__________________
71 blazer,350SBC,approx.375HP,700R4,factory GM TPI.Dual electric fans,33x12.5x15 ATR on stock suspension. Petrolia,Ontario,Canada but working in Port Huron,MI. See ALL my Blazer pic's HERE |
|
|
|
|
02-25-2005, 02:38 AM
|
#14 |
|
C10 Club Tennessee
Join Date: Mar 2003
Location: White House, TN 37188
Posts: 8,281
|
I'll be the first to want them then. How much to make them?
thanks,
__________________
Bryan www.gmtruckshow.com Project "Andes"-Halen's First Truck Project: Patina Burb for he is Gods servant for your good. But if you do wrong, be afraid, for he does not bear the sword in vain. For he is the servant of God, an avenger who carries out Gods wrath on the wrongdoer. Romans 13:4 |
|
|
|
|
02-25-2005, 08:35 PM
|
#15 |
|
Registered User
Join Date: Oct 2003
Location: Central Vermont
Posts: 8,537
|
Nice work!
I put some seats like those from an 03 Tahoe in mine too. Okay, so it's a burb not a blazer...that's next. Last edited by vtblazer; 02-25-2005 at 08:39 PM. |
|
|
|
|
02-26-2005, 12:00 PM
|
#16 |
|
Got Blazer?
Join Date: Oct 2004
Location: Newcastle, California
Posts: 76
|
Hey vtBlazer
Nice! They're a bit more comfortable huh? Did you directly bolt them to the floor or did you bracketize too?
|
|
|
|
|
02-26-2005, 04:15 PM
|
#17 | |
|
Registered User
Join Date: Oct 2003
Location: Central Vermont
Posts: 8,537
|
Quote:
I just did the quick and dirty method, mounted them to the existing front mounts and put a small spacer under the rear that bolts to the rear mounts. Your brackets look alot nicer/cleaner, I'll do it that way when I put the next set in my blazer. Once again, nice work. |
|
|
|
|
|
03-01-2005, 06:25 PM
|
#18 |
|
Registered User
Join Date: Jun 2004
Location: richland
Posts: 36
|
How hard is it to slde behind the passenger seat to get into the back

|
|
|
|
|
03-02-2005, 12:13 PM
|
#19 |
|
Got Blazer?
Join Date: Oct 2004
Location: Newcastle, California
Posts: 76
|
It's not too bad. One of the pics shows the seat folded up and slid all the way forward. I'm a pretty wide sholdered guy and I can squeeze through with little problem. I was actually shocked at how easy it was. I thought it would be harder.
|
|
|
|
|
03-02-2005, 01:26 PM
|
#20 |
|
Registered User
Join Date: May 2004
Location: Williston, North Dakota
Posts: 469
|
Did you make the brackets from scratch? Or did you use something as a base and then build from that? I want to put tahoe/burb/escalade power heated seats...and I am sure I will run into some of the same problems you did, so any ideas for the brackets would be great...
thanks Lenny
__________________
Always looking for a 2wd blazer |
|
|
|
|
03-02-2005, 02:08 PM
|
#21 |
|
Got Blazer?
Join Date: Oct 2004
Location: Newcastle, California
Posts: 76
|
Tips
Well... Here's what I did. And yes, they are all from scratch. The first thing I did was poor a pint. Drink it. Then poor another. Then I got started. I wanted to get the brackets up off the floor so I could put the seat bolts up through the brackets. So in the front, the strip steel you see has standoffs I made of tube steel at each of the mounting points to the cab. On the outside front mounting points the hole for the seat lands pretty close to the outside stock hole. So the outside rails are slid forward 1 place so I could use a separate mounting point. It still slides up and back far enough. I hope all of this helps. Let me know if you need more tips.
|
|
|
|
|
03-02-2005, 04:36 PM
|
#22 |
|
Registered User
Join Date: May 2004
Location: Williston, North Dakota
Posts: 469
|
I like the pint part the best....haha
thanks... I might send you a PM when I get to that point...if that is ok
__________________
Always looking for a 2wd blazer |
|
|
|
|
03-02-2005, 05:12 PM
|
#23 |
|
Got Blazer?
Join Date: Oct 2004
Location: Newcastle, California
Posts: 76
|
No problem Tryfelynn. I look forward to sharing.
|
|
|
|
|
03-03-2005, 11:41 PM
|
#24 |
|
Cause the Chicks DIG IT!!
Join Date: Nov 2003
Location: Beaufort SC
Posts: 509
|
Man why didn't i see this post last week. DOHH!! You're brackets look alot schnazzier than my holes drilled in the floor and small 1/2 inch risers on the outside front corner of the seat brackets.
|
|
|
|
|
03-04-2005, 10:17 AM
|
#25 |
|
'71 Chevy Blazer
Join Date: Jan 2005
Location: San Leandro, CA (near Oakland)
Posts: 96
|
congrats Drublazer, the seats look great. and your brackets are very clean. i got a quick question. how are the shoulder harnesses mounted? i was planning on eventually swapping in newer front buckets and i was wondering how i would mount the shoulder harnesses. i thought about welding a mount to my roll bar... how did you do it?
__________________
'71 K5 Blazer (new project / daily driver) "If you are not working to improve the situation, you have no business complaining" |
|
|
|
|
| Bookmarks |
|
|


 Linear Mode

