
|
 01-09-2006, 11:49 PM
|
#1 |
|
Outlandish Trends - FL
Join Date: Jul 2005
Location: Orlando
Posts: 1,396
|
In-dash tach install
Well, I started my project of installing an in-dash tach tonight. I had purchased a 3-3/8" Autometer Sport-Comp 3991 tach on ebay. The wife went out w/ the girls tonight so I started in on it.
1. First, I had to remove the entire gauge cluster. Since I have a '67, I had to remove the choke cable. I disconnected it at the carb and then undid the nut on the back of the bezel 2. I then had to disconnect the light switch & wiper switch assemblies. The wiper assembly was a little confusing until I found the little lock screw up under the knob to remove that.  3. Once the above was done, I disconnected the main wiring prong from the printed circuit. This just pulls out after you squeeze the 2 prongs together. Then disconnected the speedometer & oil pressure lines. That's it for everything behind the cluster. All that's left is to unscrew the bezel screws and the clip that wraps under the column and it just comes right out. OK, that was the easy part! Time to start disassembling the cluster. There's a bunch of 1/4" hex head screws that hold the bezel onto the cluster. I removed them and separated the bezel from the cluster. There's basically 4 main pieces to the gauge cluster, the bezel, the glass (plastic), rear main piece (the printed circuit is on the back of this) and the front inner frame (black on one side & green on the inside) <----this is what guys are painting white to reflect the light better. I'll be doing this as well. Here's pictures of everything separated (keep in mind I've already cut stuff so yours won't look like this at first:  OK, now the fun part begins. LET THE CUTTING BEGIN!! My tool of choice was a dremel with a cut-off wheel. First I cut the inner metal bezal that sits right behind the plastic bezel. I used the cut-off wheel on the dremel and then rounded it out with a drum sanding disc.  After this is done, I realized that the prong for the lights on the back of the tach was going to stick out too far for the rear of the cluster so I had to notch that out as well for clearance:  I thought I'd be able to just get away with that, and not have to cut the printed circuit, but it wouldn't stretch much and I didn't want to damage it so I had to notch that as well. I used an exacto knife for this, being careful to stay away from the circuitry.  After this, I still need to cut the clear plastic panel in the tach area. I put it behind the bezel and scribed a line around with a Sharpie. Not sure exactly what I'm going to use to cut the plastic without damaging it. I have to think about that a little. It's pretty brittle at almost 40 years old. I then fit everything together as sort of a mock-up to make sure it would all fit back together. Here's where I'm at now: 
__________________
-Bret 67 short-fleet sold! Last edited by 67Fleet; 01-10-2006 at 08:10 PM. |

|

|
|
01-09-2006, 11:57 PM
|
#2 |
|
Oil trash and damn proud of it
Join Date: Aug 2005
Location: Williston, ND
Posts: 1,993
|
Re: In-dash tach install
awesome! sounds like a sweet deal, now hurry up and give up some pictures!

__________________
Mark 1997 K1500 Z71, 14 bolt SF 3.73 posi, Bright Blue Metallic. 6" Superlift 1972 C-10, toolbox, p/s, 350/TH350/3.73 open, black int., bronze 2008 Dodge MegaCab. H&S tuned 6.7 Cummins. Fast Four Tons Some of my pics http://s107.photobucket.com/albums/m294/69-350/ |
|
|
|
|
01-10-2006, 12:04 AM
|
#3 |
|
Registered User
Join Date: Feb 2005
Location: Carl Junction, Missouri
Posts: 2,061
|
Re: In-dash tach install
but we know all that, grrr, now i have to come back and see how you finsihed it. good luck
|
|
|
|
|
01-10-2006, 01:23 AM
|
#4 |
|
Senior Member
Join Date: Nov 2005
Location: northwestern wi
Posts: 2,111
|
Re: In-dash tach install
i pulled my dash today too lets see the pics
__________________
common sense isn't so common anymore |
|
|
|
|
01-10-2006, 05:08 AM
|
#5 |
|
Designated A-hole!
Join Date: Mar 2003
Location: South Mississippi
Posts: 36,448
|
Re: In-dash tach install

__________________
"If it ain't broke, fix it 'til it is!" Being stupid ain't illegal. ") We're Still Debt Free Except for the House!!! www.daveramsey.com 70 GMC SWB Stepside project "Green Booger" soon to be 6.0l/4l80e 93 S-10 "Poppaw's Truck" |
|
|
|
|
01-10-2006, 10:10 AM
|
#6 |
|
Registered User
Join Date: Jan 2000
Location: Michigan
Posts: 312
|
Re: In-dash tach install
Hey, you are on your way to having a nice FAQ submission. Very nicely done, so far.
__________________
Chuck 1972 C-20 Longhorn 402 BB .030" over (409?), curved HEI, RV cam, quadrajet, dual 3" exhaust, TH 400 ported w/shift kit 1999 K1500 Suburban (old style) 5.7L Vortec 4L60E "No matter where you go, ........ there you are" |
|
|
|
|
01-10-2006, 10:37 AM
|
#7 |
|
Dork For Days
Join Date: Aug 2005
Location: Dallas
Posts: 407
|
Re: In-dash tach install
  
__________________
1972 C20, 402/700R4 - My first classic truck, bought in September 2005. 85% transformed from "Farm" to "Cool" status!  1970 Dodge Challenger 440, 4sp (my other toy) 12.67 @ 117 MPH, with a pathetic 2.022 60' 2007 Dodge Charger SRT-8 2008 Cadillac CTS All-American garage, baby! |
|
|
|
|
01-10-2006, 08:17 PM
|
#8 |
|
Outlandish Trends - FL
Join Date: Jul 2005
Location: Orlando
Posts: 1,396
|
Re: In-dash tach install
Told you guys I'd have pics up tonight! It's amazing at how dirty the backround letters & markings get on the gauges. Look at how nasty the volt meter & oil pressure gauges look. I need to clean those up with some mild soap and water. It's probably not a good idea to use any solvents or chemicals on something this old as it might just remove all the lettering. Before everything goes back together for the last time I need to clean up every piece thoroughly, and then paint the inside of the inner cluster pieces a nice bright white so the light reflects brighter. This has actually been a bit easier than I thought it would be going into the project. I could probably get it done tonight if I wanted to, but I think I'm going to save the rest for this weekend when I can give it 100% of my efforts. I'll update as I finish. Hope this helps some of you guys.
__________________
-Bret 67 short-fleet sold! Last edited by 67Fleet; 01-10-2006 at 08:17 PM. |
|
|
|
|
01-10-2006, 08:26 PM
|
#9 |
|
Registered User
Join Date: Feb 2005
Location: Carl Junction, Missouri
Posts: 2,061
|
Re: In-dash tach install
i thought i was in that picture with your hand (the hair and shiny watch, quite similar to me) good work!
Last edited by matthufham; 01-10-2006 at 08:27 PM. |
|
|
|
|
01-10-2006, 08:28 PM
|
#10 |
|
Car O'Holic
Join Date: Jan 2005
Location: Austin, Tx.
Posts: 692
|
Re: In-dash tach install
that looks NICE!
|
|
|
|
|
01-10-2006, 08:29 PM
|
#11 | |
|
Outlandish Trends - FL
Join Date: Jul 2005
Location: Orlando
Posts: 1,396
|
Re: In-dash tach install
Quote:
__________________
-Bret 67 short-fleet sold! |
|
|
|
|
|
01-10-2006, 10:13 PM
|
#12 | |||
|
Union Electrician
Join Date: Feb 2005
Location: Louisville, Ky.
Posts: 3,354
|
Re: In-dash tach install
looks great so far!!! keep up the good work, watch out on using water on the speedo and fuel gauges as you can easily wipe off the markings. I haven't ever had that problem with the temp,batt,oil gauges.The dremel and cut off wheeel will do the lens as well, done it before installing the tach the same way, with the exception I didn't have to cut anything and it was a autometer pro comp series. I just cut the inner tin and then the lens(watch out for flying hot plastic, and don't forget your ppe, gloves glasses) I ran the wiring out by drilling a 7/8" hole in the backing plate between where the oil pressure gauge plate and the printed circuit.
Popped a 1/2" plastic bushing for protecting the wires and it turned out really nice. I didn't need to cut the backing plate as I used the dreel tool to trim down the chrome ring in the hole you are mouting the gauge too on the inside of the bezel cut if off flush from behind the bezel, so that it was easier to install and move the rear mounting parts inside the dash to avoid the cutting of the backing plate and printed circuit issue Randy
__________________
 69 Custom-10 SWB FLEETSIDE 350/350 TH Dropped 3.5/5.5" 69 Custom-10 SWB FLEETSIDE 350/350 TH Dropped 3.5/5.5"Help support the board->HERE Board vendors -> Vendors list Zip:40272 Big Sandy Survivor... Quote:
Quote:
Quote:
Last edited by byrd; 01-10-2006 at 10:16 PM. |
|||
|
|
|
|
01-16-2006, 09:34 PM
|
#13 |
|
Outlandish Trends - FL
Join Date: Jul 2005
Location: Orlando
Posts: 1,396
|
Re: In-dash tach install
Well, got some more work done on my gauge cluster yesterday and this evening. It's all ready to go back into the dashboard now. I painted the inside of the inner bezel gloss white, replaced all the bulbs with new ones, cleaned everything, cut the glass with a plastic dremel cutting bit, and mounted the tach. Here's some pics. (the pic with the tach mounted was only in the mock-up stage and wasn't tightened down so it's not centered up yet).
 
__________________
-Bret 67 short-fleet sold! |
|
|
|
|
01-16-2006, 09:50 PM
|
#14 |
|
67-72 Addict!
Join Date: Feb 2002
Location: The TAX State!
Posts: 7,856
|
Re: In-dash tach install
Nice job. Now paint the needles on your cluster to match the tach and it will look even better.
__________________
Jim 1970 C/10 Fleetside w/Ghost Flames Lowered 4.5" front and 4" rear (Raked) 355/350 Turbo w/shift kit 10" Redneck Performance Verter w/2500 stall Hooker Super Comps part#2808-1 Performer RPM Air-Gap 12 Bolt w/3:73 gears- Eaton Posi Comp Cams XE262 with 1.6 Crane Energizers, Road Demon 625 and Brodix IK 180 heads |
|
|
|
|
01-16-2006, 10:18 PM
|
#15 |
|
Cantankerous Geezer
Join Date: Aug 2002
Location: Bel Aire, KS
Posts: 6,264
|
Re: In-dash tach install
I would think about outlining the gauges with aluminum paint that matches the tach. Or paint the silver of the tach black. Make it so the tach doesn't stand out.
__________________
Fred There is no such thing as too much cam...just not enough engine.
|
|
|
|
|
01-18-2006, 06:16 PM
|
#16 | |
|
Outlandish Trends - FL
Join Date: Jul 2005
Location: Orlando
Posts: 1,396
|
Re: In-dash tach install
Quote:
__________________
-Bret 67 short-fleet sold! |
|
|
|
|
|
01-22-2006, 06:27 PM
|
#17 |
|
Outlandish Trends - FL
Join Date: Jul 2005
Location: Orlando
Posts: 1,396
|
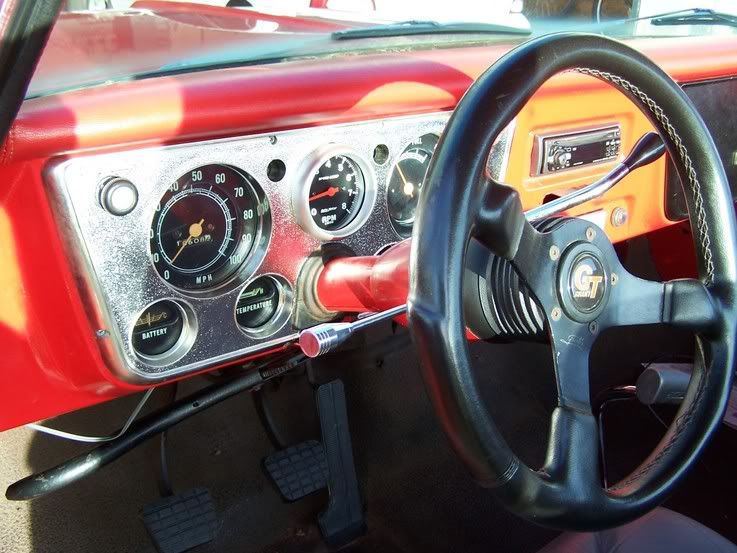
Re: In-dash tach install
Well, here it is in all it's glory! I decided to use the new cluster's chrome bezel that I got. When I took it apart, what did I find? A vaccuum gauge! So it's all installed in the truck now. I still need to figure out what I'm going to do with my wiper switch assembly. It won't reach to the other side and so I'm thinking about drilling a hole below the headlight switch with a hole saw. If anyone has any questions or suggestions, feel free to post away.
__________________
-Bret 67 short-fleet sold! |
|
|
|
|
01-22-2006, 06:35 PM
|
#18 |
|
its all about the +6 inches
Join Date: Jan 2001
Location: Hilliard Ohio
Posts: 2,690
|
Re: In-dash tach install
Now you need a chrome glove box door to ballance it all out.
Looks good. |
|
|
|
|
01-22-2006, 06:37 PM
|
#19 | |
|
Outlandish Trends - FL
Join Date: Jul 2005
Location: Orlando
Posts: 1,396
|
Re: In-dash tach install
Quote:

__________________
-Bret 67 short-fleet sold! |
|
|
|
|
 |
| Bookmarks |
|
|


 Linear Mode

