
 |
|
|
|
Register or Log In To remove these advertisements. |
|
|
|
|||||||
|
|
Thread Tools

|
Display Modes

|
|
|
#1 |
|
Designated A-hole!
Join Date: Mar 2003
Location: South Mississippi
Posts: 36,448
|
Martinsr's "Basics of Basics" Seam sealer
“Basics of Basics” Seam Sealers.
By Brian Martin Applying seam sealer is one of the most important things you will ever do on your car. Not only does it keep out moisture, it can keep it IN if done improperly. It also many times has an ascetic purpose. To get it looking as close to the original sealer looked, means your repair work is less noticeable. Nothing looks worse than the new left quarter panel seam sealer in the trunk gutter looking completely different than the original right side! Even a housewife who knows nothing about cars will spot it. The products; There are too many product names to list. But if you go to your source for automotive body repair and paint supplies you will be able to get one to do the job. What it comes down to is 1K or 2K. Most 1K products are going to air dry basically. It is going to be in a tube, either a toothpaste size tube or a large cartridge you put in a special applicator. I will use 3M products as an example. Only because they are the most common found. They are by no means the best, or the only products available. 3M “Drip Chek” sealer (08531) in a toothpaste tube is the starting point. It used to be pretty common around body shops, you don’t see it much any more, very old technology. It really should be left in the store, move up to something better. Moving up to 3M “Fast n’ Firm” (08505) will hold up a lot better, shrink a lot less and is just miles better. It uses a normal old chalking gun that can be found for only a few bucks. But spring for a good one, you will be glad you did. 3M “Ultrapro” urethane (08361) is a moisture curing sealer that is pretty hard to beat. It takes a special applicator that is kinda pricy but well worth the money. The 2K products are the way to go for the highest of quality. They are chemically curing and will be insoluble, resisting water, oil, fuel, thinner, just about anything. Yes, they cost a heck of a lot more, yes they need a special applicator which costs a heck of a lot more, but they are light years better than 1K (save for the Ultrapro, that is a darn good product). Something like 3M Automix Seam sealer – Heavy bodied (08306) has virtually zero shrinkage, kicks fast, it’s paintable, sandable, it will out last you and I. Again, there are zillions of brands out there that are just as good or better, I only used these numbers as reference. You want to look at where you are seam sealing, duplicating the factory usage is the best way to go. Don’t get to creative or you could very well be sealing IN moisture. Unless you fully understand where you are putting it on seams, stay clear of anything but where it was from the factory. Apply it over a good primer, anything that you wouldn’t want to paint over, you certainly don’t want to seam seal over. That is a good rule, prime it, clean it, all as if you were going to paint before seam sealer. It’s a good idea to bead some out and then “dress it” with some pressure, either by finger (in a latex glove of course) or with a brush. If the area is small, a little “acid brush” is the way to go. They are very inexpensive, just spread out your sealer and toss the brush when done. You can also use the disposable paint brushes, but you will usually have to cut the bristles shorter so you can apply that pressure to the sealer and not only just “spread it around”. When spreading out seam sealer, be extra careful that you do in fact TOTALLY seal it. This is a common mistake, the sealer is spread out but on a spot or two there is a small gap over a seam, or the sealer isn’t pressed down and feathered out on an edge. These tiny flaws can mean a total failure. You MUST be sure that it is in fact SEALED. If you look at original seam sealer, it is usually applied pretty liberally. If it is not going to be seen like under carpet or mats, don’t be cheap, apply a lot and spread it out. Photo A, for this display of seam sealer techniques I grabbed a bumper reinforcement out of the garbage.  Photo B, This shows the seam masked up for a narrow seam sealer strip. This is the cool thing; you can take your time and mask it up just as you would for painting and seal only what you want. This method works well when seam sealing something like a rocker to quarter seam on a sixties Chevelle or Camaro. Or down the bed seam on a 75ish Ford pickup. You know, those thin seams where the two panels are together. Photo D (ok I mess up the order of photos. J) shows a close up of this masking.  Photo C shows the seam sealer applied and me rubbing my finger along the seam pressing the sealer into the crack and thinning its edges. Sealing the seam it’s self is all that is needed, having it all over the place is not. And when you press it into to seam, you are sure to seal it. 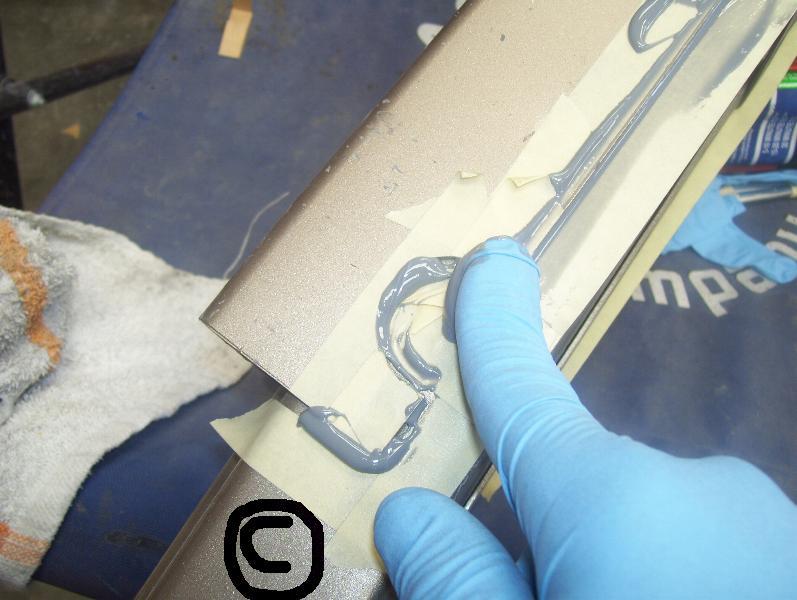 Photo E is the finished product. Now, at this point you could put some wax and grease remover on your finger and rub it over the seam sealer to really thin the edge out. If it was a seen spot like that rocker to quarter or the rear tail panel to quarter on a 1st series Camaro you would want to smooth it out like that. But even then, if you keep the seam sealer down to a small strip right down in the groove it looks pretty clean to just leave it alone.  Photo F it’s masked up for a wide seam sealer application. This is for a quick application and works like a charm on floor pans or something like that, anywhere that will isn’t so critical. It is about a quarter inch from the seam on each side of it. But you could do it any way you want. On late model cars I will do this about a half inch on each side of the seam on the rear body panel for instance, it looks just like the original.  Photo G I put a liberal amount of sealer and then I am brushing it back and forth side to side. It leaves a “bead” like of look like a large weld. This is how many late model cars are applied with a robot doing the work. 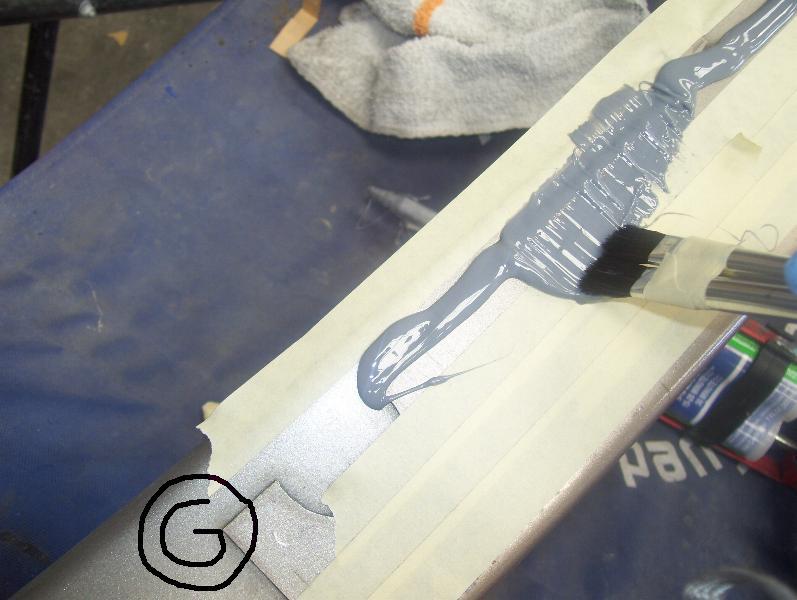 Photo H is the finished product; on the left side it is brushed back and forth for the “bead” look. On the right side it is brushed with the seam. The ends are simply done with a finger, pressing the sealer down and thinning it out to an end. 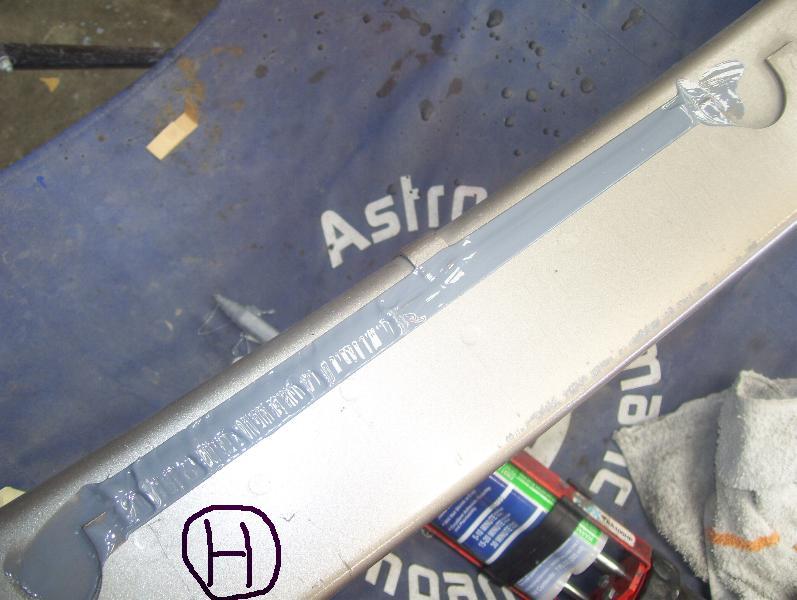 Photos I thru Na is an example of matching the seam sealer on a Toyota door, it shows what you can do, which is just about anything, to match existing seam sealer or make it look how you want. Photo I is masked ready for sealer. The tape was ran just a 1/16” inch or so on the outside of the seam on the skins folded edge. The inside tape was ran about 3/16” on the inside of the seam where the skins folded edge meets the shell. You can see where the inside tape was stopped at the corner. You can see in later pictures why this was done. 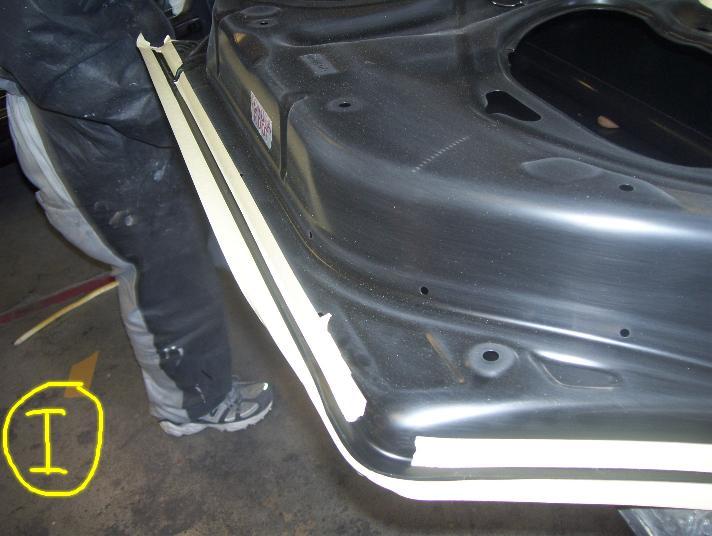
__________________
"If it ain't broke, fix it 'til it is!" Being stupid ain't illegal.  We're Still Debt Free Except for the House!!! www.daveramsey.com 70 GMC SWB Stepside project "Green Booger" soon to be 6.0l/4l80e 93 S-10 "Poppaw's Truck" |
|
|
|
|
#2 |
|
Designated A-hole!
Join Date: Mar 2003
Location: South Mississippi
Posts: 36,448
|
Re: Martinsr's "Basics of Basics" Seam sealer
Photo J the sealer is applied, no need to be neat here! Just get it on there, run a bead and don’t worry what it looks like. Remember, some of these 2K sealers can kick pretty quickly. You want to get it on, “work” it out how you want before it kicks. So running the bead when you have it masked up doesn’t take any time, just get it on there.
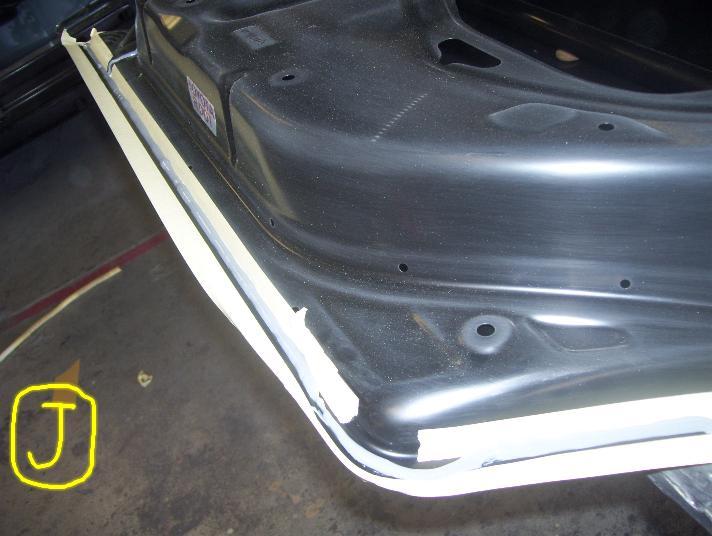 Photo K the sealer is brushed out. Press down lightly on the brush so the sealer is forced down into the seam. But not too hard, you want the edges of the sealer to be a little thick so it looks like a “bead” when you unmask. You could apply a smaller bead, press that in with your finger, then apply another bead and brush it lightly to build up a good bead. When unmasked while sealer is still not kicked, it will flow down a little and leave a very nice factory looking bead. 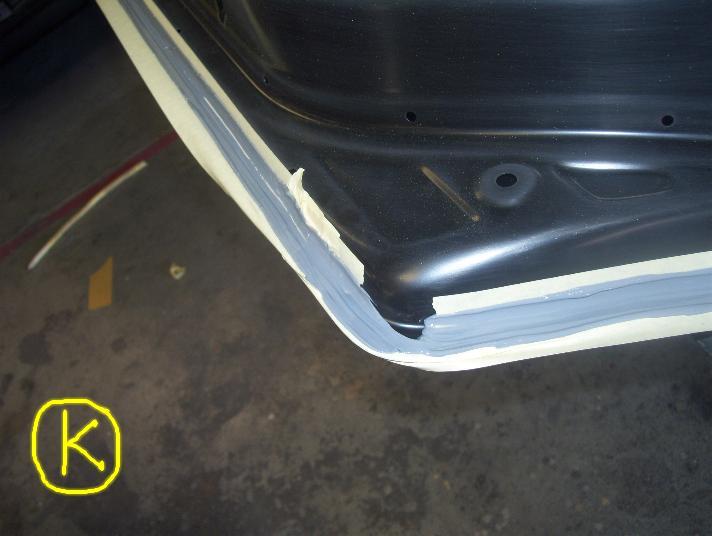 Photo L is me cutting across the corner with my finger. Remember, this isn’t is for a late model car and getting it close is all that is needed, no need to go nuts. 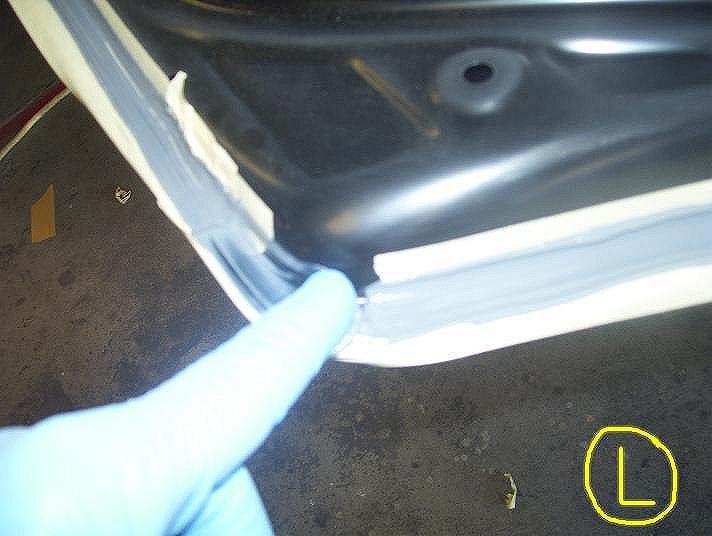 Photo M shows the door finished and unmasked. 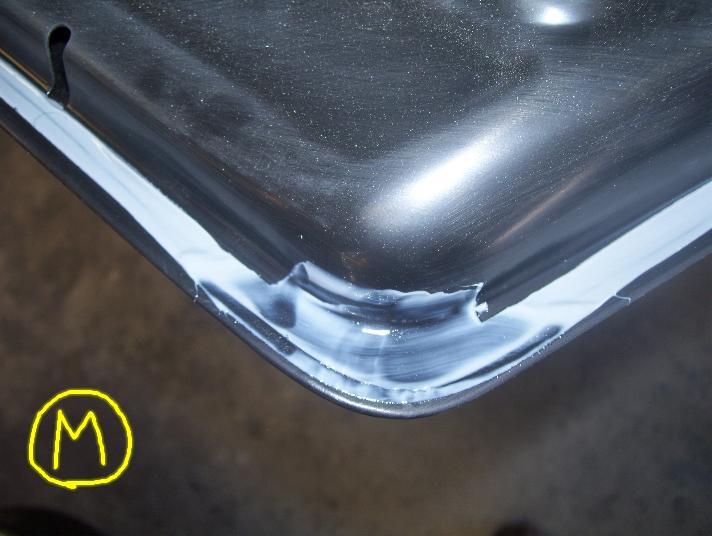 Photo N, the original seam sealer on the other door. 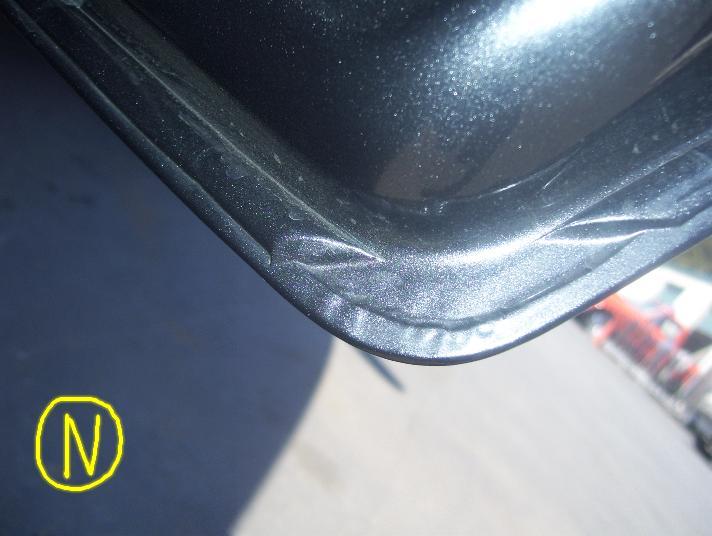 Photo Na, the one I did after paint. Again, this just needs to be close and this is far from the cream of the crop jobs, but it looks pretty good.  The next few photos are of another technique that I was taught by a guy in the shop a few years ago. Under fender wells and trunk floors of late model cars there is a lot of sprayed underseal that is pretty hard to duplicate with the underseal we use, even the hot rod one we have that is sprayed out of a pressure pot doesn’t go on as thick as the factory stuff. My co-worker showed me how you can spread out the seam sealer with your brush, then “dab” it with a wax and grease soaked Turkish towel (photo O) 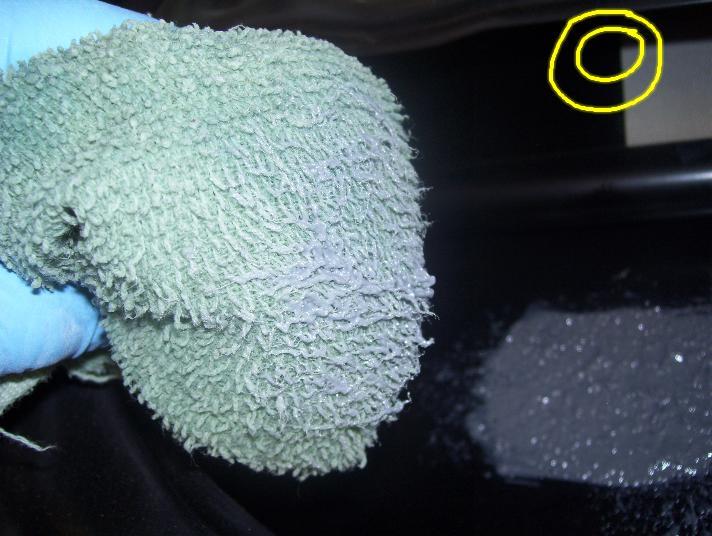 to get a texture pretty darn close to the factory (photo P). to get a texture pretty darn close to the factory (photo P).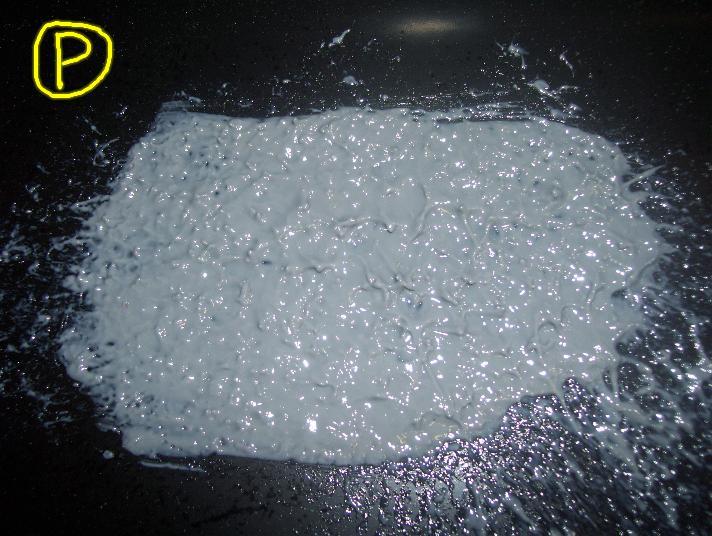 The cool thing is, it kicks very fast. So you can get the stuff paint ready in minutes. I don’t know of a spray on that is this fast. And, if you only have a few small spots, setting up a gun, cleaning it and so forth is going to take much longer. This procedure can’t be beat for “touch up”. The cool thing is, it kicks very fast. So you can get the stuff paint ready in minutes. I don’t know of a spray on that is this fast. And, if you only have a few small spots, setting up a gun, cleaning it and so forth is going to take much longer. This procedure can’t be beat for “touch up”.Now, I know you all aren’t doing these late model cars and the techniques used here may not exactly duplicate what you see in your classic car. The point is, if you look at the factory seam sealer, take a bunch of close up photos before you remove it, you likely can duplicate it close enough. You certainly don’t need to get it perfect, that is for sure. Most seam sealer is pretty sloppy and it is easy to duplicate. But with a little planning you can get some amazing results. Every car is a little different and I couldn’t possibly show all the little tricks, those you will have to get by trial and error. One very important point is to when you peel the tape up. It is a learning process and would be different with different brands of sealer. So some test runs would be HIGHLY advised. But basically, you remove it the second you get it dressed the way you want it. And for this reason, do small sections at a time if you have a big sealing project. On all three of the examples in the photos I pulled it immediately after spreading it out, IMMEDIATELY! On the door in photo "J" that area you see long the bottom was the first sealer applied and pulled off, in just the minutes I did this it started to kick. I got a small section that you can't see in the photos where the edge of the sealer got funky. Not too bad, but on the end where people would see it I would have had to spend some time fixing it. Under the bottom, no big deal. But different sealer is going to kick at different times. One you could wait twenty minutes, another you better be pulling that tape pretty fast. It all depends on the temp of the metal and shop as well. So, there is no replacement for running a little test and see before you do your project.
__________________
"If it ain't broke, fix it 'til it is!" Being stupid ain't illegal.  We're Still Debt Free Except for the House!!! www.daveramsey.com 70 GMC SWB Stepside project "Green Booger" soon to be 6.0l/4l80e 93 S-10 "Poppaw's Truck" |
|
|
| Bookmarks |
|
|