
|
Register or Log In To remove these advertisements. |
|
|
|
|||||||
 |
|
|
Thread Tools | Display Modes |
 03-20-2008, 05:04 AM
|
#1 |
|
Registered User
Join Date: Jan 2008
Location: Clinton Twp. MI
Posts: 66
|
Started Shaving Drip Rails
I started shaving my drip rails today and it is not as easy as i thought! The door drip moldings are overtop of a pinch weld that connects the roof skin to the door opening housing and the door opening housing to the rear window panel. I removed the rail and then ground the remaining pinch welds down flush to the cab and tomorow i will tack weld these two pieces together. Has anyone shaved their rails before and can offer any info i may be missing while doing this? Also do most people weld in a small 1 inch strip on the inside of the door channel where the molding used to be? I test fit the door up to the cab and it seems like it is going to have one hell of a gap! any advice would be appreciated
thanks taylor
__________________
67' C-10 Project Truck Clinton Township MI My Build Thread http://67-72chevytrucks.com/vboard/s...d.php?t=287690 |

|

|
|
03-20-2008, 05:08 AM
|
#2 |
|
Need a bigger hammer..
Join Date: Feb 2007
Location: Escondido,CA.
Posts: 280
|
Re: Started Shaving Drip Rails
No advice, but I'm always interested in progress pics..
__________________
1968 GMC 3/4 LWB fleetside Custom Camper 2018 Silverado High Country 2500HD Duramax 4X4 |
|
|
|
|
03-20-2008, 05:28 AM
|
#3 | |
|
Registered User
Join Date: Jan 2008
Location: Clinton Twp. MI
Posts: 66
|
Re: Started Shaving Drip Rails
Quote:
__________________
67' C-10 Project Truck Clinton Township MI My Build Thread http://67-72chevytrucks.com/vboard/s...d.php?t=287690 |
|
|
|
|
|
03-20-2008, 06:54 AM
|
#4 |
|
Registered User
Join Date: Nov 2007
Location: minot north dakota
Posts: 45
|
Re: Started Shaving Drip Rails
theres a writeup in classic trucks or custom classic trucks this month about shaving the driprails on 67-72 should still be on newstands, they pretty much said that the whole cab is held together by the drip rails so they cut out a few inches at a time and welded it up then did another few inches and so on and so on
|
|
|
|
|
03-20-2008, 08:07 AM
|
#5 |
|
Account Suspended
Join Date: Jun 2000
Location: over yonder
Posts: 14,270
|
Re: Started Shaving Drip Rails
you'll regret doing that later ... leaks o' plenty
|
|
|
|
|
03-20-2008, 11:07 AM
|
#6 |
|
Registered User
Join Date: Sep 2006
Location: Lompoc, Ca
Posts: 128
|
Re: Started Shaving Drip Rails
Ya I read an article a while back on shaving them, and it said to take a sawzall or cutoff wheel and cut a couple inches then tack it then cut another couple and so on, I have removed the outer rail on mine so far, but havent gone further as I have been sidelined with a back injury, so this is the only truck entertainment I get right now.
|
|
|
|
|
03-20-2008, 04:16 PM
|
#7 | |
|
Registered User
Join Date: Jan 2008
Location: Clinton Twp. MI
Posts: 66
|
Re: Started Shaving Drip Rails
Quote:
__________________
67' C-10 Project Truck Clinton Township MI My Build Thread http://67-72chevytrucks.com/vboard/s...d.php?t=287690 |
|
|
|
|
|
03-20-2008, 05:59 PM
|
#8 |
|
Registered User
Join Date: Aug 2001
Location: Santa Fe Springs, CA,USA
Posts: 1,579
|
Re: Started Shaving Drip Rails
Or move where it doesn't rain much.

__________________
70 shortbed stepside "Schleprock" 350 w/TH400 rallys and BFGs -We can rebuild it, we have the technology-lower,shinier,faster |
|
|
|
|
03-20-2008, 06:13 PM
|
#9 |
|
Senior Member
Join Date: Jul 2005
Location: Winters Ca. 95694
Posts: 4,843
|
Re: Started Shaving Drip Rails
Well you asked so here you go. You have already gone to far with your cutting and grinding. You should have only cut out a few inches of the drip then tacked welded it in place and only then moved on from their. So now that you have already gone past this you are on new un-wanted gound.
I would recomend that you hang your doors if they are off and get them to fit as good as you can. Once they are all set how you want them I would them weld the doors shut! Do this by taking two small pieces of scrap bar or solid stock (1/4" to 1" in size) and tack weld it to the bottom of the door to the B post and another one right at the top of the door below were the window chanel starts also to the B post. This will help the cab stay in shape as you tack the roof back together. Now go around the roof and tack the lip together. Since you have cut yours all out I would do one tack per side and one on the front and keep moving in this direction. Normally you would tack about every few inches as you work your way around but I would be concerned in your case about pulling the top a bit so you really need to stager your welds as far apart as you can. Once you skit around like this and have it tacked every say 3" all the way around the roof and down the B pillars AND it is still in the corect shape you are home free. Now I say you are home free only to the extent that you are back were you should have been if you did it "the normal way". Now just take your time welding it up slowly and keep in mind you will have some issues to deal with at the top of the A post at the roof. This area just does not line up well and will need some extra work. Now are you looking for a knife edge all around the roof or what. The last one I worked on was started by another shop and they used 1/4" round stock around the door up to the top of the A post and it looked great. It also gives you some metal to work with and also helps get the door gaps better before adding to the edge of the door to finish things off. Kevin LFD Inc. |
|
|
|
|
03-20-2008, 07:17 PM
|
#10 |
|
Registered User
Join Date: Mar 2008
Location: kansas city mo
Posts: 898
|
Re: Started Shaving Drip Rails
Thanks for the write up.. I am going to do this sometime in the near future but I got to fix my floors first.
Last edited by bguild; 03-20-2008 at 07:19 PM. |
|
|
|
|
03-20-2008, 07:44 PM
|
#11 | |
|
Registered User
Join Date: Jan 2008
Location: Clinton Twp. MI
Posts: 66
|
Re: Started Shaving Drip Rails
Quote:
__________________
67' C-10 Project Truck Clinton Township MI My Build Thread http://67-72chevytrucks.com/vboard/s...d.php?t=287690 |
|
|
|
|
|
03-20-2008, 09:04 PM
|
#12 |
|
Registered User
Join Date: Oct 2006
Location: Oshkosh, WI
Posts: 101
|
Re: Started Shaving Drip Rails
I can't help you, but I do like the pictures. At some point I would like to shave the rails over the windshield only. Hopefully that would get rid of the leaking issue, but still look cleaner.
Good luck. |
|
|
|
|
03-21-2008, 01:27 AM
|
#13 |
|
Senior Member
Join Date: Aug 2002
Location: Valley Center KS
Posts: 3,524
|
Re: Started Shaving Drip Rails
I recently started on this, and I'm pretty much done. I do need to put in a piece to fill in the door gap.
front of the cab 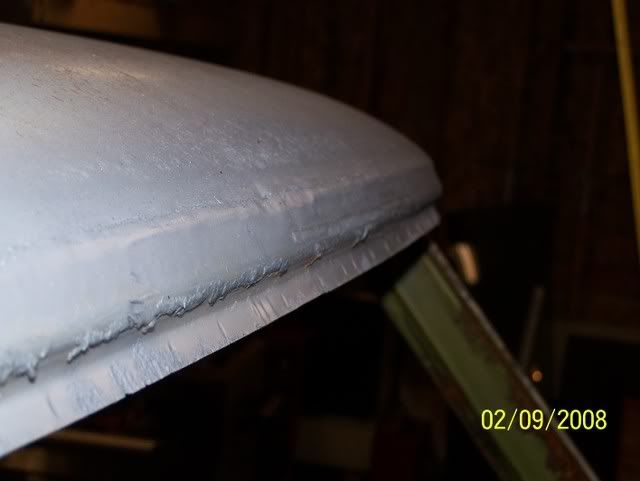 doors 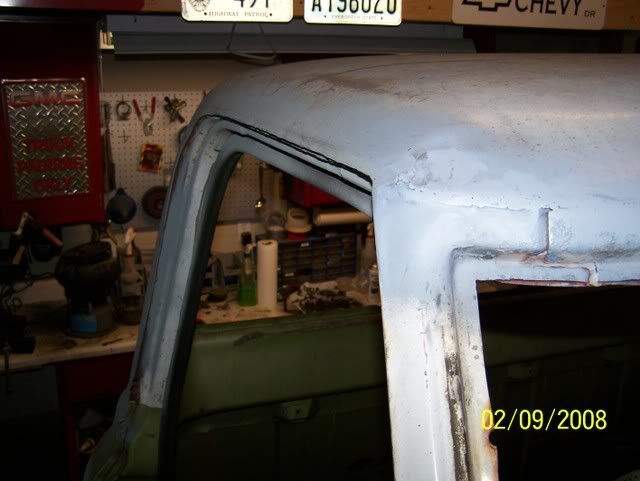 as others said, the corner of the roof above the A pillar is tricky. I had to make a relief cut to make it look right. How I did the shaving part was cut maybe half of the drip rail off, and then grind down to where I wanted it in that spot, then welded, and then moved on to the next spot. The whole process took A LONG time. I also had to hammer back the front edge above the windshiedl to get it to lay down the way I wanted it too. Another problem....the metal around the top of the b-pillar is VERY thin and difficult to weld without blowing holes in it. I'm not real experienced at welding, and with some time, patence, and a grinder I was able to make it look decent. I still have some body work to do on it to smooth it out, but I'm pretty happy with the results so far. |
|
|
|
|
03-21-2008, 02:10 PM
|
#14 | |
|
Registered User
Join Date: Jan 2008
Location: Piedmont , SC
Posts: 728
|
Re: Started Shaving Drip Rails
Quote:

|
|
|
|
|
|
03-21-2008, 02:37 PM
|
#15 | |
|
Registered User
Join Date: Jun 2007
Location: Texas
Posts: 63
|
Re: Started Shaving Drip Rails
Quote:
|
|
|
|
|
|
03-21-2008, 05:38 PM
|
#16 | |
|
Account Suspended
Join Date: Jun 2000
Location: over yonder
Posts: 14,270
|
Re: Started Shaving Drip Rails
Quote:
|
|
|
|
|
|
03-21-2008, 05:46 PM
|
#17 |
|
Registered User
Join Date: Mar 2008
Location: kansas city mo
Posts: 898
|
Re: Started Shaving Drip Rails
Where do these leak when you shave the drip rails? Is it above the doors? I dont plan on driving my truck when its nasty out but I guys i want to know 100% what I am getting into if I shave the rails.
|
|
|
|
|
03-21-2008, 06:52 PM
|
#18 |
|
Senior Member
Join Date: May 2004
Location: johnstown, NY
Posts: 2,393
|
Re: Started Shaving Drip Rails
Looks good. Are you going to fill that roof seam too?
|
|
|
|
|
03-21-2008, 11:45 PM
|
#19 |
|
Yeah baby!
Join Date: Feb 2001
Location: United Kingdom
Posts: 436
|
Re: Started Shaving Drip Rails
I plan on doing this (one day) I was gonna just cut off the vertical piece and leave the horizontal part over the door to keep the rain out.
It rains a lot here.
__________________
11.37 @116 |
|
|
|
|
03-22-2008, 03:09 AM
|
#20 |
|
Registered User
Join Date: Feb 2008
Location: Phoenix, Az
Posts: 1,204
|
Re: Started Shaving Drip Rails
That looks cool, but d@mn that's a lot of work!! I think I'll keep mine....
|
|
|
|
|
03-22-2008, 03:11 AM
|
#21 | |
|
Registered User
Join Date: Jan 2008
Location: Clinton Twp. MI
Posts: 66
|
Re: Started Shaving Drip Rails
Quote:
__________________
67' C-10 Project Truck Clinton Township MI My Build Thread http://67-72chevytrucks.com/vboard/s...d.php?t=287690 |
|
|
|
|
|
| Bookmarks |
|
|


 Linear Mode

