
|
Register or Log In To remove these advertisements. |
|
|
|
|||||||
 |
|
|
Thread Tools | Display Modes |
 11-29-2008, 10:16 PM
|
#1 |
|
Registered User
Join Date: Jul 2003
Location: Lancaster, TX
Posts: 291
|
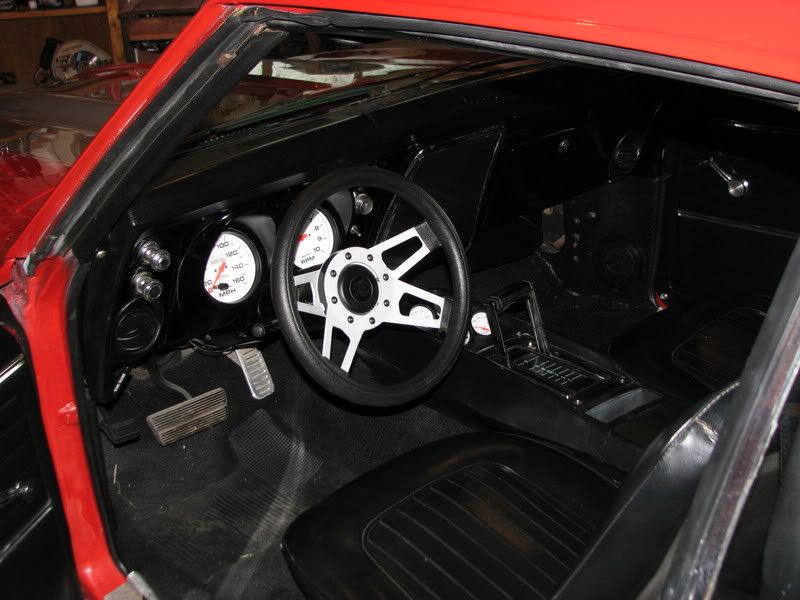
Project Autometer Upgrade w/Pics
I finally took the plunge and performed the Autometer Gauge upgrade. I have to give special thanks to our long time member Mike "Swervin" Ervin as well as Eric aka ocbaud. I got the score from Craigslist for $275.
The gauges (Autometer Phantom) were installed on the front of the original bezel but I always wanted to do it recessed like Mike and Eric did. So here are some pics from the score and the upgrade that I just finished tonight. I will add some good info here in a bit. I decided to go ahead and git-r-dun even though it may be a little while before they get installed, I can't wait. Enjoy!!! 
Last edited by twoodson; 11-30-2008 at 08:59 PM. |

|

|
|
11-29-2008, 10:32 PM
|
#2 |
|
yeller
Join Date: Oct 2001
Location: Twin Cities
Posts: 13,824
|
Re: Project Autometer Upgrade w/Pics
Looks great!!
Are they epoxied in or something?
__________________
Jeff 73-87.com 73-87.com Facebook page 73-87 cab corner 6x9 speaker brackets for sale 67-72 cab corner speaker brackets for sale 47-54 cab corner speaker brackets for sale |
|
|
|
|
11-29-2008, 10:35 PM
|
#3 |
|
2WD 4 Life
Join Date: Oct 2008
Location: Coon Rapids, MN
Posts: 169
|
Re: Project Autometer Upgrade w/Pics
looks awesome! can wait to replace my old broken gages
__________________
Big D 1969 c10 1960 cadillac 1978 king cobra |
|
|
|
|
11-29-2008, 10:55 PM
|
#4 |
|
Registered User
Join Date: Sep 2008
Location: Bailey, NC
Posts: 2,462
|
Re: Project Autometer Upgrade w/Pics
Looks awesome. How much did the project cost?
__________________
Jeramy '84 GMC project truck '85 Chevy 4X4 SOLD '07 Chevy Trailblazer SS 5th Annual SHPHC Car/Truck Show Pics http://67-72chevytrucks.com/vboard/s...d.php?t=543605 UPDATED PICS! CHECK 'EM OUT |
|
|
|
|
11-29-2008, 11:00 PM
|
#5 |
|
Low & Fast!
Join Date: Jan 2007
Location: Knoxville, TN
Posts: 3,110
|
Re: Project Autometer Upgrade w/Pics
Very cool and what a $$$ on that!!
__________________
|
|
|
|
|
11-29-2008, 11:32 PM
|
#6 |
|
BAD BOW-Silverado XST
Join Date: May 2000
Location: Senior Member from Austin, TX
Posts: 6,431
|
Re: Project Autometer Upgrade w/Pics
Nice! Can you post a close up picture of the gauges to bezel. I'm working on my Autometer upgrade too. I'm still looking for the best way to mount the gauges to the bezel.
|
|
|
|
|
11-29-2008, 11:36 PM
|
#7 |
|
Registered User
Join Date: Jul 2003
Location: Lancaster, TX
Posts: 291
|
Re: Project Autometer Upgrade w/Pics
Thanks everybody. I am loving it. I used hot glue just like Eric (ocbaud) did with his and he was not lying about the strength. I can grab the back of either gauge (large or small) and pick the entire bezel up. I am thinking up either fabbing up some metal strips or use the wire just like Mike Ervin did just to add re-enforcement. I also used 1/4" masking tape to measure how much tunnel to cut off in the speedo and tack and I just doubled it to make it 1/2" on the smaller gauges and these meaurements were per Mike's instructions. I think i got a little off on the voltmeter; the 1 in the number 10 i think the very tip of it maybe be sort of covered. Feel free to ask any questions and I will respond ASAP. As for the $$$ I scored the set for $275 from a guy off of Craigslist. The gauges were like 2 months old and his truck got t-boned and so he parted it out. I bought a 2 temp (low & high) heat gun($9.97) from Wal-Mart along with some Glue Sticks ($4.97). I will be purchasing the Painless Performance Gauge Harness from Summit. I am still contemplating on were to mount my indicators for check engine, high beam, break, etc. My truck is a '87 350 TBI SWB. Again thanks guys.
|
|
|
|
|
11-30-2008, 12:52 AM
|
#8 |
|
Registered User
Join Date: Aug 2008
Location: Summit, MS
Posts: 56
|
Re: Project Autometer Upgrade w/Pics
I did this swap on my 68 camaro. I used a little LED from auto zone for the blinkers (the lights I deleted by performing this mod). They are sheap and sill suffice for any lights that you missed by adding the auto meters.
 Can you still metal "u" shaped brackets that come with the guages for mounting to the dash? I have a 79 truck and this looks lie a mod I would consider. Nice job. |
|
|
|
|
11-30-2008, 01:05 AM
|
#9 |
|
Happy to be here
 Join Date: Mar 2000
Location: Cypress, TX
Posts: 39,021
|
Re: Project Autometer Upgrade w/Pics
Nice work. Those turned out great...
__________________
Follow me on Facebook and Instagram @N2trux.com Articles- "Jake" the 84 to 74 crewcab "Elwood" the77_Remix 85 GMC Sierra "Scarlett" "Refining Sierra" |
|
|
|
|
11-30-2008, 01:08 AM
|
#10 |
|
US Army Veteran
 Join Date: Nov 2008
Location: Central Texas
Posts: 1,049
|
Re: Project Autometer Upgrade w/Pics
Great score and thanks for sharing the pics!
We're about to begin the frame-off on my '78 and I've been going back and forth on whether to do this or not. I really like how yours look. Wished I could come across a score like this! |
|
|
|
|
11-30-2008, 01:13 AM
|
#11 |
|
Registered User
Join Date: Jul 2003
Location: Lancaster, TX
Posts: 291
|
Re: Project Autometer Upgrade w/Pics
gchemist I will get some close up pics up for you tomorrow evening after I get out of church. Bradf74 Those "U" shaped brackets that came with the gauges were mounted on the rear of the gauges in the original bezel that I purchased from the seller on Craigslist. If I am not mistaken those brackets are used to hold the gauges in place if they are surfaced mounted on the front of the bezel to keep them from falling forward and out of the bezel. Since mine are recessed I don't think it would help me to secure them, that's why I have thought about using the wire like Swervin Ervin did or fab up some metal strips. Ocbaud just used the Hot glue, which is what I used and he was satisfied, I may leave it like it is. By the way that Camaro looks good just from that pic.
|
|
|
|
|
11-30-2008, 01:16 AM
|
#12 |
|
Registered User
Join Date: Jul 2003
Location: Lancaster, TX
Posts: 291
|
Re: Project Autometer Upgrade w/Pics
Thanks N2Trux and Bruthaman. N2Trux and many others here are the reason I keep saying one day I will get it like I want it. Thanks again Gents
|
|
|
|
|
11-30-2008, 01:28 AM
|
#13 |
|
Registered User
Join Date: Apr 2006
Location: Texas
Posts: 93
|
Re: Project Autometer Upgrade w/Pics
Looks awesome..
Are you gunna put the prndl back. and I used small led lights for the blinkers and put my high beam indicator where my prndl was...
__________________
Chickenhouse chopshop 81 rcsb chevy bagged LS1/4l60E(under the knife) 94 ecswb L92 headed LQ9/ 4l80E(waiting to go under the knife) 78 rcsb chevy LQ4/4L80E |
|
|
|
|
11-30-2008, 02:13 AM
|
#14 |
|
Registered User
Join Date: Nov 2007
Location: New Jersey
Posts: 466
|
Re: Project Autometer Upgrade w/Pics
I like how the guages are behind the stock bezel not mounted in front. Nice job.
|
|
|
|
|
11-30-2008, 03:30 AM
|
#15 |
|
3DrDwn--the 'burb not the band
Join Date: Jan 2007
Location: missoula, mt
Posts: 598
|
Re: Project Autometer Upgrade w/Pics
one caution on the hot glue in warm temps. It IS possible for the interior temp esp. on a black dash to soften the hot glue enough that it will let go. I had a pair of air guages mounted from the front of a custom fiberglass panel but the u brackets were missing so i used hot glue to hold them in. The glue is stuff I had left over from my days as a car audio installer that I have used sucessfully in many other projects.
The guages were std 2" dual needle air guages with two air inputs and a light socket. One warm day 90+ degrees both guages popped out of the dash about an inch because of the air lines. I have since replaced the missing brackets but it did make me skeptical about using the glue unsupported. The look is awesome and something I wouldn't mind doing in any of my bowties but will definately look for something to help the glue support the weight. Josh
__________________
Slo and Lo that is the tempo. '72 burb build page here: http://67-72chevytrucks.com/vboard/s...d.php?t=259256 '89 GMC Dually crew build page coming soon. 88  4x4 crew DD 4x4 crew DDduallys past/present pics here: http://67-72chevytrucks.com/vboard/s...46#post4001246 89 1 ton Dually rear flip kit install here: http://67-72chevytrucks.com/vboard/s...d.php?t=354327 |
|
|
|
|
11-30-2008, 09:27 AM
|
#16 |
|
Slots go on anything!
Join Date: May 2003
Location: Richardson, TX
Posts: 5,957
|
Re: Project Autometer Upgrade w/Pics
Looks good, Trevino. Where have you been hiding?
|
|
|
|
|
11-30-2008, 12:00 PM
|
#17 |
|
Registered User
Join Date: Nov 2008
Location: edmonton, alberta
Posts: 293
|
Re: Project Autometer Upgrade w/Pics
Very cool setup.
I am planning on a similar gauge change but will likely take the easy route and secure them from the face, like yours prior to the glue mod. Got a question for you though- are you still using the plastic panel that the factory gauges used as your mount for the bezel? If so, when you cut holes in that piece for the backs of the gauges, did you have to strap or strengthen the plastic in some way to keep it from breaking? Or, did you toss the factory mount and fabricate/ use something else to mount your newly mod-ed bezel? |
|
|
|
|
11-30-2008, 01:13 PM
|
#18 |
|
Registered User
Join Date: Jul 2008
Location: Pennsville, New jersey (southern)
Posts: 143
|
Re: Project Autometer Upgrade w/Pics
How are you going to hook the speedo up? It looks electric
__________________
Mine- '91 GMC RCSB 2wd, 350tbi, 5 speed, 3.42 G80 -Dad/Me Projects/Toys 75 SWB Silverado Factory 454, Th400 87 SWB Silverado 305tbi, 700r4, 2.73's...17.4 @74mph a couple dodge cummins trucks. PLEASE DO NOT MESSAGE ME ABOUT FACTORY TACH DASHES, I AM NOT MY FATHER AND I KNOW VERY LITTLE ABOUT THEM. Thanks 
|
|
|
|
|
11-30-2008, 05:11 PM
|
#19 | |
|
yeller
Join Date: Oct 2001
Location: Twin Cities
Posts: 13,824
|
Re: Project Autometer Upgrade w/Pics
Quote:
__________________
Jeff 73-87.com 73-87.com Facebook page 73-87 cab corner 6x9 speaker brackets for sale 67-72 cab corner speaker brackets for sale 47-54 cab corner speaker brackets for sale Last edited by bigblock73; 11-30-2008 at 05:12 PM. |
|
|
|
|
|
11-30-2008, 05:41 PM
|
#20 |
|
Registered User
Join Date: Jul 2003
Location: Lancaster, TX
Posts: 291
|
Re: Project Autometer Upgrade w/Pics
Thanks for the comments and advice guys:
Kainzien - I plan on reinstalling the shifter dial unless something changes RunninLo - Thanks for that info I was about to head up to Home Depot or Ace Hardware and browse around to see if I can get any ideas. I will definitely keep everyone posted with pics when I come up with something other than the wire like Swervin Ervin used. Jonboy - What's happening, I have been around just busy with work, coaching, and taking a class. I recently acquired a Serpetine setup that I will be installing, I will post pics of it as well. Right now I am in the process of getting the engine compartment painted and I was cleaning up some wiring, just trying to get it cleaned up. Vtwinsport - As far as the bezel I used one that I bought from ebay over a year ago to install the gauges from the rear. The other bezel that came with gauges I did not use because the guy cut the holes to accomodate the surface mounting, I can post pics of it if you like. I will use everything Swervin used in his instructions from Jeff's 73-87.com website. Crossy's son - Jeff (Bigblock73) is correct it is a Mechanical Speedo and I am getting rid of my cruise control. Apparently the '87 year came with either a mechanical (cable driven) or electric speedo. I looked at the connection on my tranny it it was a screw on (mechanical) not connector type (electric)connection. I will post some up close pics here in a bit at gmchemist's request. |
|
|
|
|
11-30-2008, 07:27 PM
|
#21 |
|
Garage Queen Material
Join Date: Oct 2002
Location: USA
Posts: 4,129
|
Re: Project Autometer Upgrade w/Pics
one thing you may want to do, is use more hot glue.
with other things i've used it on in the past, it will heat up and come off in the summer heat. i haven't had that problem with my gauges, but i used about 5x as much as you did. i think i used a whole bag of hot glue sticks just for reinforcing the gauges. looks good though
|
|
|
|
|
11-30-2008, 07:34 PM
|
#22 |
|
Registered User
Join Date: Jul 2003
Location: Lancaster, TX
Posts: 291
|
Re: Project Autometer Upgrade w/Pics
Thanks Eric, you are the man I have been waiting to hear from. I appreciate that advice because I wasn't for sure how much glue you used and I appreciate RunninLo for informing me as well. I guess I will get the Glue Gun back out and add some more glue, I still wanted to run up to the hardware stores to see what else I could possibly re-enforce them with. Wire may be the only choice.
|
|
|
|
|
11-30-2008, 07:37 PM
|
#23 |
|
yeller
Join Date: Oct 2001
Location: Twin Cities
Posts: 13,824
|
Re: Project Autometer Upgrade w/Pics
I know it is too late, but 2-part epoxy might be a better alternative to adhering the gauges to the bezel. The stuff works great!
__________________
Jeff 73-87.com 73-87.com Facebook page 73-87 cab corner 6x9 speaker brackets for sale 67-72 cab corner speaker brackets for sale 47-54 cab corner speaker brackets for sale |
|
|
|
|
11-30-2008, 07:41 PM
|
#24 | |
|
Garage Queen Material
Join Date: Oct 2002
Location: USA
Posts: 4,129
|
Re: Project Autometer Upgrade w/Pics
Quote:
one thing i was thinking about doing at the time, was use some metal brackets and attach one end to the threaded back on the gauges and have that held down by the alum. nut. bend it correctly and use something like some very hard epoxy to attach it to the back of the bezel. |
|
|
|
|
|
11-30-2008, 07:42 PM
|
#25 | |
|
Garage Queen Material
Join Date: Oct 2002
Location: USA
Posts: 4,129
|
Re: Project Autometer Upgrade w/Pics
Quote:
one of the reasons i used the hot glue is because it would not permanently damage the bezel or the gauges if i decided i wanted to try something else. its secure enough to hold them in place until you want them off. i was thinking about epoxy, but didn't want to risk having it not be lined up correctly or something like that. |
|
|
|
|
|
| Bookmarks |
|
|


 Linear Mode

