
|
Register or Log In To remove these advertisements. |
|
|
|
|||||||
 |
|
|
Thread Tools | Display Modes |
 02-04-2009, 11:24 AM
|
#1 |
|
Registered User
Join Date: Jan 2007
Location: Toronto Canada
Posts: 265
|
steps for assembling the front end
Can someone outline the steps for assembling the front end of a 71.
Here is where I am at. Fenders are on Hood is on Cowl is on Grill won't fit Cowl has a 1/2 in gab on the one side Hood won't shut tight on one side gaps are not so good on the hood but are good on the door to fender? I was told to start over but I'm not sure what order to bolt it down? I know the fenders go on first but do the front sections get tightened now or after the grill? And so on... 
|

|

|
|
02-04-2009, 12:47 PM
|
#2 |
|
Senior Member
  Join Date: Dec 1999
Location: Urbana,Ohio,USA
Posts: 4,618
|
Re: steps for assembling the front end
There is no perfect science to it. Trial and error on each truck.
Remember, each part has a varience in size. If each part is a little off it can mean a lot as a whole. Sometimes a die grinder is your friend when it comes to fender fitment.
__________________
2008 Chevy HHR 1/2 panel. 1949 Chevy Panel truck(just sittin, waiting) Board member #6 |
|
|
|
|
02-04-2009, 01:03 PM
|
#3 |
|
State of Confusion!
  Join Date: Jul 2002
Location: Gulfport, MS USA
Posts: 47,216
|
Re: steps for assembling the front end
Also, if your cab was removed make sure the cab is squared before you start installing pieces. It's a big mistake alot of us make the first time, even if it is a 1/8 to 1/4 inch cockeyed it'll throw everything off
Aftyer you are sure the cab is square on the frame, loosly attach everything and adjust as necessary with shime and all. As mentioned, it is a trial and error process AND requires lots of patience. Even if everything came off the same truck, it will need tweaked. It really gets different when parts come from different trucks and aftermarket sources.
__________________
Bill 1970 Chevy Custom/10 LWB Fleetside 2010 Toyota Tacoma PreRunner SR5 Double Cab - DD Member of Louisiana Classic Truck Club (LCTC) Bill's Gallery Life isn't tied with a bow, but it's still a gift. Live simply. Love generously. Care deeply. Speak kindly. Leave the rest to God! |
|
|
|
|
02-04-2009, 01:06 PM
|
#4 |
|
Hittin E-Z Street on Mud Tires
Join Date: Nov 2004
Location: Greenville, SC
Posts: 23,090
|
Re: steps for assembling the front end
Was everything pre fit before paint? Are any of the parts aftermarket (fenders or hood)?
__________________
Jesse James 1967 C10 SWB Stepside: 350/700R4/3.73 1965 Ford Mustang: 289/T5-5spd/3.25 Trac-Loc 1968 Pontiac Firebird: Project Fire Chicken! 2015 Silverado Double Cab 5.3L Z71 2001 Jeep Wrangler Sport 4.0L 5spd 2020 Chevrolet Equinox Premium 2.0L Turbo 2011 Mustang V6 ~ Wife's ride  American Born, Country by the Grace of God  1967 CST Shop Truck Rebuild! My 1967 C-10 Build Thread My Vintage Air A/C Install Project "On a Dime" Trying my hand at Home Renovation! 1965 Mustang Modifications! |
|
|
|
|
02-04-2009, 01:09 PM
|
#5 |
|
Registered User
Join Date: Apr 2003
Location: Easley, South Carolina
Posts: 491
|
Re: steps for assembling the front end
I'm no expert by any means, but I have left the rad support loose which will allow you to shift everything (fenders, innerfenders) left or right whichever is necessary to get it all adjusted. Good luck, it's good to see everything all taped off in the gaps.
__________________
Richard Dobson |
|
|
|
|
02-04-2009, 01:17 PM
|
#6 |
|
Registered User
Join Date: Jul 2008
Location: Gate City VA
Posts: 576
|
Re: steps for assembling the front end
Just make sure you have the spacers where you need them.
__________________
Mitch 22yrs. Young 1970 GMC Short-Step 350/TH350 Combo. .  . . Sold Dec 2011 . . Sold Dec 2011Current Project 68 Gmc "Second Chance" Go to my 68 GMC Shorty Rebuild Thread http://67-72chevytrucks.com/vboard/s...39#post6341739 |
|
|
|
|
02-04-2009, 01:17 PM
|
#7 |
|
Registered User
Join Date: Jan 2007
Location: Toronto Canada
Posts: 265
|
Re: steps for assembling the front end
I really am thankful for the advice. I never thought of squaring the cab! My cab mounts were gone with Canadian rust. Next question is how do you do that? How about a carpenters square against the back of the frame?
|
|
|
|
|
02-04-2009, 06:35 PM
|
#8 |
|
State of Confusion!
Join Date: Jul 2002
Location: Gulfport, MS USA
Posts: 47,216
|
Re: steps for assembling the front end
I did an cross measurement from the outer top corner of the driver' firewall to the front edge of the passenger frame rail. Then from the passenger side top outer firewall corner to the front of the drivers frame rail. If your measurement is the same, the cab is on square.
BTW I kept my cab mounts (still are in fact) bolts loose until I had things fitted.
__________________
Bill 1970 Chevy Custom/10 LWB Fleetside 2010 Toyota Tacoma PreRunner SR5 Double Cab - DD Member of Louisiana Classic Truck Club (LCTC) Bill's Gallery Life isn't tied with a bow, but it's still a gift. Live simply. Love generously. Care deeply. Speak kindly. Leave the rest to God! |
|
|
|
|
02-04-2009, 07:15 PM
|
#9 | |
|
Registered User
Join Date: Aug 2005
Location: Pasadena,Tx /Pto Pta DR
Posts: 5,415
|
Re: steps for assembling the front end
Quote:
Another thing alot of people don't do is start off with a truck thats sqaure to begin with. Its not cheap but It really helps to check the frame to see if its correct. I know it cost money but guys have brought trucks in where they did everything to get them correct but the frame was all out of wack before they even started. $800 dollars later (@$98 dollars per hr)on a frame machine and all their aftermarket parts fit good. You have to check the diagonals . Alot of aftermarket panels can get a bad wrap when the truck wasn't straight to begin with and you have an inexperienced person putting them on. Some aftermarket parts do deserve a bad rap 
|
|
|
|
|
|
02-04-2009, 07:29 PM
|
#10 |
|
Registered User
Join Date: Mar 2008
Location: Lawrenceville, Ga
Posts: 300
|
Re: steps for assembling the front end
Even in today's high tech manufacturing facility's there is still a guy at the end of the line with a rag and a big rubber mallet.
Trial and era - one piece at a time. Just get the cab exactly where you want it and assemble from there. |
|
|
|
|
02-04-2009, 07:46 PM
|
#11 |
|
Account Suspended
Join Date: Nov 2007
Location: FT STEWART GA
Posts: 509
|
Re: steps for assembling the front end
|
|
|
|
|
02-04-2009, 07:47 PM
|
#12 |
|
Account Suspended
Join Date: Nov 2007
Location: FT STEWART GA
Posts: 509
|
Re: steps for assembling the front end
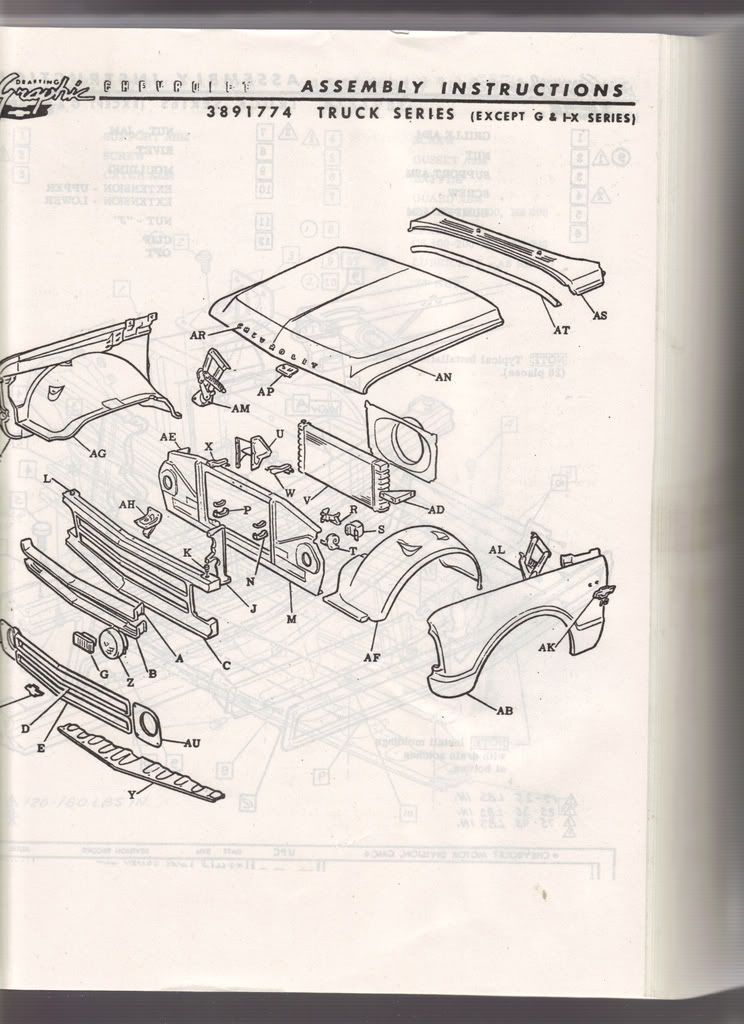
 hope this helps |
|
|
|
|
02-04-2009, 07:58 PM
|
#13 |
|
Registered User
Join Date: Mar 2008
Location: Lawrenceville, Ga
Posts: 300
|
Re: steps for assembling the front end
The diagram makes it look so easy!!
|
|
|
|
|
02-04-2009, 10:38 PM
|
#14 | |
|
The Older Generation
 Join Date: Aug 2006
Location: Montezuma, Iowa
Posts: 25,771
|
Re: steps for assembling the front end
Quote:
 LockDoc
__________________
Leon Locksmith, Specializing In Antique Trucks, Automobiles, & Motorcycles (My Dually Pickup Project Thread) http://67-72chevytrucks.com/vboard/s...d.php?t=829820 - |
|
|
|
|
|
02-04-2009, 11:58 PM
|
#15 |
|
Senior Member
Join Date: Jul 2004
Location: Estherville, Iowa
Posts: 3,371
|
Re: steps for assembling the front end
Hope you have new rubber cab and rad support mounts. Start with no shims under rear of cab and 1 square shim at the front. Cab has to sit square on frame and line up well with box. I have had to use an extra shim at the driver rear several times to ger the rear window line to line up with the box top edge.
Also measure the rad support side to side and get that centered, or your bumper will not center on the grill. One side or the other of the read support may need a shim to get it level. Once everything is close, the hood becomes your alignment tool. Be prepared to loosen and re-adjust everthing many times. When you change one area, it will likey have an effect somewhere else.
__________________
1968 C10 307 3spd Long Fleet ------ http://67-72chevytrucks.com/vboard/s...d.php?t=201103 1970 C10 305 Super T10 Long Fleet --- http://67-72chevytrucks.com/vboard/s...d.php?t=202285 1971 C20 383 TH350 Dana Posi ----- http://67-72chevytrucks.com/vboard/s...d.php?t=206894 2001 GMC Sierra 1500 C3 6.0 |
|
|
|
|
02-05-2009, 06:17 AM
|
#16 |
|
Account Suspended
Join Date: Nov 2007
Location: FT STEWART GA
Posts: 509
|
Re: steps for assembling the front end
if any one needs any factory assembly info i have the book
|
|
|
|
|
| Bookmarks |
|
|


 Linear Mode

