
|
Register or Log In To remove these advertisements. |
|
|
|
|||||||
 |
|
|
Thread Tools | Display Modes |
 09-02-2009, 04:26 PM
|
#1 |
|
Questionable
Join Date: Mar 2005
Location: Atlanta
Posts: 13,373
|
Pictures of CPP notch before/after drilling for bags?
As many of you that have em, I want to see several of them.
Anyone got any photos handy of what your notch looked like before and after drilling (WITHOUT the bag installed)? Thanks if you can help. Any photos of the template and process are appreciated also.
__________________
If I've got anything up for grabs, it'll be here: 7-hole gauge cluster for a 67-72 p/u FREE (link) I can't check the forum daily. If I don't reply to you within 24 hours, drop me a PM! I'm (hopefully) still alive and will reply faster to a PM. |

|

|
|
09-03-2009, 12:14 AM
|
#2 | |
|
Registered User
Join Date: Apr 2001
Location: DALLAS,TX
Posts: 22,064
|
Re: Pictures of CPP notch before/after drilling for bags?
Quote:
__________________
67SWB-B.B.RetroRod 64SWB-Recycle 89CCDually-Driver/Tow Truck 99CCSWB Driver All Fleetsides @rattlecankustoms in IG Building a small, high rpm engine with the perfect bore, stroke and rod ratio is very impressive. It's like a highly skilled Morrocan sword fighter with a Damascus Steel Scimitar..... Cubic inches is like Indiana Jones with a cheap pistol. |
|
|
|
|
|
09-03-2009, 11:03 PM
|
#3 |
|
Questionable
Join Date: Mar 2005
Location: Atlanta
Posts: 13,373
|
Re: Pictures of CPP notch before/after drilling for bags?
That's what I have right now downstairs on paper (template), I traced off my RE7's to make it.
I didn't want to reveal the real reason for me asking cause I might have screwed up, but here goes  My center hole for the spring doesn't hit in the exact same place on both notches. It hits at the top of the ovular center hold of the notch on one, and the bottom of the notch on the other. However, the center point of the notch measures equidistant from common points on the frame, and the axle seemed to tuck properly/centered in the notch with the stock crossmember and trailing arms. I will go take some pictures so you can see what I'm saying.
__________________
If I've got anything up for grabs, it'll be here: 7-hole gauge cluster for a 67-72 p/u FREE (link) I can't check the forum daily. If I don't reply to you within 24 hours, drop me a PM! I'm (hopefully) still alive and will reply faster to a PM. |
|
|
|
|
09-03-2009, 11:35 PM
|
#4 |
|
Questionable
Join Date: Mar 2005
Location: Atlanta
Posts: 13,373
|
Re: Pictures of CPP notch before/after drilling for bags?
here you go. this is what i'm looking at. sorry, they're taken from different heights. i will explain:
in these pictures, the C-notches are sitting in the position they were in as clamped - and eveyrthing is sitting flush against the frame, and i smacked them with a hammer to set them. notice that the top hole is spot-on, regardless of how I clamp the notch down, but the center spring hole is slightly out of whack, misaligned to the top on one side and towards the bottom on the other. the bottom-most hole is slightly more out of whack, no matter what I cut, the damned thing just will not get near center, vertically or horizontally. 
__________________
If I've got anything up for grabs, it'll be here: 7-hole gauge cluster for a 67-72 p/u FREE (link) I can't check the forum daily. If I don't reply to you within 24 hours, drop me a PM! I'm (hopefully) still alive and will reply faster to a PM. |
|
|
|
|
09-03-2009, 11:54 PM
|
#5 |
|
Señor Member
Join Date: May 2002
Location: Edge of the world
Posts: 5,367
|
Re: Pictures of CPP notch before/after drilling for bags?
You'll be fine. Get them bolted tight and then warble out the bag hole. That's as good as anyone has gotten the notches to fit.
__________________
|
|
|
|
|
09-04-2009, 12:01 AM
|
#6 |
|
Questionable
Join Date: Mar 2005
Location: Atlanta
Posts: 13,373
|
Re: Pictures of CPP notch before/after drilling for bags?
sorry, what's a "bang hole"?
i have some ideas in my head, and they aren't related to trucks 
__________________
If I've got anything up for grabs, it'll be here: 7-hole gauge cluster for a 67-72 p/u FREE (link) I can't check the forum daily. If I don't reply to you within 24 hours, drop me a PM! I'm (hopefully) still alive and will reply faster to a PM. |
|
|
|
|
09-04-2009, 12:05 AM
|
#7 |
|
Registered User
Join Date: Apr 2001
Location: DALLAS,TX
Posts: 22,064
|
Re: Pictures of CPP notch before/after drilling for bags?
The pics do help understand your issue. I did the CPP bolt-in notches but cheated on my first round of mods. I flipped the bags upside-down....
This meant no drilling multiple holes in the frame. I took a typical bag plate, placed it on the truck arms, marked the areas that needed drilling & trimming, drilled the bolt holes (I 'clocked' them so they split the center of the truck arm seam & then notched the arms on one half for the air fitting). The plate was then put between the bag & arm as reinforcement upon installation. It was much easier to modify the single layer of steel on the arms vs. dealing w/the frame, CCP notch material, OE reinforcement piece, etc.... When I re-did the suspension, I installed smaller bags up-right & drilled the required holes. I never looked to see if mine were centered or not. I just used the original truck arm hole to center the placement of the bag & my templates to drill where the holes needed to be in the frame (you don't use that upper spring retaining hole on the top side of the 6" Slam bag). If I remember correctly, the air fitting hole & the spring retaining-bolt hole did intersect & I had to use a file to clean the edges for one 'larger' kidney shaped opening. Ugly to view, but functional. Once the bag was installed, you wouldn't know w/o me telling (& I'll never tell ).
__________________
67SWB-B.B.RetroRod 64SWB-Recycle 89CCDually-Driver/Tow Truck 99CCSWB Driver All Fleetsides @rattlecankustoms in IG Building a small, high rpm engine with the perfect bore, stroke and rod ratio is very impressive. It's like a highly skilled Morrocan sword fighter with a Damascus Steel Scimitar..... Cubic inches is like Indiana Jones with a cheap pistol. Last edited by SCOTI; 09-04-2009 at 12:11 AM. |
|
|
|
|
09-04-2009, 11:34 AM
|
#8 |
|
Account Suspended
Join Date: Jun 2000
Location: over yonder
Posts: 14,270
|
Re: Pictures of CPP notch before/after drilling for bags?
I'm with XXL ... drill it out enough that a bolt passes thru and tighten it down.
You're thinking about this too much. |
|
|
|
|
09-04-2009, 01:29 PM
|
#9 |
|
Questionable
Join Date: Mar 2005
Location: Atlanta
Posts: 13,373
|
Re: Pictures of CPP notch before/after drilling for bags?
I have done that a lot with the project.
But in this case, I blame the equipment. Why didn't CPP cut a perfect circle out of the middle of that notch plate (spring pocket center hole) instead of an oval hole? Why cut an oval hole? Doesn't make sense to me. This would be a lot easier if that hole in the middle was, like, 1" round. Will it hurt anything if I drill it out as such?
__________________
If I've got anything up for grabs, it'll be here: 7-hole gauge cluster for a 67-72 p/u FREE (link) I can't check the forum daily. If I don't reply to you within 24 hours, drop me a PM! I'm (hopefully) still alive and will reply faster to a PM. |
|
|
|
|
09-04-2009, 03:29 PM
|
#10 | |
|
Registered User
Join Date: Apr 2001
Location: DALLAS,TX
Posts: 22,064
|
Re: Pictures of CPP notch before/after drilling for bags?
Quote:
If not, don't worry about opening up the hole to a perfect 1" or whatever larger size. Figure out where your air fitting hole needs to be. If necessary, open up the hole to accomodate.
__________________
67SWB-B.B.RetroRod 64SWB-Recycle 89CCDually-Driver/Tow Truck 99CCSWB Driver All Fleetsides @rattlecankustoms in IG Building a small, high rpm engine with the perfect bore, stroke and rod ratio is very impressive. It's like a highly skilled Morrocan sword fighter with a Damascus Steel Scimitar..... Cubic inches is like Indiana Jones with a cheap pistol. Last edited by SCOTI; 09-04-2009 at 03:30 PM. |
|
|
|
|
|
09-04-2009, 03:55 PM
|
#11 | |
|
Señor Member
Join Date: May 2002
Location: Edge of the world
Posts: 5,367
|
Re: Pictures of CPP notch before/after drilling for bags?
Quote:

__________________
|
|
|
|
|
|
09-04-2009, 04:21 PM
|
#12 |
|
Registered User
Join Date: Apr 2001
Location: DALLAS,TX
Posts: 22,064
|
Re: Pictures of CPP notch before/after drilling for bags?
^^^ I've always loved that pic.
__________________
67SWB-B.B.RetroRod 64SWB-Recycle 89CCDually-Driver/Tow Truck 99CCSWB Driver All Fleetsides @rattlecankustoms in IG Building a small, high rpm engine with the perfect bore, stroke and rod ratio is very impressive. It's like a highly skilled Morrocan sword fighter with a Damascus Steel Scimitar..... Cubic inches is like Indiana Jones with a cheap pistol. |
|
|
|
|
09-04-2009, 06:27 PM
|
#13 | |
|
Questionable
Join Date: Mar 2005
Location: Atlanta
Posts: 13,373
|
Re: Pictures of CPP notch before/after drilling for bags?
Quote:
__________________
If I've got anything up for grabs, it'll be here: 7-hole gauge cluster for a 67-72 p/u FREE (link) I can't check the forum daily. If I don't reply to you within 24 hours, drop me a PM! I'm (hopefully) still alive and will reply faster to a PM. |
|
|
|
|
|
09-04-2009, 07:02 PM
|
#14 | |
|
Registered User
Join Date: Apr 2001
Location: DALLAS,TX
Posts: 22,064
|
Re: Pictures of CPP notch before/after drilling for bags?
Quote:
__________________
67SWB-B.B.RetroRod 64SWB-Recycle 89CCDually-Driver/Tow Truck 99CCSWB Driver All Fleetsides @rattlecankustoms in IG Building a small, high rpm engine with the perfect bore, stroke and rod ratio is very impressive. It's like a highly skilled Morrocan sword fighter with a Damascus Steel Scimitar..... Cubic inches is like Indiana Jones with a cheap pistol. |
|
|
|
|
|
09-04-2009, 09:28 PM
|
#15 |
|
Registered User
Join Date: Jul 2009
Location: Needville, TX
Posts: 283
|
Re: Pictures of CPP notch before/after drilling for bags?
Sorry to jack the thread but... Now you guys got me worried. I got my c-notch today and was going to try and get it in this weekend but do I need to wait until I get my bags and do it all at one time to make a template??
|
|
|
|
|
09-04-2009, 09:59 PM
|
#16 | |
|
Señor Member
Join Date: May 2002
Location: Edge of the world
Posts: 5,367
|
Re: Pictures of CPP notch before/after drilling for bags?
Quote:
__________________
|
|
|
|
|
|
09-05-2009, 08:53 AM
|
#17 | |
|
Registered User
Join Date: Jul 2009
Location: Needville, TX
Posts: 283
|
Re: Pictures of CPP notch before/after drilling for bags?
Quote:

|
|
|
|
|
|
09-07-2009, 12:32 AM
|
#18 |
|
VA72C10
 Join Date: Mar 2008
Location: Midlothian, VA
Posts: 25,267
|
Re: Pictures of CPP notch before/after drilling for bags?
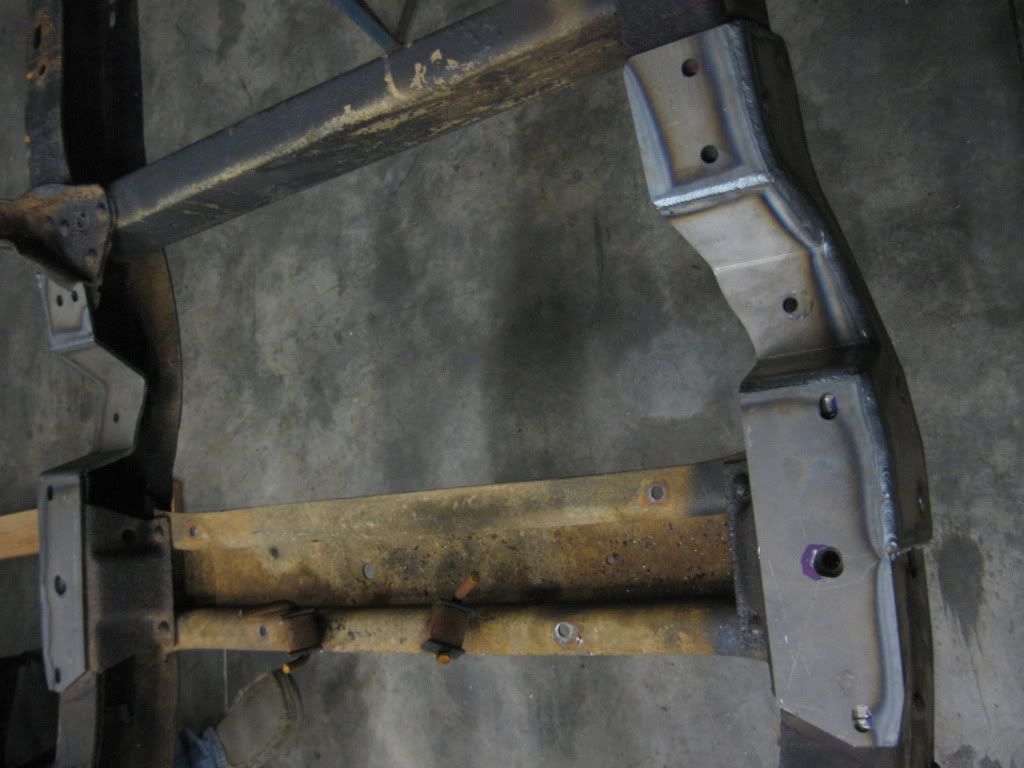
Any recommendations on how large to make that center fitting hole overall? I have the same bags (RE-7's but not the fittings yet so I want to make the holes large enough so I don't have to drill more holes after I paint. I'm going to make a paper template as well for the bolt holes upper and lower but want to make sure I leave ample room for the fittings. Thanks. Also, here's a picture from my CPP notch install. We welded it on...no bolts at all. You can see where we wallowed out the hole already somewhat to line up with the other holes. Didn't think about the fitting being larger until now or I would have made the hole in the frame larger before welding on the notch. Since this picture the underside (the top in the picture) has been welded as well.
__________________
Looking for a 67-72 swb or blazer project in or around VA. 
Last edited by VA72C10; 09-07-2009 at 12:33 AM. |
|
|
|
|
09-07-2009, 12:51 AM
|
#19 |
|
Registered User
Join Date: Apr 2001
Location: DALLAS,TX
Posts: 22,064
|
Re: Pictures of CPP notch before/after drilling for bags?
One thing I noticed is that you're both wanting to know how much to open up the hole when none of the airbag holes line up exactly w/that frame hole.
The mounting holes for the bag are slightly offset from center as is the air fitting (vs. the exact center of the bag).
__________________
67SWB-B.B.RetroRod 64SWB-Recycle 89CCDually-Driver/Tow Truck 99CCSWB Driver All Fleetsides @rattlecankustoms in IG Building a small, high rpm engine with the perfect bore, stroke and rod ratio is very impressive. It's like a highly skilled Morrocan sword fighter with a Damascus Steel Scimitar..... Cubic inches is like Indiana Jones with a cheap pistol. Last edited by SCOTI; 09-07-2009 at 12:55 AM. |
|
|
|
|
09-07-2009, 01:03 AM
|
#20 |
|
VA72C10
Join Date: Mar 2008
Location: Midlothian, VA
Posts: 25,267
|
Re: Pictures of CPP notch before/after drilling for bags?
I guess when I make the template and mock up the bags it will be more clear' but basically you're sying I'll be drilling one extra large hole for the fitting and one for the bolt on the other side of the existing spring bolt hole?
__________________
Looking for a 67-72 swb or blazer project in or around VA.
|
|
|
|
|
09-07-2009, 09:25 AM
|
#21 | |
|
Registered User
Join Date: Apr 2001
Location: DALLAS,TX
Posts: 22,064
|
Re: Pictures of CPP notch before/after drilling for bags?
Quote:
The easier method is to use a 'hat' that has a single stud welded to it. This keeps the mounting bolts & air fitting below the plain of the hat & only the single stud goes through the existing OE hole that located the coil spring originally. The drawback is the hat will need to be @ least 1" tall (it has to be taller than the air fitting) which means 1" less drop w/all other dimensions being equal.
__________________
67SWB-B.B.RetroRod 64SWB-Recycle 89CCDually-Driver/Tow Truck 99CCSWB Driver All Fleetsides @rattlecankustoms in IG Building a small, high rpm engine with the perfect bore, stroke and rod ratio is very impressive. It's like a highly skilled Morrocan sword fighter with a Damascus Steel Scimitar..... Cubic inches is like Indiana Jones with a cheap pistol. Last edited by SCOTI; 09-07-2009 at 09:35 AM. |
|
|
|
|
|
09-07-2009, 12:50 PM
|
#22 | |
|
Señor Member
Join Date: May 2002
Location: Edge of the world
Posts: 5,367
|
Re: Pictures of CPP notch before/after drilling for bags?
Quote:
__________________
|
|
|
|
|
|
09-07-2009, 01:05 PM
|
#23 | |
|
Registered User
Join Date: Apr 2001
Location: DALLAS,TX
Posts: 22,064
|
Re: Pictures of CPP notch before/after drilling for bags?
Quote:
I found that inch was needed to be able to have more air pressure in the bag @ ride height (2600/7" bag & 1.5" block = ~35psi @ ride height = 1" inside the frame @ the top of the axle tube). When I had the 'hat' installed, I was under 30psi (@ the same ride height) & it was noticed (bouncy ride quality). Once I bumped air pressure up, the bounce was gone so I removed the hat for slightly higher air psi @ the same overall ride height.
__________________
67SWB-B.B.RetroRod 64SWB-Recycle 89CCDually-Driver/Tow Truck 99CCSWB Driver All Fleetsides @rattlecankustoms in IG Building a small, high rpm engine with the perfect bore, stroke and rod ratio is very impressive. It's like a highly skilled Morrocan sword fighter with a Damascus Steel Scimitar..... Cubic inches is like Indiana Jones with a cheap pistol. Last edited by SCOTI; 09-07-2009 at 01:06 PM. |
|
|
|
|
|
09-07-2009, 09:22 PM
|
#24 | |
|
VA72C10
Join Date: Mar 2008
Location: Midlothian, VA
Posts: 25,267
|
Re: Pictures of CPP notch before/after drilling for bags?
Quote:
__________________
Looking for a 67-72 swb or blazer project in or around VA.
|
|
|
|
|
|
09-07-2009, 10:44 PM
|
#25 | |
|
Registered User
Join Date: Apr 2001
Location: DALLAS,TX
Posts: 22,064
|
Re: Pictures of CPP notch before/after drilling for bags?
Quote:
My drop was around 8" out back. The rear axle tube was ~1" inside the c-notch/above the bottom portion of the framerail @ ride height.
__________________
67SWB-B.B.RetroRod 64SWB-Recycle 89CCDually-Driver/Tow Truck 99CCSWB Driver All Fleetsides @rattlecankustoms in IG Building a small, high rpm engine with the perfect bore, stroke and rod ratio is very impressive. It's like a highly skilled Morrocan sword fighter with a Damascus Steel Scimitar..... Cubic inches is like Indiana Jones with a cheap pistol. Last edited by SCOTI; 09-07-2009 at 10:46 PM. |
|
|
|
|
|
| Bookmarks |
|
|


 Linear Mode

