
|
 02-06-2011, 09:06 PM
|
#1 |
|
Registered User
Join Date: Nov 2010
Location: Fayetteville NC
Posts: 752
|
K1's build thread
Figured I spend enough time on this website I may as well create a build thread of my own to help me get ideas down and brainstorm with people...and also serve as motivation when it starts to dwindle. Before I get to the truck here's a little about me...
I'm a 23yr old single male currently station at Ft Bragg in North Carolina. I've been in the Army about 1.5 years now and I'm an Infantry guy who is dumb enough to jump out of a perfectly good airplane. Before the Army I was a full time college student and I've got a BA in Psychology with minor studies in Management (specifically team dynamics). I worked as a kayak instructor and raft guide for about 8 years, a landscaper for about 3, and owned my own gunsmithing business while I was in college (closed up shop when I enlisted). Between those jobs and my non-traditional high school career as a professional whitewater kayaker I've learned some pretty bizarre and unique skills. I'm a tinkerer by nature, always have been and always will be. If I don't have something I'm messing with I'm usually not happy. One of my goals has always been to restore a classic vehicle...and after seeing a buddies 66 GMC I fell in love with the look of the 1st Gen C10 longbed stepsides. 8 months after seeing his truck I had one of my very own. Now onto my truck. It's a bare bones 1966 C10 longbed stepside with a 250 I6 and 3 on the tree trans. I paid $1800 for it in Nov of 2010, some may say I overpaid but I drove it 130mi back the night I bought it...and considering I don't have a tow vehicle it limited my options as far as project vehicles goes. I'm doing all of the work on this truck either in the barracks parking lot, my buddies places, or at the base auto shop. Because of this I'm limited in the tools I have available to me. The auto shop rents lift time at $7 an hour and tool rentals are free. They have a decent selection too so I likely will not need to buy anything. However they do not allow for welding or bodywork so for that I'm either going to have to buy a welder or borrow a friends. Right now it's looking like buying is my best bet even though I don't really want to. I have a tentative budget of $8K for the build, tool purchases are not factored into that figure. Here are some pics from when I first got the truck, and I'll admit that not much has changed in the last 4 months I've owned it. 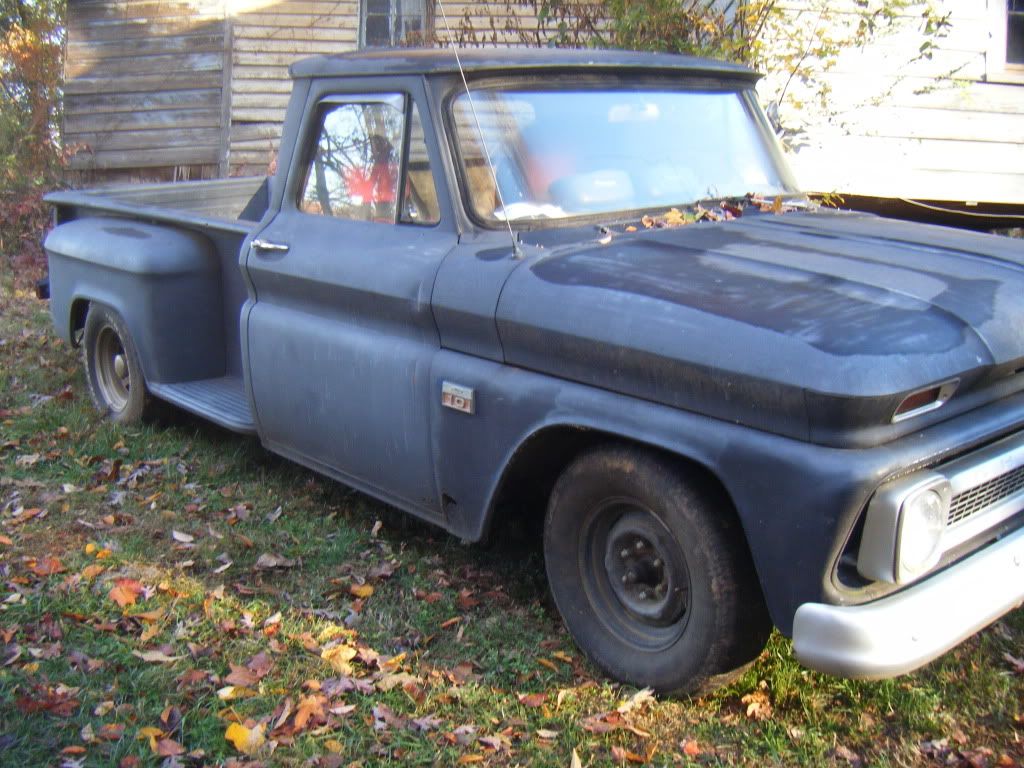 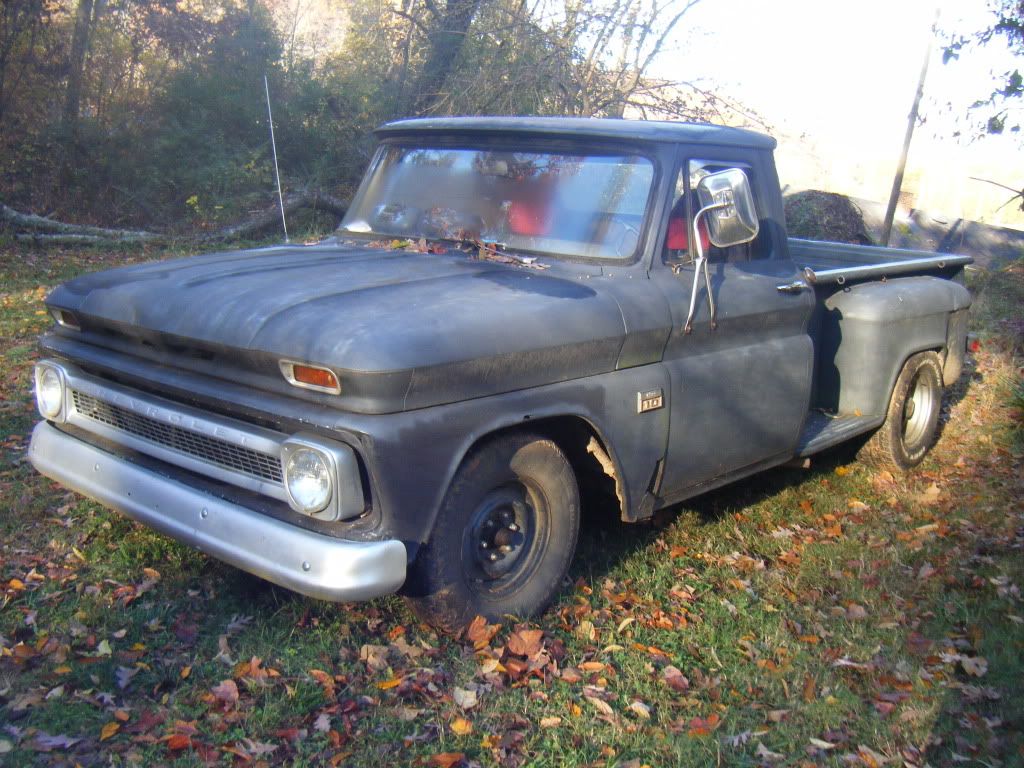 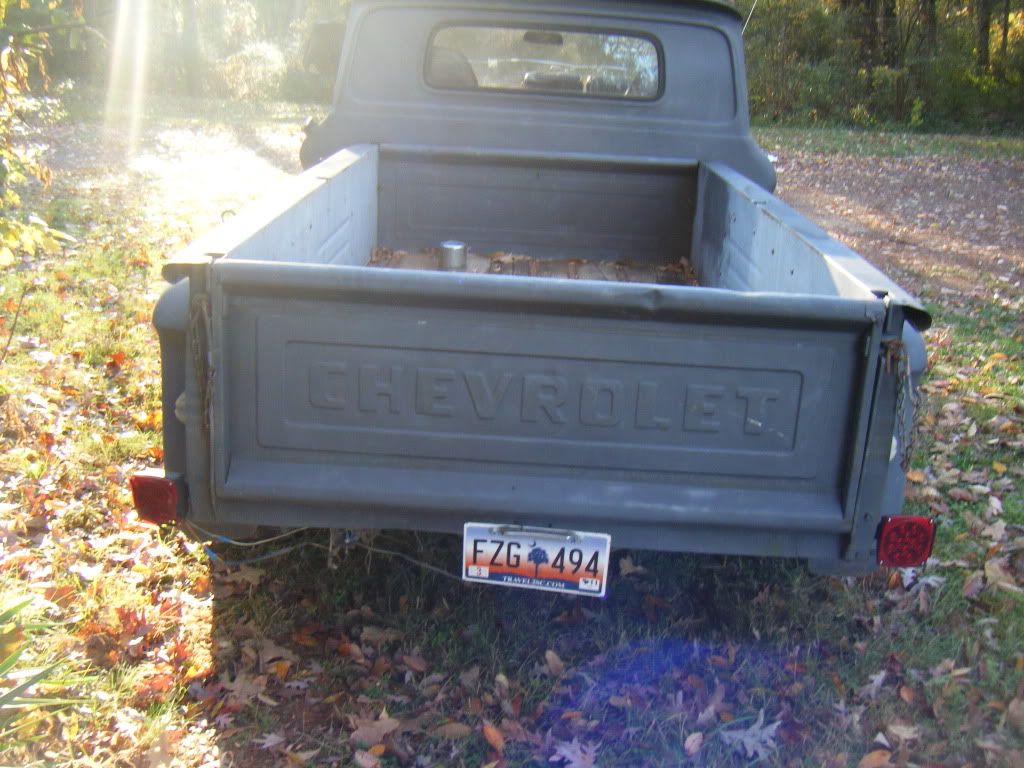 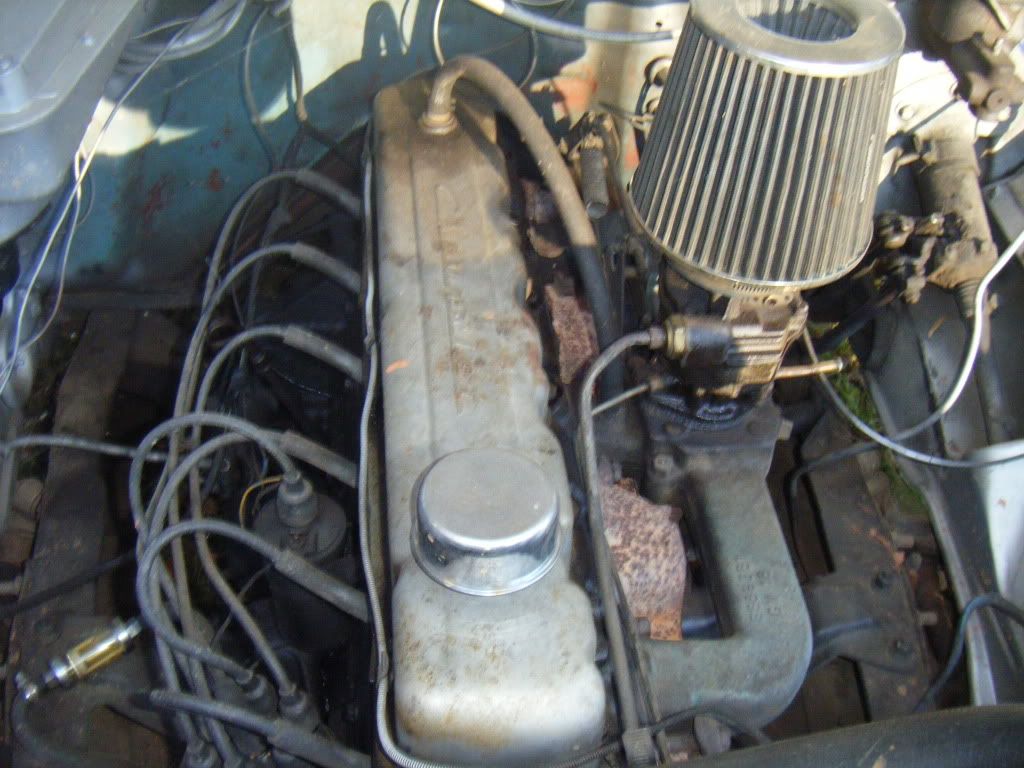 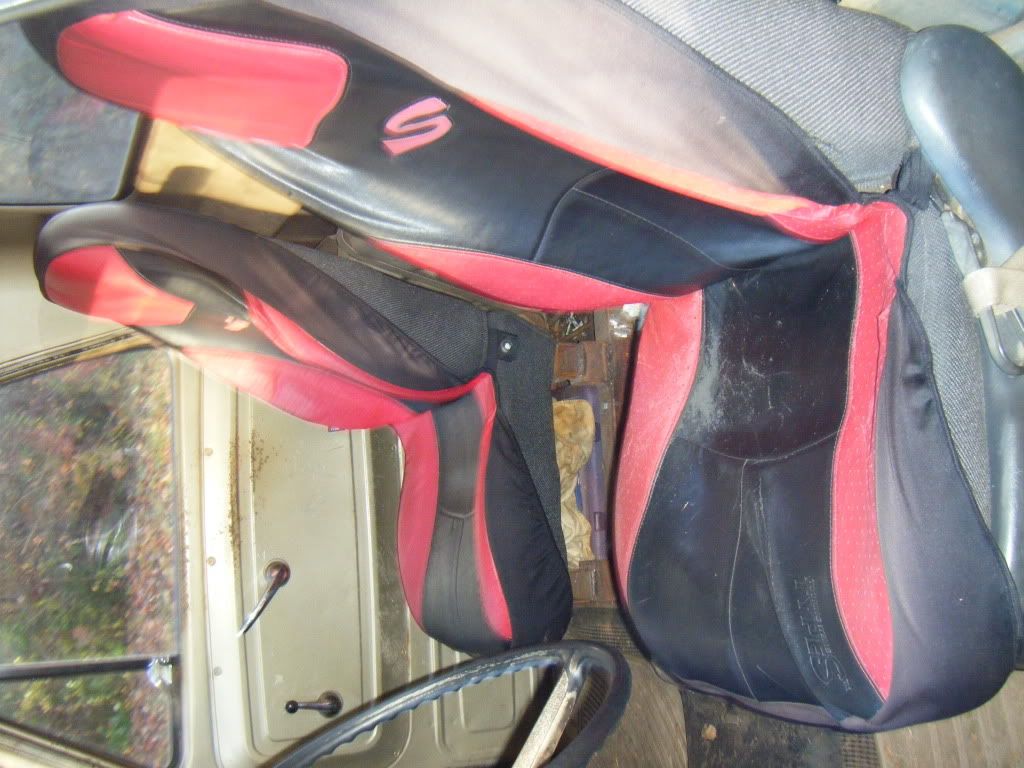 (sorry, just tilt your head) Mostly what I've been doing over the last 4 months has been acquiring parts and doing things here and there on the truck. So far this is what I've done. -removed ghetto bucket seats, swapped in a 69 GMC seat as a temporary (have a 65 seat in PA) -swapped the carb out and added a stock air cleaner I got from geezer (Thanks again http://67-72chevytrucks.com/vboard/i...lies/metal.gif), the old one was leaking and mounting bracket was missing hence the ghetto rigged filter -replaced the battery -got new tires on the stock steelies, the rears in the pic are gonna get sold -remounted the rear bumper (it was in the bed) -removed the ghetto stereo and all of the ghetto wiring -rewired the turn signal harness (temp job, it's not pretty but it works) My near future plans are as follows -disc brake conversion (staying 6 lug) with new rims (still TBD) -mount up a 69 Camaro gas tank in the rear with the filler behind the license plate -new repo inner and outer fenders -replace the tails with stock repos -replace the turn signal column switch -replace the door and ignition switches -replace the windshield -replace the wipers -give the engine a tune up -Get a 36" gang box from Lowes and mount it in the bed to hold my tools (got cited on the last barracks inspection for tools and parts in my room) Once I have all of the above done really all I have left to do is the rust repair on the cab and any engine/driveline work that may need to be done. Currently I'm sitting about about $3.5K invested including the purchase price of the vehicle and with all of the parts I've acquired so far (95% of which are not listed) In the next 6 to 8 weeks that will likely jump up to be in the neighborhood of about $5K. After rust repair I'm hoping to be sitting about about $2K left which will be used to fix up any mechanical issues I may have left on the truck. Paint will likely be a rustoleum roll on job for the time being to tide me over for a few years. The truck currently has spray bomb on it so it'll have to all be stripped off when it goes for it's real deal paint job. This will also allow me to test out the paint job I eventually want to do on the truck. My ultimate end goal is to have this truck more or less done by November of 2012 doing as much of the work myself as possible. My end vision of this truck is to have it a two tone like the originals with the stock dark blue and white. Wheels will be a conservative aftermarket set. Truck will not be lowered at all, I need the payload capacity to hold my Harley. A short stake side on the bed, possibly with a vintage looking sign in the middle of it. And I want to keep the I6 and 3 on the tree in the truck. I'm still undecided as for what I'll be doing with the interior, part of me wants to keep it stock scheme, but part of me wants to go custom. After I finish the truck I would like to give it to my dad. My next post will contain my project log up till today. I'll have to add pictures to it at a later date Last edited by k1rodeoboater; 02-08-2011 at 04:41 PM. Reason: typos |

|

|
|
02-06-2011, 09:11 PM
|
#2 |
|
Registered User
Join Date: Nov 2010
Location: Fayetteville NC
Posts: 752
|
Re: K1's build thread
Progress Log 11/YY/2010 Vehicle purchased in Kings Mountain NC from Justin VIN: C1546B109272 C15 = ½ ton longbed model with 127” wheelbase 4 = vehicle type, in this case truck 6 = model year, 1966 B = assembly plant, Baltimore MD 109272 = vehicle number (omit first 2 digits), 9272nd unit built in 1966 11/23/2010 Tires purchased at Sears. P235 75 R15 12/05/2010 Battery purchased at Advanced Auto Parts. AutoCraft Gold part # 246 group size: 24 700 CCA Ripped up rubber mat to assess rust damage 12/17/2010 Purchased 73 front cross member and brakes from David 12/25/2010 Purchased the following from EZ pull and save 65 folding bench seat small rear glass window jeep cherokee front door checks 83 GM pickup brake booster & master 12/26/2010 Purchased from Dave (in Hamburg PA) box of wiring harnesses (purchased for connectors and switches not to install) drivers and passenger vent window assemblies 4 drums, 2 wheel cylinders, 1 axels worth of shoes/springs/ect front and rear bumpers for a stepside with brackets 64-66 guages instrument cluster 01/08/2011 Purchased 79 GMC fixed back seat and stepside rear fender from David Gutted a good bit of the ghetto wiring from the truck and undid ghetto lowering. Shocks were chained down. Installed rear bumper and new carburetor Installed a rewired turn signal harness (temporary, cut and spliced off old connector and used new bulb sockets) 01/16/2011 Purchased 63 stepside tailgate and 79 K series brake booster & master from Justin (in Raleigh) 01/17/2011 Wrapped 79 GMC bench seat in saran wrap to temporarily hold it together...yes saran wrap 01/18/2011 Got the carburetor tuned, may need some more tweaking but vac holds at about 18-20PSI with RPMs holding at about 600-750. Installed Jeep Cherokee door stop on passenger door. Need to get 2 flared base nuts for the drivers side (10mm I believe) switch on dash is for backup lights and works. Left is on right is off 01/21/2011 Installed 79 GMC bench seat...it's ghetto but it works 01/22/2011 Installed air filter retuned the carburetor. Truck died on me while driving and I had to call AAA to get back to post. 01/23/2011 Installed drivers side Jeep Cherokee door check. No more worries about the doors opening to far YEY! Got grade 5 bolts for the GMC seat. I may have stripped the threads accidentally...oops Worst case I will have to bore them out when I install my real seat and use a nut and washer on the other side. Picked up the following from Advance Auto for the disc brake conversion brake calipers brake lines caliper lube 01/30/2011 Spent the whole weekend researching the disc brake swap for my C10. 02/05/2011 With Smitty's help I busted apart the 73 crossmember parts. Unfortunately I had to cut the rod on the upper A arms, and that's a $60 part by itself!!! Regardless the spindles are out as are the calipers which can now be used as cores. My disc brake swap will more than likely now be on my 66 A arms just to save $120 in parts. Disc brake conversion update!!! I have solved the 5 lug rim issue...I'm not going to use 5 lug rims. I found that Early Classic Enterprises and Classic Performance Parts both sell 6 lug rotors that will fit my spindles. They don't cost all that much more than what I'd pay for them at Advance Auto, and I do need to order a proportioning valve from them anyways. In addition they also sell specific brake hoses for converted 60-66 era trucks. This is because the brake lines on the 60-66 were on the rear of the cross member, and on the later models they were on the front, so the hoses I got for a 73 C10 WILL NOT WORK!!! The “conversion” hoses from ECE or CPP are about the same price as the ones from Advance Auto too, only a few bucks more. Rear gas tank update!!! A member on 67-72 chevy trucks put a 69 Camaro gas tank onto his 2nd gen C10. Advantage to this is that the 69 Camaro had the gas filler in the REAR! I found a seller on Ebay selling these tanks with the sending unit (which just also happens to be the same as my truck) for about $190. I will need to make some custom brackets for it out of some metal square tubing, but nothing will need to be welded. I just need to bolt it onto the frame. I will also need to get a flip down license plate bracket off of a 90's era Caprice (or any flip down really) and I will need to modify my rear bumper license plate mount to work with it. I have an idea that will not require me to do any welding to make it work, and it will also allow me to mount a license plate light. If I do the swap before I'm able to make that bracket I will have to remove the license plate bracket off of my bumper and temporarily put the plate elsewhere. Contacted a guy North of Durham who restores Chevy trucks, he might be able to get me a lot of the parts I need cheaper than I can order them from LMC. Will update in my log when I hear back from him regarding pricing. 02/06/2011 Returned cores and 73 brake lines to Advance Auto, should see $62 and change back on the card. Picked up some Chevy step plates for a stepside for $35. I may or may not use them but they're kinda cool. Worst case they'll make for some cool garage decorations or I can put them onto a bar stool. Spray bombed an old tool box the color I was thinking about using...not sure I like it 02/08/2011 Ordered 69 Camaro gas tank, sending unit, and anti-squeak kit from Tamraz. http://cgi.ebay.com/ebaymotors/1969-...item4398fbdc33 Had to call in to ask that the tank straps (which would be useless given my needs) be swapped out for an anti-squeak kit. Total cost came to $170 shipped...not bad...not bad at all. Especially considering that a Blazer tank from CPP is $249 + S&H for the kit. It's cheaper and a little more unique than your average bed fill/side fill tank....what's not to love? Called and verified that CPP carries the conversion brake hoses for the 64-66 trucks so they will reach from the 64-66 brake line location on the rear of the crossmember. The 73-87's were on the front of the crossmember and would require a bracket be welded/placed there. In addition I verified that their 6 lug rotors are indeed 1 1/4" rotors. I need to check my junk rotors in my storage unit to verify that they are the same size for the 73 parts I have <crossing fingers> I called around to a few people selling rims on Craigslist. Found a set of 85 K series stock Rally wheels about an hour and a half away for $100. I'm really tempted to get them...but at the same time the wheels I'm considering getting are only $150 more and are brand new. If I buy used ones I'll be replacing them again later...if I buy new ones I'm not so sure that I want to get 15" rims, but since I just got these tires 4 months ago and paid $260 for them it's stupid not to keep them. I will have to mull it over, I'm far to tired to go driving up there to get them tonight anyways. Found a guy not to far away who's got a junkyard with some C10 parts, I'm gonna check them out either this evening or later this week. He's also got that Caprice flip down plate bracket I need. 02/10/2011 Got the following from Wayne. I went there for a $25 part and wound up spending another $100. He may have more stuff too, and he said he'd get back to me about it. $25 Caprice license plate bracket $20 Chrome GMC dual headlight grill with grill support panel and wiring harness (missing the bezel and letters) $5 Aluminum 64-66 Chevrolet grill shell $15 Steel 64-66 Chevrolet grill with backing plates $5 L & R upper radiator support braces $30 Hood with lights (no dents, has pitting/rust damage but not rusted through) $25 Passenger inner fender (only surface rust, no pitting or rust through) 02/11/2011 The $30 hood has rust, dents, and a lot of bondo. I pulled the turn signal housings, lenses, bezels, hood support braces, and hood latch assembly off of it. That alone was worth the $30 I paid for it. I'll keep it around to practice dent removal and welding on, but I doubt it'll be a useable hood ever again. Over the next few weeks I'll strip it down to bare metal and see just how far gone it is. If the front lip is patchable I'll cut out all of the rust damage with a dremel tool and cutoff wheels (that will take me a few days). so far all the rust through I'm seeing is on that front lip and is maybe 3/4" tall and 6" wide. Even without a whole lot of metal working tools the areas are pretty flat. I should be able to cut strips to weld in there. 02/12/2011 Purchased a stud welder and slide hammer from harbor freight. They're on clearance for $99. I'm going to give it a shot to pull the dents in my cab which are bondo'd over, hood, doors, and tailgates. If it works, great, if it breaks and is crap it'll get returned. 02/13/2011 A big thanks to Smitty, he did a quick tune up on my truck as well as fixed the fuel line leak. New points, rotor, cap, plugs, and belt were installed today. He indicated that I have a vac leak somewhere on my truck. Also that HF stud gun welds studs on great...but the slide hammer sucks big time. I couldn't get it to work at all. I'll try to read up on it, but it will likely be going back to HF this week. I also installed my toolbox into the bed of the truck. Found a plastic tote at Walmart for $50 that will be useful when I'm done with this project. A metal gang box I'd be hard pressed to find a good use for, especially a 36" one. I'm going to have to trouble shoot why my truck keeps dying on me while I'm driving. Smitty thinks it might be a fuel pump problem. Oh well I'll find out soon enough I suppose 02/16/2011 The Camaro tank arrived today. I took some measurements of the tank and the frame. This doesn't look like it'll be all that hard to mount up. Making the license plate bracket will probably be the toughest part of this install. I've got a sketch made up for it, but I still need to cut the original license plate frame off of my bumper. The PO welded on some re-enforcement pieces of 1/4" steel that connect from the bumper to the frame. Only reason I can see for this is because there was a tow ball mounted on the bumper at one time. 02/19/2011 I have the tank mounting bars and straps mounted on the tank. Tomorrow morning I'll be installing, or at least attempting, to install the whole schabang. One cool thing to note about this install is that I haven't needed to remove my bed. I'm doing everything from underneath the truck. I had to tweak the mounting straps I bent to work with the anti squeak kit. When I added the parts to the anti squeak kit it didn't have the bends in the correct places, but they were close. Luckily 14GA steel is easy enough to bend by hand, so I was able to correct the errors. I just hope that when the tank is full the straps will be good enough. I may run an extra bolt through the straps just for piece of mind. That said I've got it tightened down to the point where I can barely move the mounting bracket/strap combo by pulling on it. I think my "vac leak" may actually be a fuel pump problem. Driving the truck over to my buddy's place it died twice on me. It only happens when I'm engine braking or just as soon as I push the clutch in. At one point it sounded like it was gonna die, but a quick blip of the throttle it kept idling along perfectly fine. I did that for the next 3 stop lights without any issue...so I don't know if that could be it. Also when it did die and it would fire back up on either the 1st or 2nd try, and when it did fire up it would fart out a nice black cloud. Also as a side note...this ghetto exhaust on my truck has GOT TO GO! It's just got a glass pack on it and exits out about a foot behind the cab on the drivers side. The really ghetto part is it's being held onto the frame by a coat hanger that's twisted together....yeah...no bueno. Besides the awesome ghettoness of it all it's just to freaking loud and annoying. The note of the drone isn't enjoyable at all. I'm thinking about cutting off some of the pipe after the glass pack, clamping on a turbo muffler and then running the exhaust out under the drivers side step like they did on the original. I may even splurge a bit and get a slash cut exhaust tip to match up with the side of the step LOL. 02/20/2011 I readjusted the tank straps one more time. The realization that 144lbs of gas will be hanging from them made me have second thoughts about my first go at it. The difference between the two is HUGE. Before I could move the brackets and straps slightly, but now with the adjustment made I literally cannot move it at all despite my buddy and I pulling on it in opposite directions. We tried to mount up the tank and a slight problem came up....I have no way to get the bolt back to where I need it to attach it to the front cross sill on the frame in the front because it's about halfway down the bracket. I'm going to try to tape the bolt onto a rod and try to bolt it on tomorrow but I'm honestly not all that optimistic about it being able to be done. The rear bolts aren't an issue at all since they're pretty much right at the end of the bracket. I have a backup plan just in case, I'll post it up if I end up having to do it. If you have a welder you could just weld a nut right onto the bracket and call it a day...but I don't have a welder....yet. 02/21/2011 I got the tank installed finally, so that's one thing off of the to-do list. In hindsight it would have been a lot easier with the bed off of the truck, but it was doable with it on there. If the bed was off it wouldn't be near as awkward to get to some of the bolts. I would have saved myself quite a few cuts, scrapes, and bruises. It was definitely a two person job, and a 3rd could have been helpful during the mounting part. All in all the order that I did the steps in I believe to be the best way. The straps would be a royal pain in the ass to bend and tweak if they were on the truck. Also the amount of force needed to get them to line up where I wanted them would have necessitated the removal of the bumper had I not done it in the order I did. Now all I have to do is run the fuel line (easy) and run the wiring (easy). The hardest part will be figuring out how to convert the sending unit from 90 ohms to 30 ohms and keep it waterproof. 02/22/2011 I've got to follow up with the guy who I'm ordering a bunch of parts for to make sure he's placed the order. Hopefully most of it will arrive during the week and I'll be able to do some more work on the truck this weekend. I'm getting new inner and outer fenders, the seals for them, door locks, turn signal switch, tail lights, and filler neck grommet. This guy is significantly cheaper in some case than going through LMC, other times it's a wash because the prices are the same or +/- a few dollars. The biggest downside is I'm betting he doesn't have a return policy. Orders to CPP for the rotors, hoses, and prop valve need to be place, and an order to Jegs/Summit for my rims needs to be made as well. I hoping that in 2 or 3 weeks I'll be running power disc brakes, that'd be sweet to check another thing off of the to-do list. Sometime during the week I'm going to go back over to Russ's place and run the wire and fuel line. That part should be pretty easy to do and shouldn't take me to much time. I know he wants to put his bed back on Wednesday or Thursday this week. Once I get the new fenders I'm going to roll the dice on that $50 paintjob. I figure the best time to paint them is while they're off the truck. I'm hoping to have them painted and ready to install the same weekend I do the disc brake swap. It'll be kinda nice seeing the truck slowly transform from chalky black to gloss blue as I replace/repair the different parts of the truck. 02/26/2011 Ran the rubber and hard fuel lines today. Got to get another length of rubber hose to connect from the hard line to the fuel pump. When I eventually take the bed off of the truck I'll have to redo the hard line from the tank. It's a PITA to try to run from underneath the truck. I got it bent in more or less the right places but I'm not happy with it. It'll work but it's not pretty. I ended up getting a can of rustolem rust converter the other day. My inner door panels were pretty rusty, especially the drivers side. I don't know how good this stuff is, but it's worth a shot. I stripped the pieces with aircraft stripper, scraped the junk off, sanded, degreased with brake cleaner, sprayed purple power rust converter on them, degreased again with simple green, and lastly sprayed with the rustoleum converter. The pitting damage on the drivers side is bad...really bad. Filler primer will probably help some of the pitting but the rest will need a skim of bondo to be smooth again. In all honesty, with the amount of flex that these door panels have I'm skeptical that bondo will work. Ended up sanding some of the surface rust off of the hood...then sanded more....and then said screw it and sanded the whole thing (with the exception of the front lip because it needs bodywork). I hit as much of the hood with some filler primer (spraycan, no compressor so it's the best I got). Some of the surface rust really was just that, but in a few places it was starting to pit. I know it's not the best or ideal, but it's better than what I've got that's not protecting the metal at all. 02/27/2011 Sprayed the following with filler primer after sanding off the surface rust: hood, wiper cover, cowls, cab roof and rear window wraparound area (2 toned my truck LOL) 02/28/2011 I also discovered my trucks engine very well may be original. The casting number on the block is 3877178 which is a 230 or 250 from 62-72 from any one of these Chevrolet / Buick / Oldsmobile / Pontiac / GMC....so pretty much it's probably original 03/01/2011 Sprayed the inner door panels with primer, the inside of the one cowl with primer (it was a bit rusty in there), and touched up some of the thin spots on the roof. 03/03/2011 I ordered my rims, lugs, and caps today, the total came to $258.40. I'm just waiting to get those and the parts from CPP I think. I'll do an inventory this weekend to see what all I'm missing if anything. As soon as the rims arrive I need to get my tires swapped over. I also picked up the two outer fenders, inner fenders, a drivers inner door panel (that's the one on my truck that is really badly pitted), and tail light brackets tonight. I should have the tail lights themselves, turn signal switch, lock assemblies, and fender/inner fender gaskets at the end of next week. That will give me plenty of stuff to do on the truck for a while 03/05/2011 Went over to my buddy's house after work and Justin and I removed drivers side rear fender, what a PITA. Ended up having to cut off all be 4 of the screws because the heads either egged out or we couldn't get enough purchase on them with the screwdriver. Surprisingly I managed to cut them off only nicking the bedside once. Unfortunately just removing the fender took us a little over 2 hours and close to 8PM. That's my cutoff for using power tools. Not because of city ordinances, or that anyone has complained about the noise, I just figure out of courtesy at 8PM you should be winding down or doing stuff that doesn't make a whole lot of noise. We cleaned up our work area, grabbed what we needed for the next project, and headed to my storage unit. There we prepped and primered the inner and outer fenders, probably taking another hour or so to do it all. I just sprayed the "show" sides with primer. I will more than likely roll/spray bed liner on the insides of them. After carefully putting them away into my little storage unit we packed it up and called it a night. Not a very productive evening but we got the parts primered which was really what I primarily wanted to get done. 03/06/2011 Rolled 2 coats of the paint onto my parts. The first coat looked like crap (always does apparently), and the second looked a LOT better...hopefully the trend continues. The truck in now fender-and-step-less...and without a rear bumper again. The drivers bedside is in good shape, the passenger side will need to have the cancer cut out and patched where the fender mounts up at. The bumper has been stripped and primered. Tomorrow if the weather permits it'll get sprayed with a few coats of gloss white. My rims, caps, and nuts came in from Summit today. They tossed in a free hat which is nice since I needed to get a new one. My old khaki US flag hat is well broken in already but I want to have something else to wear. Hopefully tomorrow I can get the rubber swapped over to the new rims. 03/07/2011 On 24hr duty today so no work on the truck but a few things I want to note that I will do tomorrow or in the next few days... -Paint the hood the next time I paint my fenders and cowls. The primer will soak up water and promote rust -Paint the upper half of the cab that I primered. Also finish primering the front portion around the windshield. -Paint the bumper brackets gloss black (debating on this one, I'll do it if I have extra paint but it's not a priority) -Fix and paint the bracket cover pieces body color (these are pretty messed up but I'll try my best to fix them. I may just paint them black) -Prep and paint side steps -Mount and balance the tires onto the new rims -Work on removing dents from the other tailgate -When I get ready to replace the windshield I will remove it myself so I can primer and paint the mounting lip as well as fix any rust issues which I hope there are none...PLEASE BE NONE!!! The same will be done for the rear window. 03/09/2011 Painted the primered portions of the cab with the gloss white tractor paint at lunch. It is substantially more durable/harder than the rustoleum white spraypaint. Went back at the end of the day to paint the fenders with their final coat of paint for now, and to also spray the rear bumper and inner door panels with the rustoleum gloss white. If the rear doesn't hold up well I'll redo it with the tractor paint later on sometime 03/11/2011 Pulled off the grill, front bumper, grill support piece, radiator support pieces, hood latch, and the hood off of the truck. I'll need to use some broken bolt extractors on the rad cover, a few of the bolts sheared off. We took the painted fenders and cowls over to my storage unit for safe keeping, unfortunately one cowl got scratched in transit but that's no biggy. I'm going to repaint the whole truck when it's all reassembled...or I'll just hit it with some spraypaint before it gets installed. The $30 ghetto hood go bolted onto the truck to cover the engine up incase the weather turns. I ended up sanding down and reprimering my hood because in the last 3 weeks it's sat outside it got dinged up from branches falling and pooped on by birds. Interestingly under the primer there was no rust, and we've had quite a few rain storms in the last month. 03/19/2011 Went to a junkyard today with my dad to pull some parts...unfortunately he had to do most of the work because my pain level was pretty high. Haul 1 - $40 65 c10 windshield 65 c10 steering wheel 65 c10 turn signal components and switch cut out a radio repair panel from the same truck High hump out of a 66 C30 flatbed dually door handles (inside) window cranks rochester monojet carb 4 way flasher trim piece Haul 2 - $25 Stepside bed headboard off unknown 64 to 66 GMC front sway bar with brackets off 73 to 87 C10 3 glove box doors Power steering bracket off of a 67 to 70 C10 with a 250 I6 Not a bad haul for a gimp and an old man 03/22/2011 Primered the grill support, rad support pieces, and cab. Im gonna need to do a bit more sanding on the grille support, I missed a few spots. I also painted 3 coats on the inside portion of the inner fenders and 2 coats on the show surfaces. Gonna wetsand and do another 2 coats tomorrow if it looks like it needs it. The parts from CPP also arrived. Now I have everything to do the disc brake swap except for the booster bracket from captianfab, that will be ordered tomorrow. 03/23/2011 Turns out I ordered a brake line kit instead of the hoses for my truck from CPP...crap. Oh well I can use 73-87 hoses now. To bad I returned them a month ago...oh well I can buy them again. It's not worth it to return and re-order the parts side from that the last two coats of paint were rolled on the wiper cowl and hood (all but that front piece that's separate, that'll get painted once I weld up the pinholes). Hopefully Justin and Russ can get the hood mounted up for me, I don't want to try to lift it right now with my back the way it is. I also painted the small part of the cab where I need a bit of the blue for the two tone by the windshield. I'm gonna spot test the spray can version of the blue paint on an inconspicuous spot first, if that matches the rolled on paint I'm gonna just sand off what I rolled on and spray it tomorrow during lunch. I figure after the day is over I can go back and finish up the two tone on the cab (just one coat for now) Side steps got scuffed and primered, and the grill support got 2 coats of blue rolled on the upper and lower portions of it. 03/25/2011 sprayed the blue on the lower part of the A pillar, sprayed some white as well just to get some coverage before it rains this weekend. I'll have to redo both at a later date (no biggy planned on it anyways) Since I knew that this paint does not like to sit unused after it's been sprayed I went ahead and sprayed the side steps as well. The difference between the spray and can version of this paint is the spray has a hardener in it. I figure for the steps having the harder paint is probably a good thing, so I used the rest of the can to coat the two steps (probably 3 coats on each, and I did mention that this stuff sprays on thick earlier I think) I used what I had left of a partial can of white I had forgotten about from when I did the roof and rear window area...it sprayed like crap but it was about 1/3 of a can. I used that on the front bumper which I just scuffed with a fine grit sanding sponge. It was good for about 2 thin coats. I used what I had left of the new can of white I had used on the A pillars and eyebrow above the windshield. I also brought out the hood and mounted it up. My truck is now starting to look less and less hoopty like. If the weather isn't crappy on Sunday I'm thinking about mounting up the wiper cowl, and side cowls. I'll also be finishing up the blue on the grill support so that Monday I can spray the white down and mount it up that evening along with the front bumper. All I'm waiting on to mount the repo inner fenders and outer fenders are the gaskets that go onto the cab Last edited by k1rodeoboater; 03-26-2011 at 08:34 PM. Reason: typos and updates |
|
|
|
|
02-06-2011, 09:46 PM
|
#3 |
|
Registered User
Join Date: Sep 2008
Location: Vancouver Washington
Posts: 726
|
Re: K1's build thread
Cool thread. I like your progress write ups

__________________
 1960 GMC short fleet, full frame build... http://67-72chevytrucks.com/vboard/s...d.php?t=329718 |
|
|
|
|
02-07-2011, 12:16 AM
|
#4 |
|
Registered User
Join Date: Nov 2010
Location: Fayetteville NC
Posts: 752
|
Re: K1's build thread
I'm a bit OCD...you should see my build book/owners manual. I have pictures, dates, prices, phone numbers (and what they may be looking for, for their projects), product numbers/codes, labels, ect. There's no way I can keep track of everything I purchase let alone all the ideas I come up with so I write it all down. If/when I sell the truck it'll be handy for whoever buys it. Not only will they see I took this seriously but I also have meticulous records of everything. They will also know the ins and outs of the vehicle intimately as well as what years and vehicles to get parts from if they need to make repairs.
Of course if things go to plan my pops is getting the truck. I figure it'll be good for him to have while I'm deployed. |
|
|
|
|
02-08-2011, 01:28 AM
|
#5 |
|
Registered User
Join Date: Nov 2010
Location: Fayetteville NC
Posts: 752
|
Re: K1's build thread
Nothing really to report today. I pretty much did nothing since I had the day off (WOOT WOOT impromptu 3 day!!!). Woke up at 0730, reported in via text message, and went back to bed till about noon. The most productive thing I've done all day was to gather up some stuff to go to my storage unit, find the charger cable to my camera (it's been MIA since 2 moves ago...I'm up to 10 moves in 14 months), and finish spray painting a toolbox "royal blue". I was thinking about using that color for the ghetto roll on paintjob...but after seeing it on the toolbox I'm not so sure about it. I'll post pics tomorrow of it on the hood of the truck so you can see what I mean. I may just stick with the flat black for now.
I'm gonna place the order for the Camaro tank, sending unit, and anti-squeak kit at lunch today. My local used parts guy has a Camaro tank from an unknown year, but I'll feel better knowing that my fuel system will be 100% good to go. If the tank arrives by Friday afternoon I'll try to install and get it working this weekend. I'm also going to order all of the parts I need for the disc brake conversion. Once I have all of those parts I'll just be waiting on getting a set of rims to transfer my tires over to before I can start the swap. Last edited by k1rodeoboater; 02-08-2011 at 04:41 PM. Reason: typos |
|
|
|
|
02-08-2011, 09:23 AM
|
#6 |
|
Registered User
Join Date: Nov 2010
Location: Fayetteville NC
Posts: 752
|
Re: K1's build thread
Only got about 2 hours of sleep...but I did figure out that by piecing together my own disc brake kit I will have saved an estimated $600 to $650 over buying a complete kit that's "ready to install"
I will say this though, if you're wanting drop spindles BUY THE KIT!!! You'll end up paying a more than if you were to piece it all together but it's a lot easier and saves you the headache. I'm also using the OE brand parts from Advance Auto for my steering components...they're the cheapest ones they've got, but since I'm not planning on driving this truck much more than maybe 1-3K a year they should last a good while. If you use the "higher" quality stuff that Advance sells you're better off buying the front steering rebuild kit (rubber) from CPP, it's cheaper or about the same with a coupon code for Advance. As ghetto as the roll on paint job is this link does give me a glimmer of hope that mine will turn out half as good. http://www.rickwrench.com/index79mas...llarpaint.html If I had my way I'd drop the coin on a proper paint job the first time around, but some sort of paint is better than exposed metal. I also must admit the concept of it does kind of intrigue me and for a pretty small investment and the experience...why not. My truck sure won't look any worse than it already does with the spraybomb job the PO did. I'm the first one to admit it looks like crap. I'm going to try testing it out on a spare stepside fender I got to use as a patch piece. It only cost me $15 and it's going to get cut up anyways. |
|
|
|
|
02-08-2011, 12:25 PM
|
#7 |
|
Registered User
Join Date: Aug 2009
Location: Bowser
Posts: 13,775
|
Re: K1's build thread
Nice truck young fella!!! Good build thread. Here's a link for you. I had a light duty welder I bought from these guys but gave it away. I've also used their stitch welder for small patch jobs on body panels. Cheap too!!!
Then you could weld the snout back on that aircleaner. LOL!!! Lots of other handy tools on eastwood's site too!! http://www.eastwood.com/ Had a brain phart!!! Just remembered!!! Look up Jblackie47803 build thread on the 67 section. He did a roller paint job on a couple of his projects. http://67-72chevytrucks.com/vboard/s...d.php?t=359543 Last edited by geezer#99; 02-08-2011 at 12:33 PM. |
|
|
|
|
02-08-2011, 04:39 PM
|
#8 | |
|
Registered User
Join Date: Nov 2010
Location: Fayetteville NC
Posts: 752
|
Re: K1's build thread
I ordered the 69 Camaro tank, sending unit, and anti-squeak kit a few minutes ago. I ended up ordering it from these guys
http://cgi.ebay.com/ebaymotors/1969-...item4398fbdc33 I had to call them up and talk to someone in sales to get the to exchange the tank straps for an anti squeak kit. The total came out to be $170ish delivered IIRC. I'll update it with an exact figure when I get it, and I'll continue to update my project log in my 2nd post. I cannot claim any credit for the Camaro tank install. All the credit must go to 67Slider and his thread... http://67-72chevytrucks.com/vboard/s...ghlight=camaro Quote:
Last edited by k1rodeoboater; 02-08-2011 at 04:45 PM. Reason: typos |
|
|
|
|
|
02-08-2011, 05:58 PM
|
#9 |
|
VA72C10
 Join Date: Mar 2008
Location: Midlothian, VA
Posts: 25,267
|
Re: K1's build thread
Very cool truck and I love the detailed build. I am a fan of the cheap paint job. Just remember it will take a LOT of time to do. And once you have the body prepped enough to get to the point to do a good roll-on paint job...it's to the point to take it to a maaco or earl scheib to get a 299 spray job. If you've already taped and masked and/or removed everything and done the body work then why not get it sprayed?
If you consider not only the cost of paint but also the wet sand paper, polishing compound, and buffer wheels (and a buffer if you don't own one) you'll probably end up spending at least 300 on a job that takes several days time of YOUR time. Just something to consider....
__________________
Looking for a 67-72 swb or blazer project in or around VA. 
|
|
|
|
|
02-08-2011, 09:23 PM
|
#10 | |
|
Registered User
Join Date: Nov 2010
Location: Fayetteville NC
Posts: 752
|
Re: K1's build thread
Quote:
inner and outer fenders repair dent in hood repair dents in doors repair/replace drivers side rear fender The cab repair is what will take me the longest since 1.) I don't know how to weld and will be learning on this project, 2.) I can't weld in the barracks parking lot or the auto shop on post, 3.) I don't want to be imposing on my friends by leaving my vehicle there for several days while I work on it, and 4.) My schedule and available work spaces aren't conducive to burning the midnight oil during the week. As you can see by my project log almost all of my work has been done on weekends, that will more than likely be the norm for a good long while. Cab repair wise I have the following Drivers floorpan Drivers rear outer floorpan Drivers kick Drivers rocker Driver cab support (possibly not needed) Passenger entire outer floorpan Passenger kick Passenger rocker Passenger cab support (possibly not needed) Cab corners x2 All in all not to bad, but a lot of work will be needed. I figure I can do the passenger side over the course of several weekends, the drivers side is the tougher one to do since I won't be able to move the truck anymore If by some miracle I am able to get the truck fully done quicker than expected, and nothing crazy pops up that I don't foresee, I will for sure be taking the truck to get a professional paint job. And since there are to many unknown variables in regards to the budget right now I'm thinking of a cheap roll on job as a temporary to hold me over and protect the metal. It's my hope for the best but plan for the worst mentality coming into play. I'm hoping to tune up and test my engine this weekend, that will really determine what work it may require. If I need to rebuild the engine I have to get quotes on it or attempt it myself (leaning towards having the pros do it). My current plan is to keep the I6 and restore the truck. However, if the I6 is to far gone to rebuild (which I HIGHLY doubt), I'm going to say screw the budget and hot rod the truck. This may be my first go at restoring a vehicle but I know that sometimes it will make the choices for you. Last edited by k1rodeoboater; 02-08-2011 at 09:26 PM. |
|
|
|
|
|
02-09-2011, 11:23 AM
|
#11 | ||||||
|
Registered User
Join Date: Nov 2010
Location: Fayetteville NC
Posts: 752
|
Re: K1's build thread
Here's a good little tidbit about the sending unit in that Camaro tank if you're staying with stock gauges. The sending unit in our trucks (1960-1966) are 30ohm. In 67 all Chevy/GM vehicles used 90ohm senders, so that 69 Camaro tank will have a 90ohm sending unit in it. As I'm doing more and more research I'm finding instances of 90ohm senders being in 66 vehicles, so there was a transition period of sorts. Bottom line is check your sender before you go modifying anything.
This doesn't mean you're screwed, it just needs to be modified or you can get an aftermarket gauge that will work in the 0-90ohm range. Follow this link, or look below for the important part. http://www.oldengine.org/unfaq/oddbits.htm Quote:
Here's another method from our very own '63GENIII, see the last post in the thread or look below at the quote. http://67-72chevytrucks.com/vboard/s...d.php?t=403321 Quote:
Here is another possible option I've found that isn't near as invasive and potentially more accurate while retaining the linear readings of the stock gas gauge. http://www.hotrodders.com/forum/gm-f...hm-106069.html Quote:
Quote:
Quote:
Quote:
Last edited by k1rodeoboater; 02-09-2011 at 01:54 PM. Reason: additional info |
||||||
|
|
|
|
02-11-2011, 12:04 AM
|
#12 |
|
Registered User
Join Date: Nov 2010
Location: Fayetteville NC
Posts: 752
|
Re: K1's build thread
Got a great update for today. I went out to pick up a flip down license plate bracket from a Caprice and a bunch more parts just happened to follow me home...here's the break down
$25 Caprice license plate bracket $20 Chrome GMC dual headlight grill with grill support panel and wiring harness (missing the bezel and letters) $5 Aluminum 64-66 Chevrolet grill shell $15 Steel 64-66 Chevrolet grill with backing plates $5 L & R upper radiator support braces $30 Hood with lights (no dents, has pitting/rust damage but not rusted through) $25 Passenger inner fender (only surface rust, no pitting or rust through) $125 for it all.....but the best part is really it was all FREE! First a random tangent. I found out recently from my dad that my Grandfather was a Chevy man. He never owned a truck, cars only, and that was all he owned up until his last car which was a 91 Toyota Camry...but that's not what this is about. If it weren't for my Grandfather I wouldn't be as observant as I am today. When I was younger we would go out on what he called the "yarmakh" which may or may not be the polish term for dumpster diving. My Grandfather was one of the most frugal people I've ever known, probably due to growing up during the Great Depression. Many a time we'd go out on the yarmakh and find all sorts of treasures, some useful and most not. He also told me to keep an eye on the ground in parking lots to look for money that people drop. When I was maybe 3 or so he wanted to test me and he dropped a dollar on the ground while we were walking through an apartment parking lot. I tore off after it like a dog after a hare, and my Grandfather was extremely proud that he had trained me so well. Still to this day I will scan the ground as I walk into a store, and if I see a penny I will stop to pick it up. I like to think that every coin I pick up he's smiling about it. I rarely have dumpster dive for anything anymore but when I saw these motorcycle fairings just sitting off to the side I couldn't help but take a look. After looking them over they were in good condition aside from the cosmetic damage and I instantly thought of my Grandfather. So sure enough I took them and posted them up on Craigslist and wound up selling them for $125. As my Grandfather used to say, "One man's trash is another man's treasure." Boy was he right. If he were still alive he'd be hooting and hollering with joy over this. So thanks Grandpa...you cheap Polak 
Last edited by k1rodeoboater; 02-11-2011 at 12:39 AM. Reason: story time |
|
|
|
|
02-13-2011, 12:59 AM
|
#13 |
|
Registered User
Join Date: Nov 2010
Location: Fayetteville NC
Posts: 752
|
Re: K1's build thread
A bit of an update from yesterday.
I went over to my buddy's place and decided to try to strip down the hood and see what I had. It first appeared to be a perfect hood...however it proved to be anything but. The front lip is rusted out and the rust spots were filled with bondo. The flat portions of the hood have dents with bondo on them. All in all...it's crap. $30 however was not wasted. The parking light housings, lenses, and bezels are in almost perfect shape. I also nabbed the hood support braces off of it as well as the hood latch mechanism. I'm gonna keep the hood for now to practice dent repair and welding on, though it will likely get sent to the scrapper which is a shame. I also located some piss poor bondo work on the back of my cab. I'm goign to have to take my wire wheel to it and see just how bad it really is. I went out and got a stud welder and slide hammer from HF. I need it for the dent repair on my hood, figure it'll get some use on the cab as well, and lastly on a few other parts. My drivers side stepside fender is going to be an interesting repair job. I'm going to essentially cut it in half, take the rear half from my donor fender, and tack weld it together while it's bolted onto the bedside to keep everything aligned (at least the idea works in my head). Get it as fully welded as possible while on the bedside, remove it, and then finish the welding to get it together. After that is done I'm going to have to cut off a part of the bottom edge of my original fender to repair the rust damage that is present on the donor fender. That will be fun to try to line up correctly I'm betting. If all else fails i'll be ordering a new repo fender and I'll only be out $15. At that price I figure it's worth a shot. I also spotted a rust through hole on the very front of my driver side door skin. I'm going to try to pull the door smileys out of both of my doors with the stud gun. If that doesn't work I'll be getting new door skins and re-skinning my doors. Best I can tell the frames are still good, it's just the skins that are rotted through. They passed the "poke" test with my awl. I may try to make my own patch panel, though at $30 for a lower skin patch that has pre-bent edges I may just go with that. Full skins are $120, but I have no idea how they are as far as fit and install. There must be a weld right below the window. I've decided on the color I'm going to paint the truck. Valspar's Royal Blue Gloss with a White Gloss cap, and grill surround. I painted an old toolbox that color and I really liked the way it came out. I was unsure of it at first but after seeing it next to the truck and some of the original blue it's a pretty close match. I'm still undecided if I'll do the roll on job or if I'll pay to get it painted. Even if I pay to get it painted it'll be those colors just in the correct automotive paint. tomorrow I'm going to try to strip my two inner door panels, spray on some primer, and try skim coating over the rust pits to see if I can get them smoothed out. The drivers side is especially bad, the passenger side isn't to bad and should be repairable. I'm still waiting on my Camaro tank...Tamraz told me I'd be getting a notification email with a tracking number when they shipped it...and they said it was supposed to go out on Friday. I have yet to receive and email from them. I'm going to call on Monday morning and find out what's going on with it. On the tank install...I'm hoping to be able to do it without removing the bed. If I have to remove the bed it'll have to wait till the weekend and I'll get a few of my friends to help me remove it Friday night and I'll try to clean the frame the best I can that evening. I'll mock up the tank and test fit, plumb the fuel line, and run the wire for the sending unit on Saturday. I'll take it all out and have the frame painted that evening. I'll reinstall everything on Sunday and drive it back to base, on the original tank more than likely. I'm still trying to wrap my head around converting the sending unit. If anyone understands it I'd appreciate any help/advice you can give me. I think I know how to wire it but I'm not sure if this is the correct potentiometer to be using based on docvette's post. http://www.radioshack.com/product/in...ductId=2062355 It's a 50K ohm linear taper pot and has a 0.5 watt range on it....like I mentioned before I'm an idiot when it comes to understanding electronics. I can run wires and hook things up but hell if I know how they work. I'll never be an electrician that's for sure. I'm also going to get in touch with my buddy and sell him one of the Chevrolet grills I have, I think he's interested in the steel one. I may sell the aluminum shell, or I may keep it and hang it on the wall. He'll get it for what I paid for it. I'm placing an order for all the rest of the parts I need for the disc brake swap (with the exception of the lines) from Advance Auto tomorrow morning. Turns out Fat Wallet has a deal with Advanced Auto that you'll get 5% off of your order, and you can add a coupon code to it. Right now the coupon Code VISA gives you the best deal if you place multiple orders of as close to $75 as possible. Going off memory it's $10 off $30, $30 off $75, $50 off $150 or more. You don't need to pay with a Visa card either, and I don't think it's one time use only. |
|
|
|
|
02-13-2011, 01:35 AM
|
#14 |
|
Senior Enthusiast
Join Date: Feb 2007
Location: Spokane Valley, WA
Posts: 8,356
|
Re: K1's build thread
Nice looking truck and great planning. I applaud your enthusiasm for restoring a truck in a military environment. It can be a lot more difficult than living in your own place. The vehicle always sits outside and everything has to be wrapped up and put away after each project. MCAS Yuma back in the late 60's had a pretty decent auto shop too. I don't remember any welding equipment but I'm pretty sure body work was encouraged and supported. Perhaps a local community college may have body shop classes that could provide tools and equipment that could help.
Looking forward to more updates. Be sure to take a lot of pictures as you go, or you'll regret it years from now when you don't have any before or in-progress shots. |
|
|
|
|
02-13-2011, 04:27 AM
|
#15 |
|
Registered User
Join Date: Feb 2011
Location: Post Falls, ID
Posts: 113
|
Re: K1's build thread
Very detailed build. Your Drill Sergeants taught you well. Lol. I don't remember if the Bragg shop does or not have a paint booth. I want to say it does. When I was there I had a new mustang and the only time I used it was to bolt on go fast parts and to lower the car. I know Jackson and Huachuca do. If so you might want to try your hand at spraying it. Plus the great thing about the army is the variety of work experience prior to the military. Ask around you may find an ex-painter who would do it for the cost of material and six pack. I know a couple with me on the trail here a Sill, only problem is my truck is in Idaho. And you may.find someone who knows how to weld and can teach you. You do not want to trash. Rear fender, those bad boys are expensive.
So off the subject a bit. Why did you not come in with a commission considering you have a degree. (i am assuming you are enlisted because you live in the barracks) I wish I had finished school prior to enlisting because I sure would have. Don't get me wrong, I love the brotherhood of being an NCO, but pay wise its not enough. I am working on a direct commission packet now so hopefully when I come off the trail in Apr I can get picked up. I just have to get a waiver for a surgery I had in my neck. I don't see why I have to fight so hard for it too. I am a Drill Sergeant, have been inducted into the Sergeant Audie Murphy Club, have my EFMB (first time go), and was a Paratrooper for six years which I am more than positive caused the problem in the first place. But I am just ranting now so I am done. Hey man good luck on the build. I will be following it and counting down the days till I can get back to my truck and do my disk brake conversion. Which I may piece together now to save the money. Later Posted via Mobile Device
__________________
-Chapa 65 SWB step-side / 383 stroker / TH350 / 4:10 gears / static drop 4 1/2" front 5" rear. Last edited by Chapstr's65; 02-13-2011 at 04:31 AM. |
|
|
|
|
02-13-2011, 11:37 AM
|
#16 |
|
Registered User
Join Date: Nov 2010
Location: Fayetteville NC
Posts: 752
|
Re: K1's build thread
Mark
I agree completely. I want to have a very detailed build book with pictures for myself, and also for resale purposes so the next owner knows exactly what is in the truck and what has been done to the truck. like most of us, I'm going to have a mix of different years, and vehicles, parts on this truck. I'll have 73 steering components and brakes, a 69 Camaro tank w/ converted sending unit, and who knows maybe even a completely different engine & trans combo. Trying to remember all of this would be an exercise in futility. I have a crappy memory as it is. Before I came in it was bad, now it's a bit worse....probably in part from being on jump status. Chapa I sent you a PM regarding the OCS part. There used to be 2 auto shops here at Bragg, one off of Yadkin Rd (82nd Auto Skills Shop), and one over in COSCOM land on the other side of Bragg BLVD (COSCOM auto shop). They shut down the 82nd one and only have the COSCOM one open. Oddly they have a body shop room and a welding room, but they won't let anyone use them. The body shop room has no tools in it, and they won't allow anyone to use the welding equipment for safety reasons. I'll have to ask one of the guys I've met on this board, who's also stationed, here if he'll teach me how to weld on that rear fender. I think the way I mentioned doing it will almost guarantee that it will be aligned perfectly (I'll still use but welding clamps). I should also be able to weld almost the entire joint with it on the truck. I'll just need to take it off to get to the portion underneath the bedside. Repairing the rust damage on the piece I'm grafting on will be interesting though. I'm not going to be able to bolt it up and use the bedside as a template. I'll probably cut the strip I need off of my fender and lay it on top of the piece I'm grafting on. Scribe a line, cut just inside the line, line it up and butt weld it into place. Worst case I'll have to buy a new fender, and to be honesty I sorta ran into this $15 fender by complete accident and chance. I was fully ready to plop down the $350 for a repo (in fact it's still factored into my budget just in case). If this works, great...if not I'm not out a whole lot. |
|
|
|
|
02-14-2011, 12:49 AM
|
#17 |
|
Registered User
Join Date: Nov 2010
Location: Fayetteville NC
Posts: 752
|
Re: K1's build thread
Did a tune up on the turck with the help of a board member on here. He indicated that I have a vac leak somewhere on my truck. I'm inclined to believe him as the truck randomly shut down again while driving...4 times actually while trying to get home. Luckily I was able to restart the truck while it was still rolling. Still it's disconcerting none the less. I'm going to try to get new heater box hoses and vac hoses this week to replace the ones on the truck. Figure I'll drain and flush the radiator, change out the upper and lower radiator hoses, and change out the heater box hoses. I'll need to grab a gallon of 50/50 mix too. With the gallon of full strength anti-freeze I already have I'll have the 12qts I need. I figure while that's all draining I'll swap out the vac lines to make the most out of my time on the lift since I'm paying for it.
I also installed my new toolbox into the truck. Originally I was going to go with a gang box from Lowes which was around $150. My buddy Russ and I happened to go to Walmart and I saw a plastic bin there for $50 that was about the right size. I looked it over and said screw it...why not! It seems to me like it's pretty durable, should keep the rain out even while driving (though I don't have wipers so there's no driving happening in the rain LOL). I'll have uses for a big plastic chest after I'm done with it in the truck...a metal gang box not so much. Late on this week I'll hopefully be getting that tank from Tamraz...still haven't heard back from them and I'm starting to get a bit miffed. If it does come in I hope to have it installed and running by the end of this coming weekend. Once that tanks is installed and running, with all new fuel lines and filter, I'll be more or less done messing with the driveline for the time being. Trans and diff fluids will be next on the list to change out. Brake swap will likely be 3 weeks out at this point. I need to order my wheels from JEGS or Summit. I've decided on these in 15x8 with a 4" backspacing http://www.jegs.com/i/Cragar/260/3975860/10002/-1 While I wasn't planning on rims anytime soon my rule of approaching 50% has won out on this one. I can get used rims for $100 or I can get new ones for just a little over 50% more and I know they're not bent. Before I can order them I need to make some room in my storage unit. I'll probably be getting a membership to this forum to post up some things for sale. The other forum I'm on isn't moving parts fast enough because it's fairly low traffic. Also that HF stud gun welds studs on great...but the slide hammer sucks big time. I couldn't get it to work at all. I'll try to read up on it, but it will likely be going back to HF this week. If I can't get it working right at least they have a good return policy. Last edited by k1rodeoboater; 02-16-2011 at 12:29 AM. |
|
|
|
|
02-16-2011, 12:32 AM
|
#18 |
|
Registered User
Join Date: Nov 2010
Location: Fayetteville NC
Posts: 752
|
Re: K1's build thread
I'm going to be picking up the tank tomorrow afternoon. I'm also hoping that I'll be able to replace the upper/lower rad hoses, heater hoses, and vac lines tomorrow or Thursday evening. I have a 4 day weekend this weekend so I'm going to be dedicating that time to doing the tank install and getting it working....hopefully....
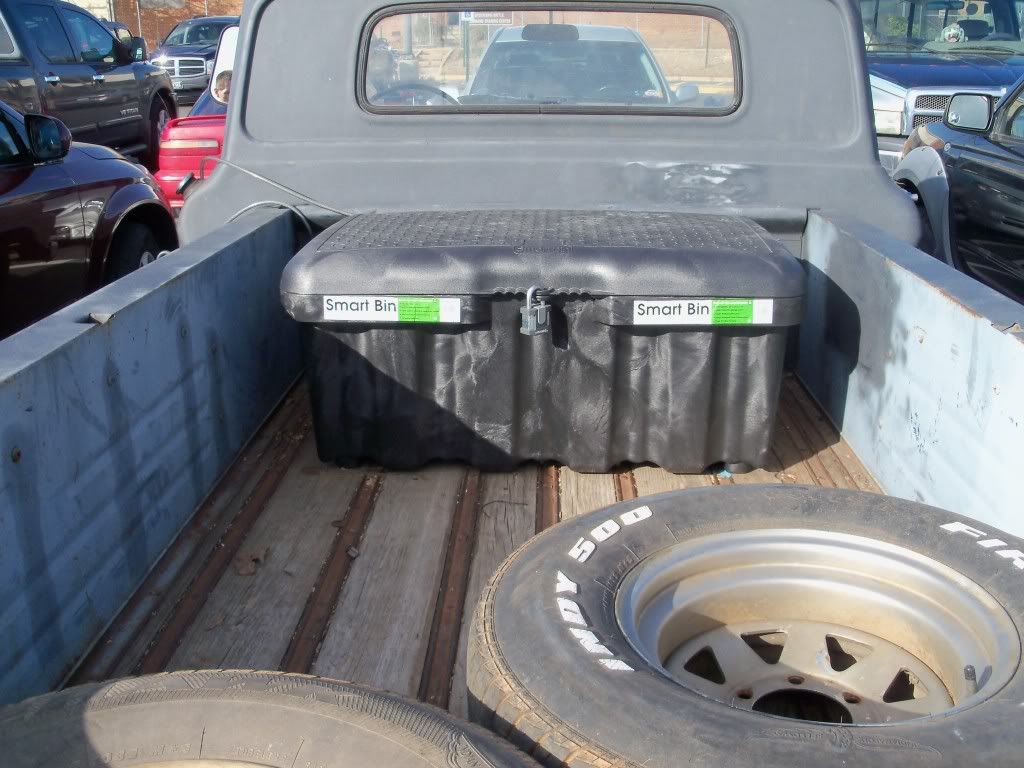
Parts for the brake swap will be ordered tomorrow or Thursday. Once they come in that following weekend I'm hoping to do the deed. I figure I'd post up some new pics from this weekend...but my camera only saved a few of them. I'll have to get the "after" shot of my new toolbox later this week for you guys. Here are the before shots of my bed. The tires say in there and have a steel cable go through them, around my drivers door handle (the lock cylinder doesn't work), and I padlock it to itself. Everything else lives in the cab. Also the blue toolbox you see in the bed on the drivers side. That's the color I want to paint the truck when I get to that point. I think it looks good for 1 coat of primer and 1 coat of spraypaint. I didn't bother to really do the proper prep or polish since it's a toolbox and it's already gotten scuffed up. The old paint was half off of it anyways and rust was forming.  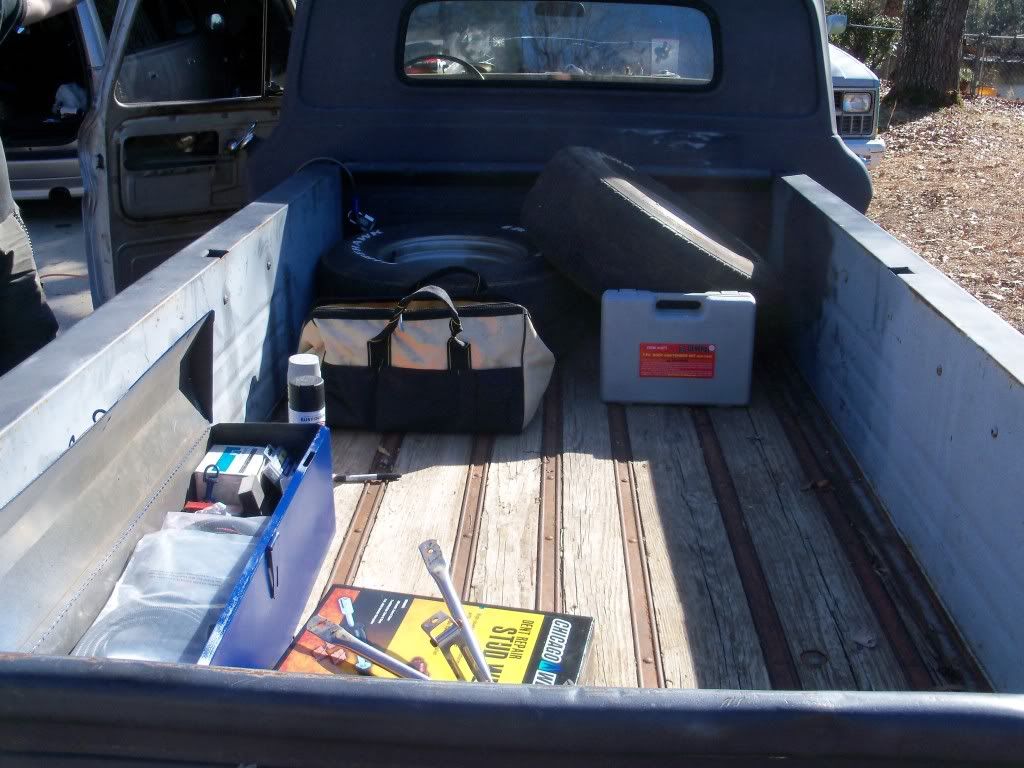 And one last pic...this is the "new" tailgate. I just wanted to see how it looked, I ended up putting my old one back on. I want to get the rust off of this one first before I mount it up. 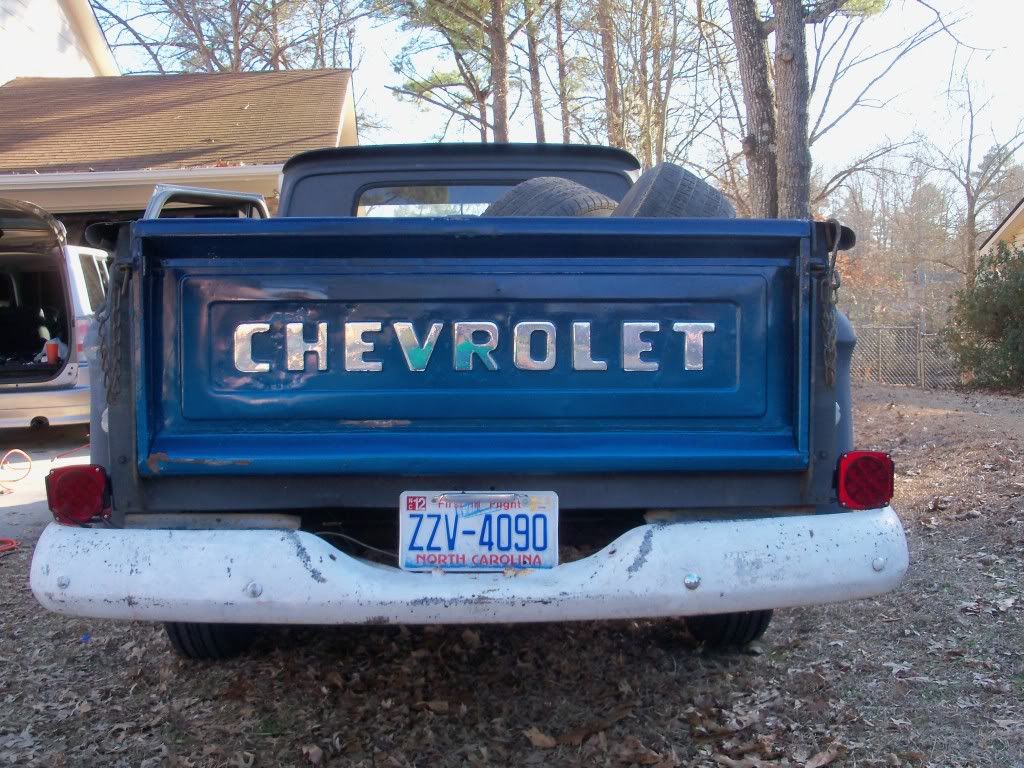 compared to the old... which do you guys think I should go with. Both have their pluses and minuses. This truck will never make it to show quality status, it'll just cost far to much to get everything perfect again. It will retain some of it's honest dents/dings and character, especially on the bed. The old gate is really just messed up on the top. The new gate's top has 1 dent but has some other smaller dents where the CHEVROLET is written. The Old gate is cracked on the edges, the new one is solid there but has welds/repairs on the backside. Whichever one I don't keep it'll be going on my buddy's 66 GMC rat rod Last edited by k1rodeoboater; 02-16-2011 at 12:42 AM. |
|
|
|
|
02-16-2011, 11:54 PM
|
#19 |
|
Registered User
Join Date: Nov 2010
Location: Fayetteville NC
Posts: 752
|
Re: K1's build thread
And those after pics as promised....
 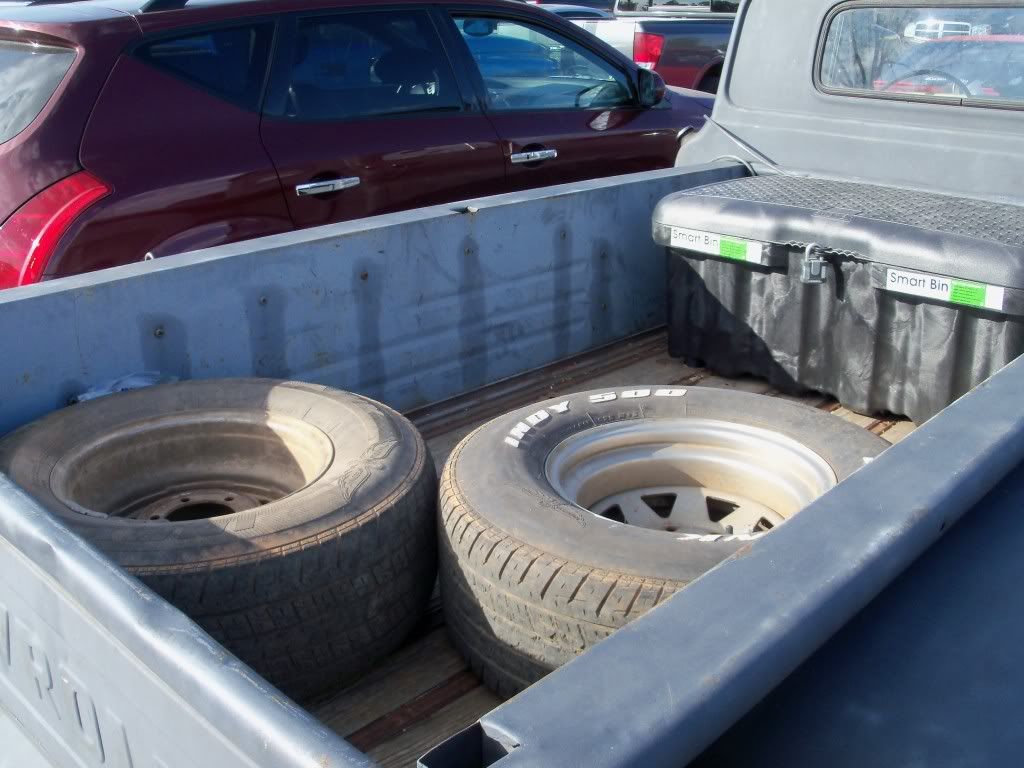 It really helped to clean up the bed and the inside of my cab a LOT. I can actually have a passenger now!!! Which is a good thing because I may need them to push the truck when it craps out on me LOL. I still don't know what's going on with the truck. It is definitely not idling correctly now. I ordered all the parts from Advanced Auto today, this weekend I'll be ordering the rest of the parts for the disc brake swap from CPP and my new wheels from JEGS or Summit (whichever one I can find a coupon code for). ...oh yeah and here's a little teaser for my weekend project.... 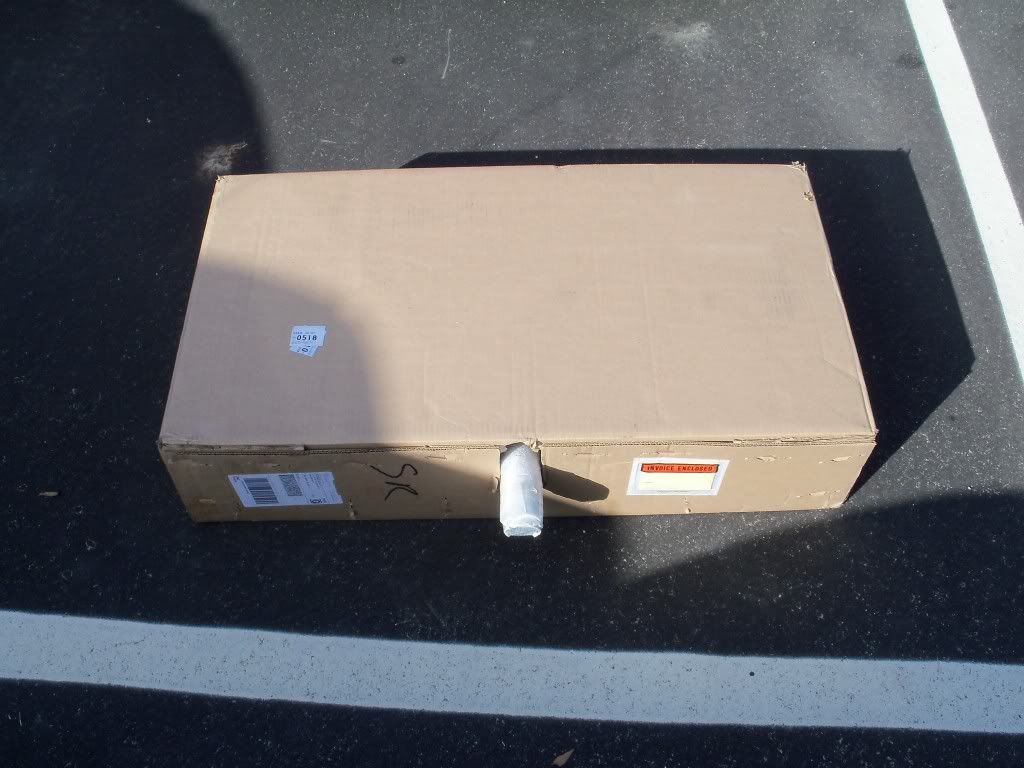 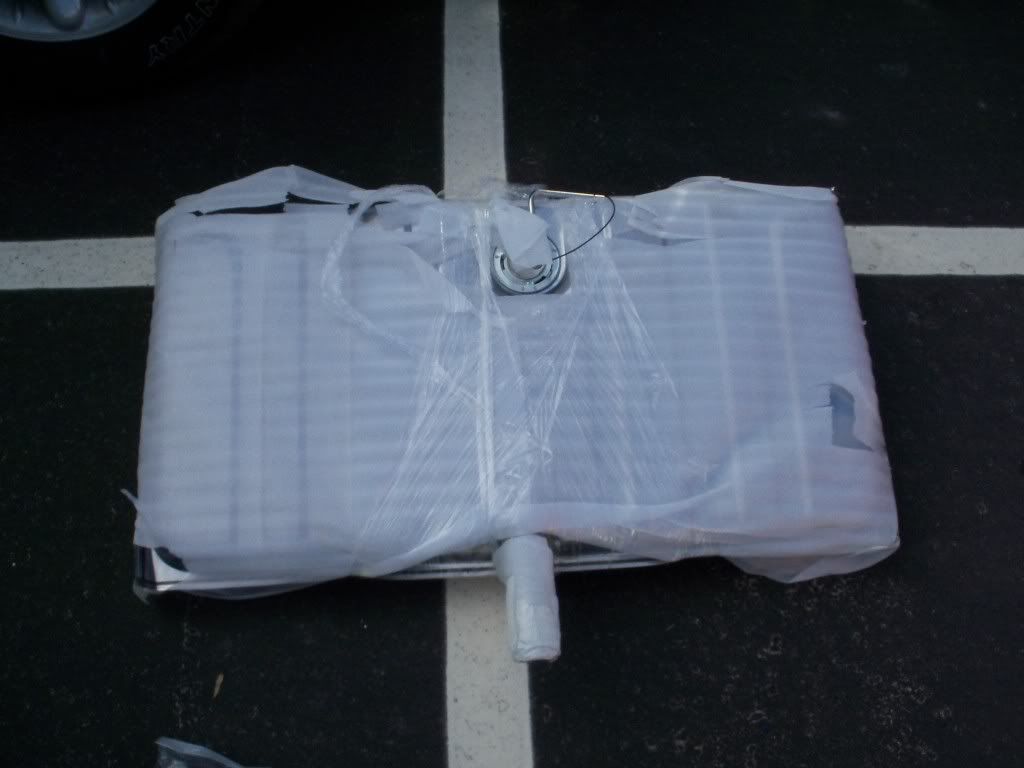 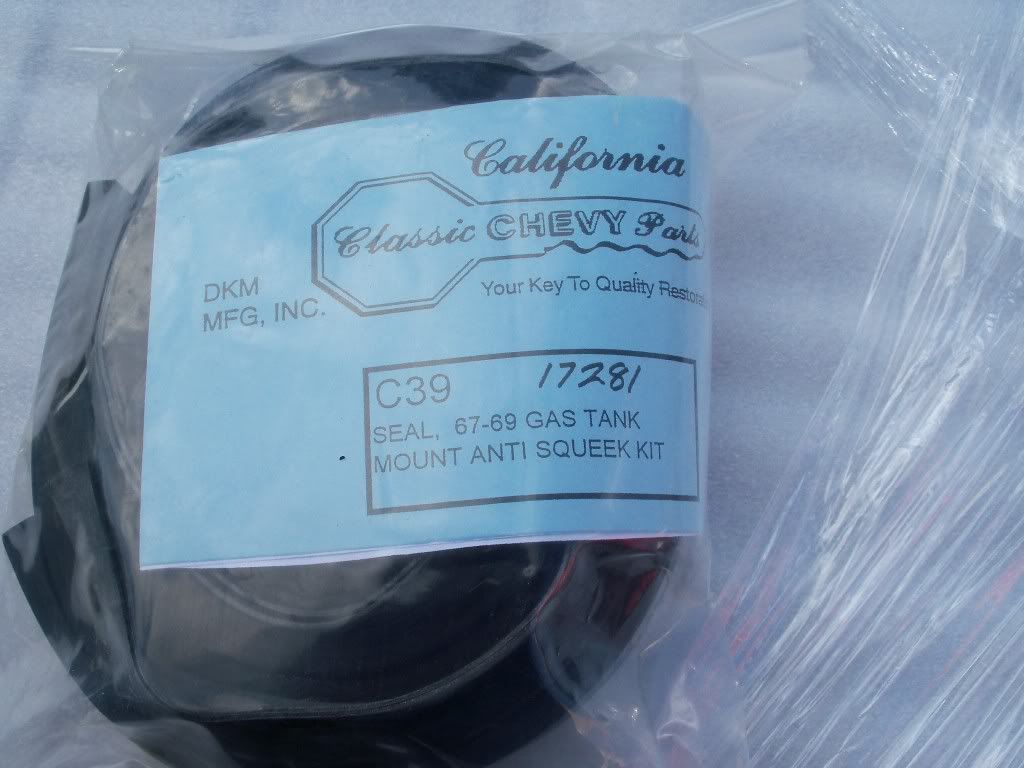 OH YEAH!!! Time for me to get creative..... ....hope someone's got 911 on standby |
|
|
|
|
02-19-2011, 12:59 AM
|
#20 |
|
Registered User
Join Date: Nov 2010
Location: Fayetteville NC
Posts: 752
|
Re: K1's build thread
Purchased all of the materials I need to mount the tank....tomorrow morning I'm going to get it mounted into place and run the hard line. My gas cap won't be in till next week so I won't get to test her out till then. I also still have to build my license plate mount. I may rig something up as a temporary with the scrap 14GA perf strap steel I'm using as tank straps.
BTW the sides of these tanks are RAZOR sharp. I cut the crap out of my thumb while trying to mock it up. |
|
|
|
|
02-19-2011, 05:56 PM
|
#21 |
|
Registered User
Join Date: Nov 2010
Location: Fayetteville NC
Posts: 752
|
Re: K1's build thread
I got the brackets made, the tank straps bent, and now I'm just trying to figure out how to make a temporary license plate frame. I haven't plumbed or wired up the tank yet. I don't have a gas cap for it so I've got to wait till the one I ordered comes in.
|
|
|
|
|
02-19-2011, 07:26 PM
|
#22 |
|
Registered User
 Join Date: Nov 2009
Location: Longview, Texas
Posts: 775
|
Re: K1's build thread
Dang it rodeo....... You sure know how to post a thread, LOL. Good info, keep it coming.
|
|
|
|
|
02-20-2011, 12:04 AM
|
#23 |
|
HOW long until spring??
Join Date: Mar 2009
Location: Star Idaho
Posts: 1,413
|
Re: K1's build thread
Looking good!!! As for your rough idle, You stated you have a vacuum leak, that will definitely affect the idle circuit.
__________________
69 chevelle convertible 71-C-10 short-wide and low 64 C-10 custom shortbox "Bubba"s Recycling project" |
|
|
|
|
02-20-2011, 01:50 AM
|
#24 |
|
Registered User
Join Date: Nov 2010
Location: Fayetteville NC
Posts: 752
|
Re: K1's build thread
One more update for the day...
I have the tank mounting bars and straps mounted on the tank. Tomorrow morning I'll be installing, or at least attempting, to install the whole schabang. One cool thing to note about this install is that I haven't needed to remove my bed. I'm doing everything from underneath the truck. I had to tweak the mounting straps I bent to work with the anti squeak kit. When I added the parts to the anti squeak kit it didn't have the bends in the correct places, but they were close. Luckily 14GA steel is easy enough to bend by hand, so I was able to correct the errors. I just hope that when the tank is full the straps will be good enough. I may run an extra bolt through the straps just for piece of mind. That said I've got it tightened down to the point where I can barely move the mounting bracket/strap combo by pulling on it. I didn't get to play with my license plate bracket yet. I'm going to try to use the scrap pieces from the tank straps to make a temporary one. If it works I may leave it for a while. If it doesn't I'm not out anything extra so what do I care, it'll end up going to the scrapper. Once I finish the tank install I'll write up a how to, make some drawings, and take some pictures of it all. I'll post it in the main forum area, with a link back to my build thread as well so people can see some of the brainstorming I've had in regards to the sending unit conversion issue. I've also got a thread in the electrical forum regarding it, but I want to try to condense it down all into this thread for my own records and sanity. As for my vac leak...I'm not sure that I actually have one. I picked up a new PCV valve from autozone but I'm not sure which one I need. I got two different ones and a length of 5/8" hose. Also isn't there supposed to be a grommet in the valve cover for the PCV valve? The reason I'm not 100% sure if I have a vac leak is because it sounds like it's idling fine now...dang 45yr old engine shakin out the cob webs I guess. I may have to look into what it would cost to get a rebuild kit for the 250 I6. I'm not looking to do anything other than tear down the engine and build it back as it was from the factory, for the time being at least. I think my "vac leak" may actually be a fuel pump problem. Driving the truck over to my buddy's place it died twice on me. It only happens when I'm engine braking or just as soon as I push the clutch in. At one point it sounded like it was gonna die, but a quick blip of the throttle it kept idling along perfectly fine. I did that for the next 3 stop lights without any issue...so I don't know if that could be it. Also when it did die and it would fire back up on either the 1st or 2nd try, and when it did fire up it would fart out a nice black cloud. Also as a side note...this ghetto exhaust on my truck has GOT TO GO! It's just got a glass pack on it and exits out about a foot behind the cab on the drivers side. The really ghetto part is it's being held onto the frame by a coat hanger that's twisted together....yeah...no bueno. Besides the awesome ghettoness of it all it's just to freaking loud and annoying. The note of the drone isn't enjoyable at all. I'm thinking about cutting off some of the pipe after the glass pack, clamping on a turbo muffler and then running the exhaust out under the drivers side step like they did on the original. I may even splurge a bit and get a slash cut exhaust tip to match up with the side of the step LOL. As far as my plans for tomorrow for my truck...get the tank mounted, get pics/drawings/dimensions for you guys, swap the wires, and clean the engine off. We're mostly going to be working on my buddy's truck tomorrow. He's got a 81 C10 that we're going to put lowering shackles on after we remove his bed. We're brainstorming the possibility of building a custom flat bed for his truck since he wants to use his truck for a motorcyclist recover business in a few months. His bed floor is pretty rotted out, and at the very least I told him he should probably cut out the bed floor and drop in either diamond plate or thick gauge sheet bolted down in sections to allow for drainage and easy replacement Last edited by k1rodeoboater; 02-20-2011 at 02:12 AM. |
|
|
|
|
02-20-2011, 02:28 AM
|
#25 |
|
Registered User
Join Date: Nov 2010
Location: Fayetteville NC
Posts: 752
|
Re: K1's build thread
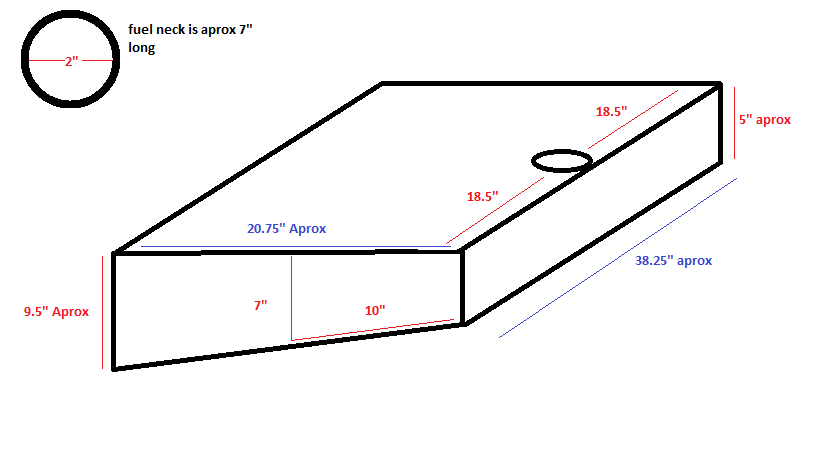
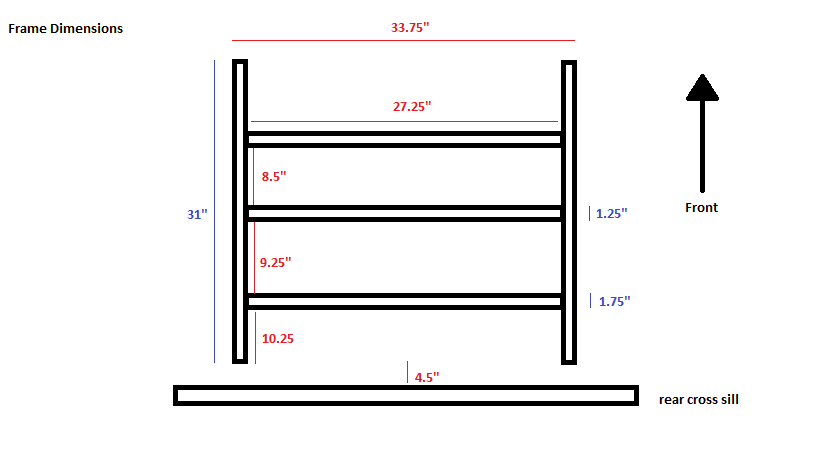
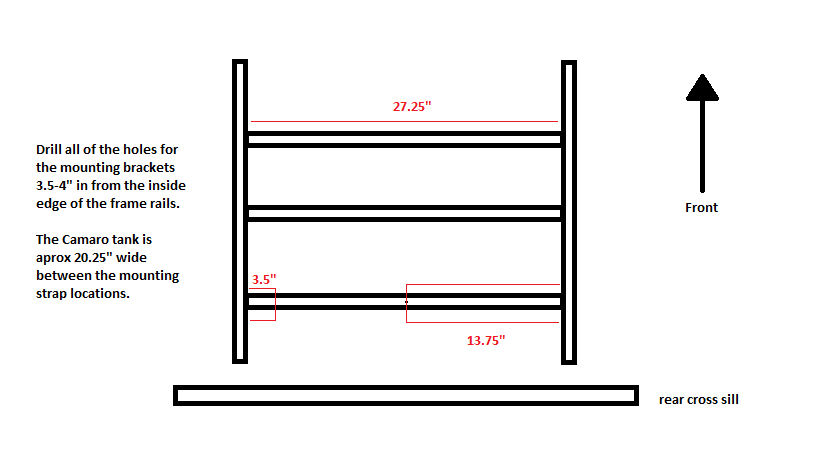
ok I lied...here's a MS Paint drawing of the dimensions of the Camaro tank. I'm going to transfer all of my hand doodles to MS Paint since they're easier to read I think.
   <place holder for MS Paint of license plate frame> <place holder for....I'll think of something I'm sure> Last edited by k1rodeoboater; 02-23-2011 at 01:27 PM. |
|
|
|
 |
| Bookmarks |
|
|


 Linear Mode

