
|
Register or Log In To remove these advertisements. |
|
|
|
|||||||
 |
|
|
Thread Tools | Display Modes |
 08-22-2011, 02:14 PM
|
#1 |
|
Senior Member
  Join Date: Nov 2008
Location: Glendora, CA
Posts: 6,336
|
Task Force Instrument Cluster Refurbish
This same info is in my chron thread (Danny Boy is BAACK!!) but I thought maybe it would be hard to find for someone searching for JUST info on instrument clusters, guages, etc. This is NOT a show worthy restoration by any means. It is a garage workbench job for a daily driver (mine) using commonly available parts and materials.
My existing cluster had cracked plastic, faded and chipped off odometer numbers to the point of being invisible. There was oil seepage from the oil pressure guage, 50 years of dust, lost screws and pitted chrome. Hopefully, this helps someone else: Before, front and back: 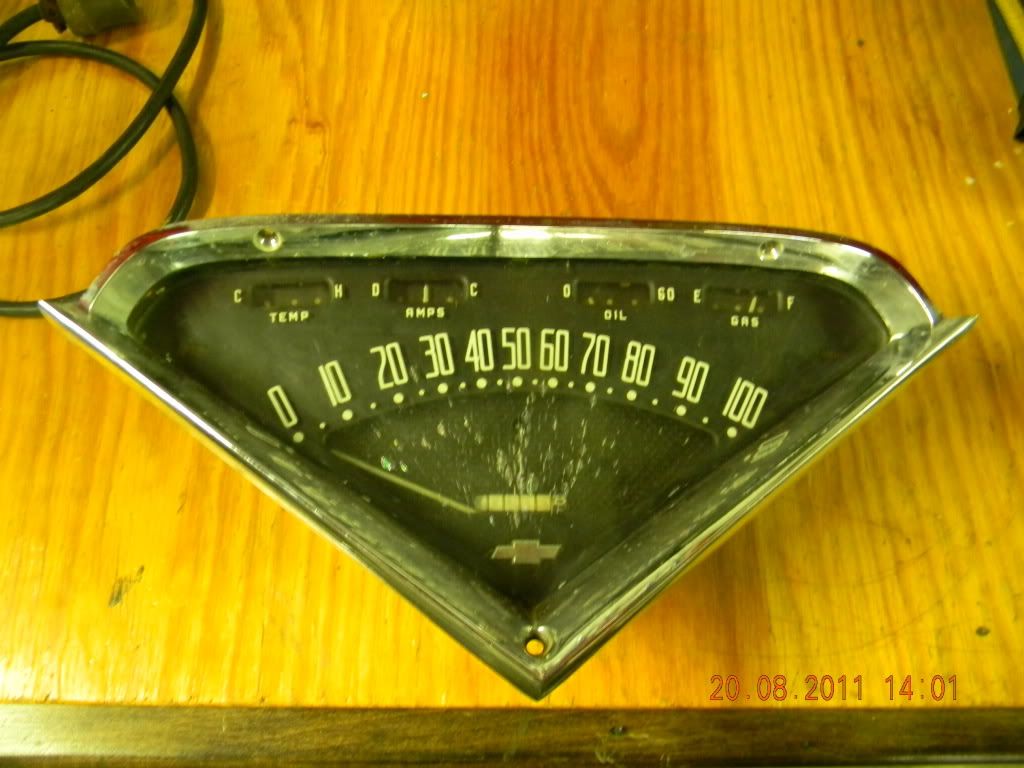 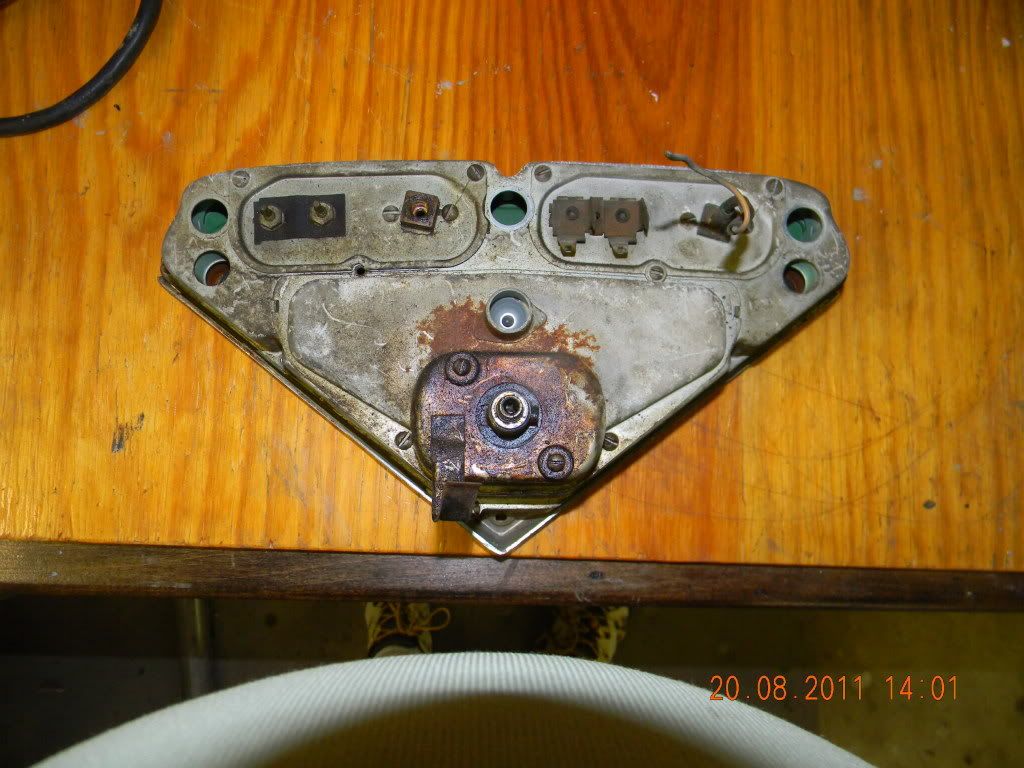 Oh, and the invisible odometer numbers: 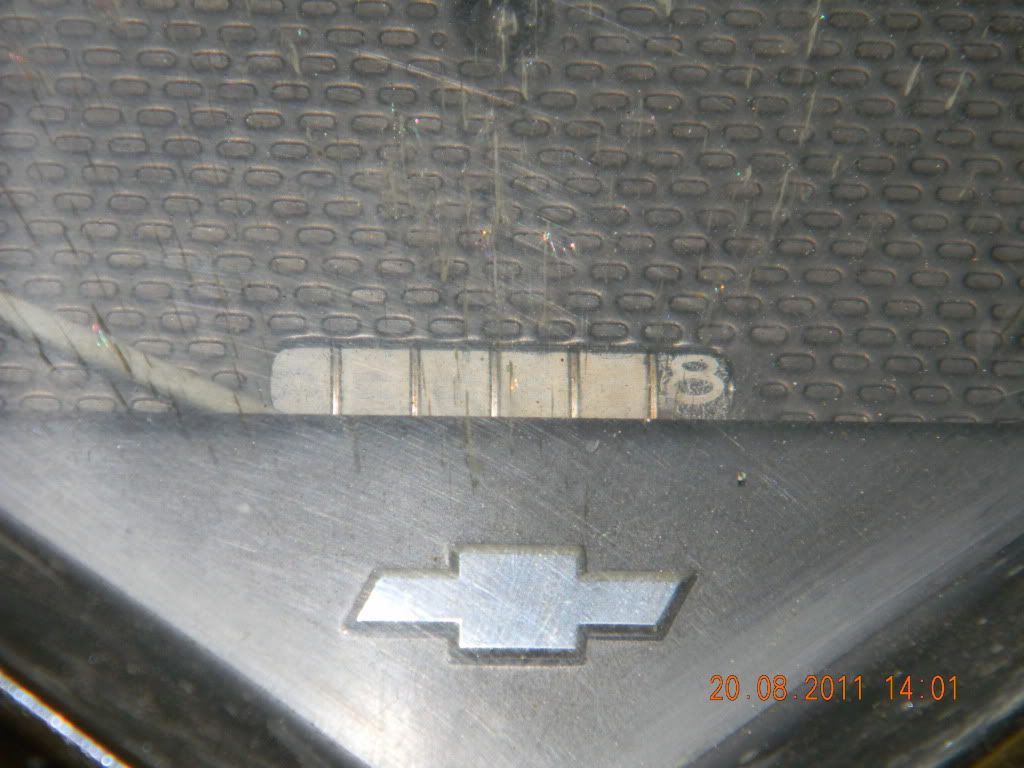 I totally took it apart, noted missing screws, and assessed what I was going to have to do to make it acceptable to me? Wire wheeling (bead blasting would be better, but I can't do that...yet!) painting the faces flat black, find a paint for the interior as mine was flaking off, new green plastic for the signal arrows, new lense, new chrome bezel. 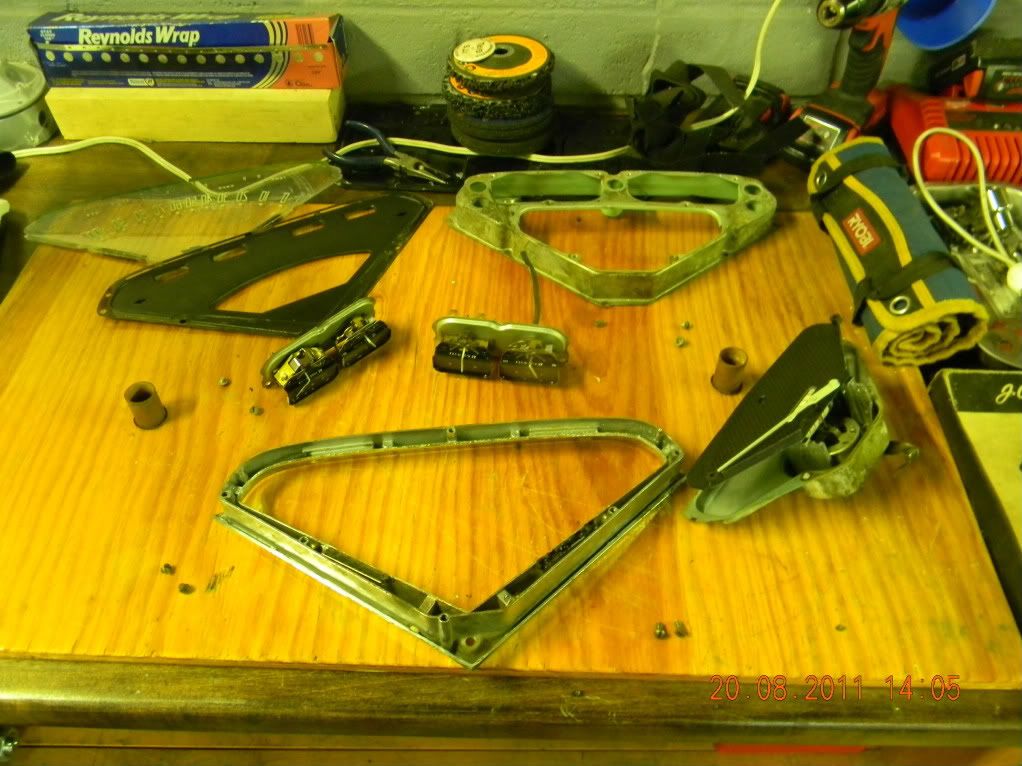 I found that THIS Rustoleum paint; Satin Apple Green, comes somewhat close to the color of the cluster interior. For a restoration its not close enough. For a driver? Close enough for me! Brighter, but that's ok. 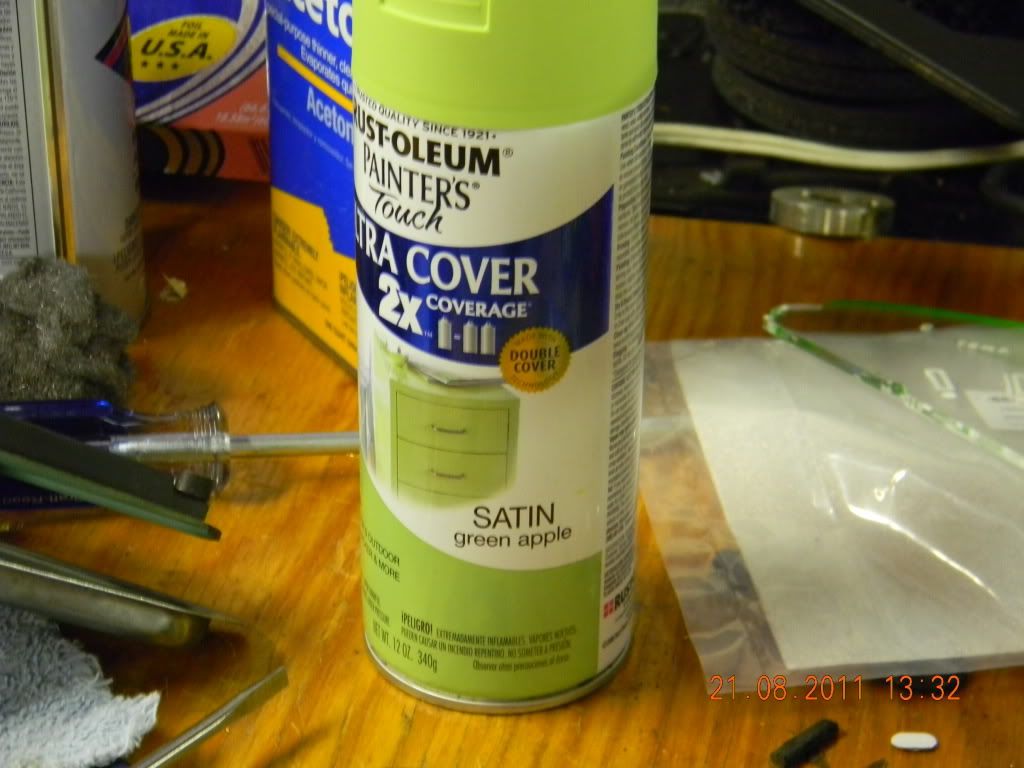 Odo numbers partly replaced to show the difference! By the way, instructions say to sand the old numbers, I didn't. I wiped them all down well with Acetone. WE'll see if that comes bac kto bite me 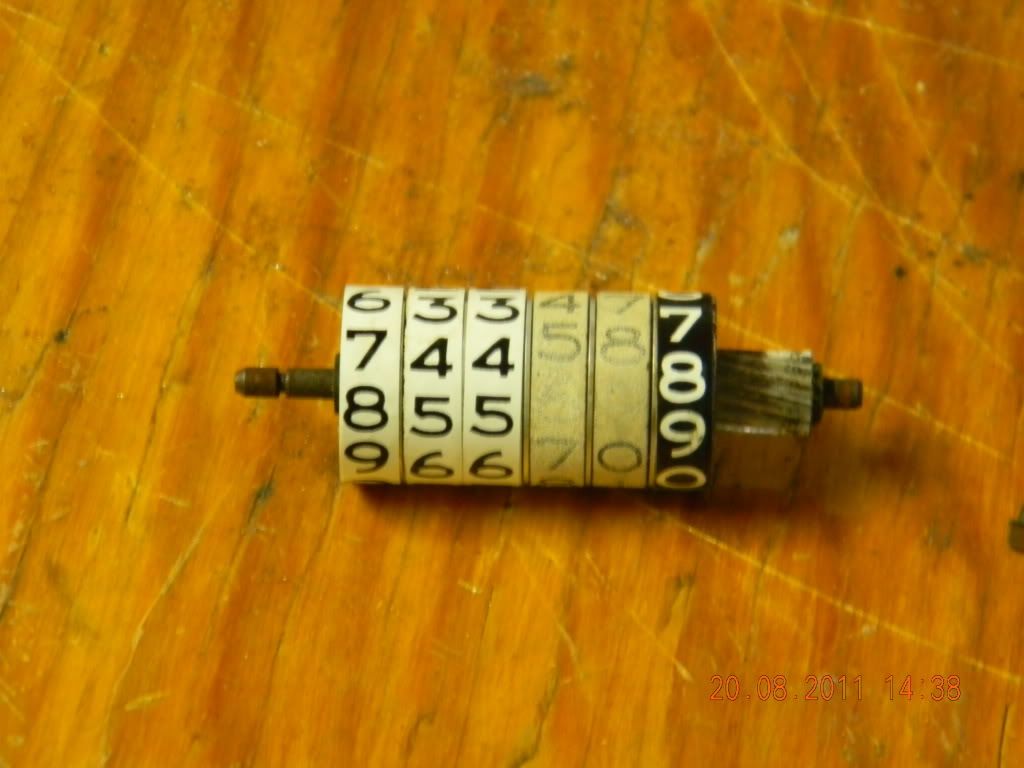 Reassembling after painting everything. You can see the El Cheapo flat black I used on the guage faces. I had it already and figured, "What the heck". I think it came out fine...for a driver  The needles were all faded to nearly white so I masked the small ones with aluminum foil and took of the speedo needle to spray it all using the same apple green.  That's it for now. I will go over to The Truck Shop in Orange, CA tomorrow to get new green plastic for my signal arrows. I REALLY wanted to finish it up this weekend but hated to reuse the old faded out crap. Plus, after getting everything looking so much better I decided to use something better than my scratched and pitted chrome bezel. |

|

|
|
08-22-2011, 07:33 PM
|
#2 |
|
Registered User
Join Date: Feb 2009
Location: Glendale, Az
Posts: 1,062
|
Re: Task Force Instrument Cluster Refurbish
I see some of the vendors are advertising a re-pop bezel for like $30. Prolly fine for a driver.
|
|
|
|
|
08-22-2011, 07:44 PM
|
#3 |
|
Senior Member
 Join Date: May 2011
Location: Cypress, Tx.
Posts: 1,504
|
Re: Task Force Instrument Cluster Refurbish
I got to the point of removing my steering column today, and attempted to pull out my intrument cluster but there were so many wires coming off of it, I put it back for another day! But this gives me hope that I can get my instrument panel looking much better someday! ; ) you can just see mine to the left of the photo; just fixing to order the radio repair patch this evening.
ps; that's looking really good btw!!!! dne' 
|
|
|
|
|
08-22-2011, 08:20 PM
|
#4 |
|
Registered User
Join Date: Jul 2011
Location: Las Vegas - Nev. aka Sin City
Posts: 1,835
|
Re: Task Force Instrument Cluster Refurbish
dne
naaaaaaaaaaaaaaaaa not to many wires ! just label thrm as you go it is worth the effort ;' dan v v nice job i know you will be happy w/ the results |
|
|
|
|
08-22-2011, 08:59 PM
|
#5 |
|
Registered User
Join Date: Sep 2005
Location: Glendale Arizona
Posts: 1,188
|
Re: Task Force Instrument Cluster Refurbish
Here is good picture of an intall. I dont remember if I got it from this site or off the net they used a quick disconnect at end. I also included a pic of a stock sphagetti pic.
|
|
|
|
|
08-22-2011, 09:20 PM
|
#6 |
|
Senior Member
Join Date: May 2011
Location: Cypress, Tx.
Posts: 1,504
|
Re: Task Force Instrument Cluster Refurbish
mercy! :| why's it have to have so many wire!
 When I get a new Painless, or whatever wiring harness, would I still need to mark the old wires? can't I just pull all the old wires off and the new instructions will tell me where to put them? At least one of them is a mechanical oil pressure gauge! one less to mess with! When I get a new Painless, or whatever wiring harness, would I still need to mark the old wires? can't I just pull all the old wires off and the new instructions will tell me where to put them? At least one of them is a mechanical oil pressure gauge! one less to mess with! PS: that's a nice laid out photo~ looks a little more simple laid out like that 
|
|
|
|
|
08-22-2011, 09:52 PM
|
#7 | |
|
Registered User
Join Date: Sep 2005
Location: Glendale Arizona
Posts: 1,188
|
Re: Task Force Instrument Cluster Refurbish
Quote:

Last edited by Rude Dude; 08-22-2011 at 10:09 PM. Reason: Spelling |
|
|
|
|
|
08-22-2011, 09:55 PM
|
#8 |
|
Senior Member
Join Date: Nov 2008
Location: Glendora, CA
Posts: 6,336
|
Re: Task Force Instrument Cluster Refurbish
I just figured out that my speedo is permanently bound up. Well, actually the plastic (nylon I think) shaft for the odometer is bound up tight. I played and played with it and it won't move. The rotating "thing" inside the speedo was stuck tight too. I lubed it and have it moving but I don't know how much resistance it's SUPPOSED to have? Anyway, I'm thinking I'll have to buy a speedo ($100) DOH! After all that work too. Once you throw in the repop bezel, lens, paint, numbers....it's getting costly. No wonder they get $500 for a full cluster!! Oh and I bought a new speedo cable too. Oh well. Ya win some and ya lose some.
Good pic's guys, keep em coming. |
|
|
|
|
08-23-2011, 01:58 AM
|
#9 |
|
Registered User
Join Date: Feb 2009
Location: Glendale, Az
Posts: 1,062
|
Re: Task Force Instrument Cluster Refurbish
Dan, my speedo was bound up too. back near where the cable threads are there's like a little soft plug. I was able to poke or drill a hole in it. I used spray brake cleaner and carb cleaner, made the hole big enough to fit the the little plastic tube in. I filled it with carb clean and started working it back and forth. I used compressed air to force the carb cleaner into the mechanism. Did I mention this is messy and you need to wear glasses? A couple cans of carb cleaner later it was free. I found Lubri-Plate in a spray can, was able to use the tube to fill the gear mechanism full of the grease. That was in '86, after I moved to Phx, still working today.
Last edited by tmoble; 08-23-2011 at 02:04 AM. |
|
|
|
|
08-23-2011, 02:16 AM
|
#10 |
|
Registered User
Join Date: Feb 2009
Location: Glendale, Az
Posts: 1,062
|
Re: Task Force Instrument Cluster Refurbish
Denee, BE SURE to disconnect the battery before pulling the cluster. Those big red and blck wires on the ammeter are direct, unfused battery current. It's real easy to get into a little amateur arc welding if you bump the cluster against the lip on the dash as it's coming out. Don't ask how I know this.
the wiring is not that complicated and there's not very much of it. Don't buy a Painful harness, talk to AAW and M&H first. that's American Auto Wire, good people, good harnesses and and actual help available. M&H, same drill. Painful? well, they're real big and advertise a lot. Kinda like Comp Cams. |
|
|
|
|
08-23-2011, 07:48 AM
|
#11 | |
|
Senior Member
Join Date: May 2011
Location: Cypress, Tx.
Posts: 1,504
|
Re: Task Force Instrument Cluster Refurbish
Thank you for the tip! fortunately my battery is not in the truck and probably won't be for a while. yes, when I pulled the cluster, I noticed how close all the wires/terminals were close to the dash! So you're saying keep the original wiring harness? I see nothing wrong with that despite the age. My '67 Mustang, I kept the original harness but sent it to a wiring guru on the Stangfix forum, and he "overhauled" it before I put it back in. He found a lot of cuts and shorts, etc. I'm fixing to check into the AAW like you mentioned~ uh, what do they do? I promise to take out the cluster today and mark all of the wires
I want to gut the dash today! I got the steering column out yesterday(pita)! so the under the dash wiring and heater is next.As for my cluster, I'm going to follow and mimick what Dan did, that really turned out nice, but in that one photo further down(or up), I'd like a plug in~ that's neat! I just can fathom buying an aftermarket or new cluster. ; ) Quote:
|
|
|
|
|
|
08-23-2011, 08:05 AM
|
#12 |
|
Registered User
Join Date: May 2010
Location: Lawrenceville, Ga
Posts: 2,640
|
Re: Task Force Instrument Cluster Refurbish
Nice work, Dan. I keep a can of Rustoleum Satin Black around for things like the gauge background panel. It works good and looks original. You can also paint the panel that goes in front of the gauges to match your dash for a custom look. I painted mine blue to match the truck when I first got it but since have restored it to original.
Now I just need time to install it and wire it up. |
|
|
|
|
08-23-2011, 10:29 AM
|
#13 |
|
Registered User
Join Date: Apr 2011
Location: San Diego CA
Posts: 241
|
Re: Task Force Instrument Cluster Refurbish
Dan you're doing some great work. I'm digging that you make it work with tools and materials on hand.
|
|
|
|
|
08-23-2011, 10:58 AM
|
#14 |
|
Senior Member
Join Date: Nov 2008
Location: Glendora, CA
Posts: 6,336
|
Re: Task Force Instrument Cluster Refurbish
Hi Russ, yeah I REALLY thought of painting my gauge face Sage Green to match my primer but in the end just decided to go stock.
Fredo, Thanks. I'm trying to enjoy the process of refurbishing my truck as much as the results. Anything new with your flat bed conversion? A thought: You could shorten your Fleetside bed to a shorty, then sell it to help finance your truck. Those short Fleet beds are real hard to come by. Posted via Mobile Device |
|
|
|
|
08-23-2011, 01:50 PM
|
#15 |
|
Registered User
Join Date: Apr 2011
Location: San Diego CA
Posts: 241
|
Re: Task Force Instrument Cluster Refurbish
Hey Dan, can you give a bit more detail on the odometer refurb? That odo came out real nice!
I haven't touched the truck. I'm in the middle of a large order for some of my leather goods. I hope to finish that this week and get back on the truck. I will be selling the fleetside bed but I don't think I'll take the time to shorten it up. I guess the new owner can do that and I can also make suure that anyone that wants a long bed has the chance to find one too. |
|
|
|
|
08-23-2011, 05:05 PM
|
#16 | |
|
Senior Member
Join Date: Nov 2008
Location: Glendora, CA
Posts: 6,336
|
Re: Task Force Instrument Cluster Refurbish
Quote:
Posted via Mobile Device |
|
|
|
|
|
08-23-2011, 08:25 PM
|
#17 |
|
Senior Member
Join Date: May 2011
Location: Cypress, Tx.
Posts: 1,504
|
Re: Task Force Instrument Cluster Refurbish
What! you can't fix it? rats! Is there a company that refurbishes the original clusters? I pulled my cluster leaving EVERYTHING attached to it! lol Actually there's not that many wires under the dash like I thought there would be~ not like my '67 Mustang coupe. So maybe I can make this messy wiry mess once again work?
Sorry about your cluster, but you can do it better next time!! ; ) 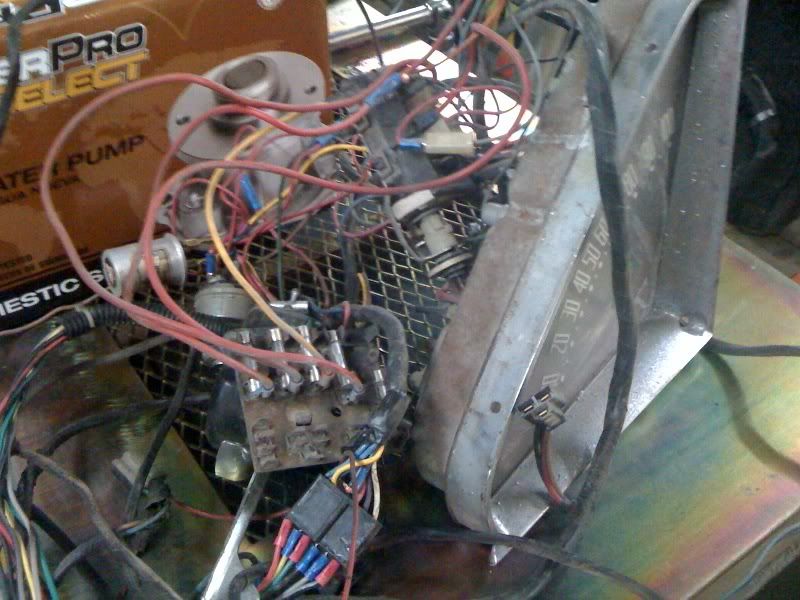
|
|
|
|
|
08-23-2011, 09:56 PM
|
#18 |
|
Senior Member
Join Date: Nov 2008
Location: Glendora, CA
Posts: 6,336
|
Re: Task Force Instrument Cluster Refurbish
Well, the nylon shaft that turns the odometer on one end With a worm gear and a square cut gear on the other end looks to have run dry til it galled and froze. I would strip the 55 year old teeth if I tried to force it and I don't think any of the usual sources sells just that gear. Maybe North Hollywood Speedometer but their prices on everything is high.
Posted via Mobile Device |
|
|
|
|
08-23-2011, 10:29 PM
|
#19 |
|
Hollister Road Co.
Join Date: Apr 2005
Location: Houston
Posts: 6,134
|
Re: Task Force Instrument Cluster Refurbish
Just to give you an Idea of what you can do with them
|
|
|
|
|
08-23-2011, 10:43 PM
|
#20 |
|
Registered User
 Join Date: Jul 2010
Location: Mesa, AZ
Posts: 513
|
Re: Task Force Instrument Cluster Refurbish
Here's mine after a refresh. New plexi, chrome bezel, new speedo, gauges given a new sticker and the needles painted white.
__________________
JB from AZ 1969 Chevy Sub K10 1957 Chevy 3200 1962 VW Beetle 1957 Willys CJ5 
|
|
|
|
|
08-23-2011, 11:11 PM
|
#21 | |
|
Senior Member
Join Date: Nov 2008
Location: Glendora, CA
Posts: 6,336
|
Re: Task Force Instrument Cluster Refurbish
Quote:
Incidentally, did you paint the needles white for any particular reason? Mine were a light green so I redid them that way. Same with the speedo needle. |
|
|
|
|
|
08-23-2011, 11:14 PM
|
#22 |
|
Senior Member
Join Date: Nov 2008
Location: Glendora, CA
Posts: 6,336
|
Re: Task Force Instrument Cluster Refurbish
Oh man, youre REALLY tempting me Dave. I don't know what color my truck will ultimatley be but while its a clean daily in green primer I am SO tempted to do something jazzy like the red one or the blue one. I thought of doing a light mint green but now you've got me wondering what candy green I could find in rattle cans in a model or hobby shop?! I know, I know, kinda whored out to some....but it would only be for awhile
|
|
|
|
|
08-23-2011, 11:21 PM
|
#23 |
|
Registered User
Join Date: Jul 2011
Location: Las Vegas - Nev. aka Sin City
Posts: 1,835
|
Re: Task Force Instrument Cluster Refurbish
hey dan
i think Tuckers pickup parts here in vegas sells the stickers you are lookin for . the stickers look just like the faces of your guages - you just peel off the backing and ''carefully line it up over you original guage and press it on - not difficult at all ya just take it slow and you will have a good lookin guage(s) good luck and show dem pitchers |
|
|
|
|
08-23-2011, 11:47 PM
|
#24 | |
|
Hollister Road Co.
Join Date: Apr 2005
Location: Houston
Posts: 6,134
|
Re: Task Force Instrument Cluster Refurbish
Quote:
The picture doesn't do the red one any favors. It looks really good lit up in the dark and when the sun hits it just right you see all the ghouls coming up in the center. The painter did a nice job on these. |
|
|
|
|
|
08-24-2011, 12:19 AM
|
#25 | |
|
Senior Member
Join Date: Nov 2008
Location: Glendora, CA
Posts: 6,336
|
Re: Task Force Instrument Cluster Refurbish
Quote:
dwcsr - I THOUGHT I saw ghouls but wasn't sure. I wouldn't go that far and I've always loved the original gauges vs the Dakota dash....well, except for a few month in the 80's when they were new!  If I end up getting a spare cluster from the other board memeber I will DEFINITELY spray a set in a custom color just to entertain myself. Then I'd be able to change them to suit my mood! Dumb, but I'll enjoy it. |
|
|
|
|
|
| Bookmarks |
|
|


 Linear Mode

