
|
 02-09-2012, 08:32 PM
|
#1 |
|
Registered User
Join Date: Jan 2011
Location: Northwest, NJ
Posts: 195
|
I bought a used bed from a guy in Vermont to use on my 1953. (Why anyone would go looking for a rust free bed in Vermont is a topic best saved for a later date) Predictably, its a little more rusty than Id hoped. So I figured my best course of action would be to take it apart to begin the de- rusting procedure.
So I started at the front, took the front panel off and then started on the crosspieces. Everything was going great- most of the bolts snapped right off so I didnt even need to unbolt them (a real time saver). But when I got to the end piece, I removed every nut and bolt I could find and the thing still would not come apart. Turns out it is welded along a couple of seams on each side. Im sure that some of you may have run into this so please tell me what I should do now? How do I break the welds without ruining the surrounding sheet metal? I tried breaking it apart by jamming a screwdriver in there but things got ugly real fast. There has to be a better way. |

|

|
|
02-09-2012, 10:04 PM
|
#2 |
|
Registered User
Join Date: Feb 2009
Location: Glendale, Az
Posts: 1,062
|
Re: Disassembling the Bed
use a cut-off wheel/disc on a high speed 1/4" die grinder. air if you have it, electric if you don't.
|
|
|
|
|
02-10-2012, 11:24 AM
|
#3 | |
|
Registered User
 Join Date: Jul 2007
Location: Toppenish, WA
Posts: 15,609
|
Re: Disassembling the Bed
Quote:
As he said, just cut through the welds enough to get things apart. |
|

|
|
|
02-10-2012, 03:10 PM
|
#4 |
|
Registered User
Join Date: Jan 2012
Location: Motown
Posts: 7,680
|
Re: Disassembling the Bed
yep, cut thru the welds. you'll have to reweld it any how.
mar-k has good instructions for assembling the bed/wood to download from their site
__________________
cool, an ogre smiley  Ogre's 58 Truk build Ogre's 58 Truk buildhow to put your truck year and build thread into your signature shop air compressor timer |
|
|
|
|
02-10-2012, 05:32 PM
|
#5 | |
|
Senior Member
  Join Date: Nov 2008
Location: Glendora, CA
Posts: 6,338
|
Quote:
Cutting those welds doesn't have to be an expensive proposition, see below: http://www.harborfreight.com/4-1-2-h...der-95578.html In the bed on my '55, a prior owner had welded 1/8" plate onto the bed strips with short welds. I bought a similar cheapo electric angle grinder and cut those easily enough. Beware to use HEAVY leather gloves!! I didn't and nearly cut the end of my index finger off....twice. ") Example: 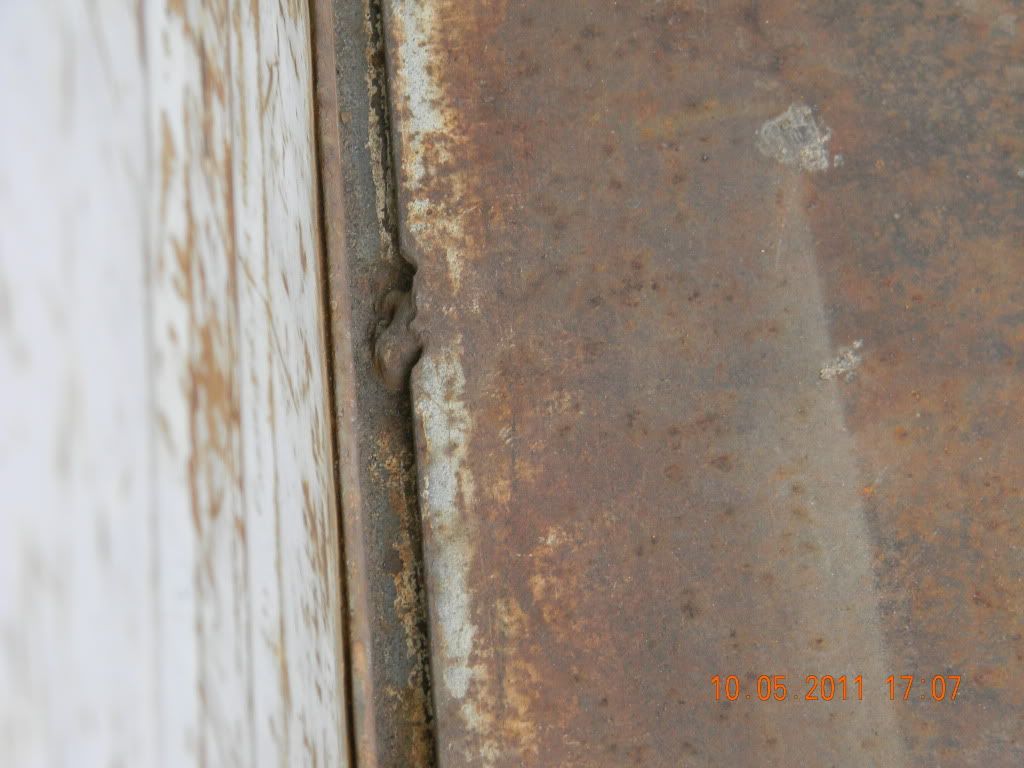 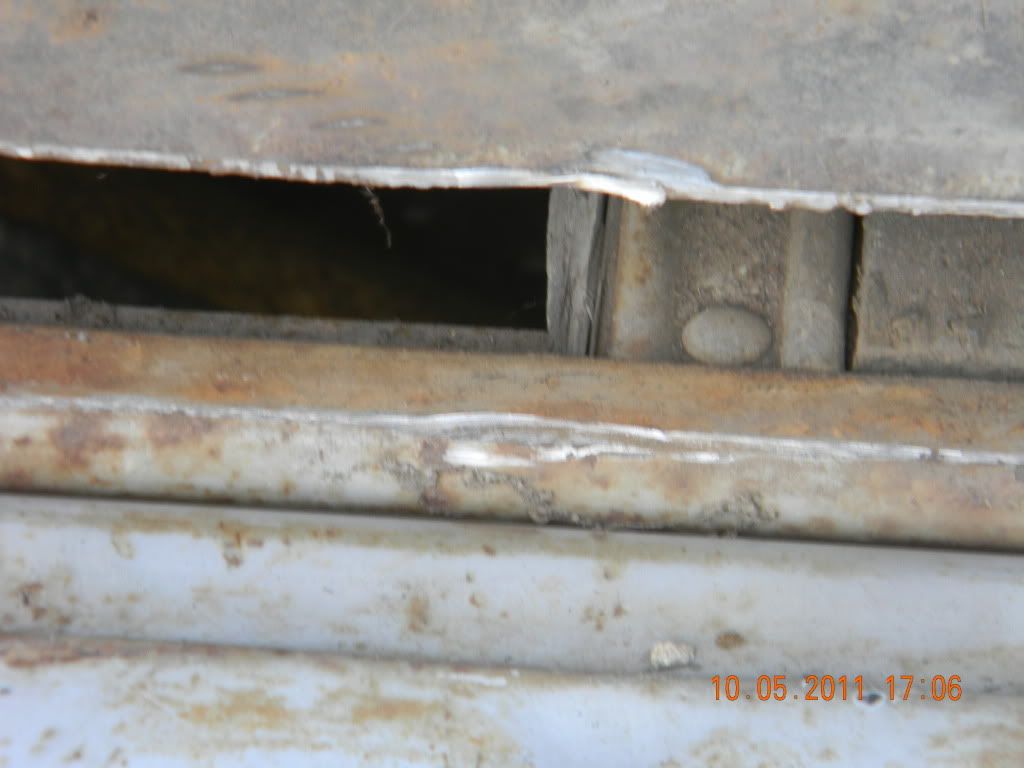 
|
|
|
|
|
|
02-10-2012, 07:34 PM
|
#6 |
|
Registered User
Join Date: Feb 2010
Location: Lebanon, Ohio
Posts: 1,359
|
Re: Disassembling the Bed
I bought a 4" electric grinders from Harbor Freight last year. Bearings are horrible. The unit lasted about 4 hours. If you want to use a little more finesse, I prefer the following, if you have an air compressor:
http://www.harborfreight.com/pack-of...tal-93178.html and http://www.harborfreight.com/3-inch-...ter-47077.html The discs are only about 1/16" thick. Bob |
|
|
|
|
02-10-2012, 07:44 PM
|
#7 |
|
Registered User
Join Date: Sep 2005
Location: Glendale Arizona
Posts: 1,188
|
Re: Disassembling the Bed
I also use cutoff wheels with die grinders and my best tool in the box 4" makita grinder. Cost $80 bucks but I bought in the late eightys still going strong.
|
|
|
|
|
02-10-2012, 07:52 PM
|
#8 |
|
Registered User
Join Date: Dec 2011
Location: Nashville,TN
Posts: 6
|
Re: Disassembling the Bed
Cut Off Wheel on Electric Grinder. Get a 5/8 Arbor if you dont have one.. and Take your time. You might want to cut any metal off and around the weld if you know your not going to use it.. You will start to see both pieces of metal when you get close to the metal you want to keep... From the pics..I have cut through welds much longer than that with good success. Again dont get in a rush and have good light on the spot you are cutting through.
__________________
 2007 Chevy Z71 Ext Cab, 327 1971 K10 SWB 350 (3rd owner since 1984) 1998 Chevy Z71 Ext Cab 350(Broke Crank and Sold) 1994 Chevy Corvette 350 (purchased new, sold in 2007) 1979 Pontiac Trans Am 400 (Sold in 1986) |
|
|
|
|
02-10-2012, 07:52 PM
|
#9 |
|
Registered User
Join Date: Sep 2005
Location: Glendale Arizona
Posts: 1,188
|
Re: Disassembling the Bed
If you are only going to use once a Harbour Freight will work just know it is a throw away tool
|
|
|
|
|
02-10-2012, 07:53 PM
|
#10 | |
|
Registered User
Join Date: Feb 2010
Location: Lebanon, Ohio
Posts: 1,359
|
Re: Disassembling the Bed
Quote:
http://www.homedepot.com/h_d1/N-5yc1...&storeId=10051 |
|
|
|
|
|
02-10-2012, 09:14 PM
|
#11 |
|
Registered User
Join Date: Jun 2006
Location: Idaho
Posts: 8,800
|
Re: Disassembling the Bed
I use a 1/16" cutoff wheel on a die grinder for those welds. Larger on my 4" grinder for cutting off the bolt heads. you will also find the rear cross sill welded to the bed sides.
__________________
1959 Chevy Short Fleetside w/ 74 4WD drive train (current project) OrrieG Build Thread 1964 Chevelle Malibu w/ 355-350TH (daily driver) Helpful AD and TF Manual Site Old Car Manual Project |
|
|
|
|
02-10-2012, 09:24 PM
|
#12 |
|
Registered User
Join Date: Jan 2011
Location: Northwest, NJ
Posts: 195
|
Re: Disassembling the Bed
Thanks everyone for all the suggestions. I really appreciate all the attempts to help. But unfortunately, I still dont understand. Im looking at what appears to me to be two sheets of metal, one lying on top of the other and welded only at the edge where the top sheet stops. How do I cut that? Do you mean cut through the top sheet but not so deep that I cut through the bottom sheet? That sounds kind of difficult to me. So much so, that I doubt that is what you mean. And why would I need to weld it back up again? It seems to me that nuts and bolts should be enough to hold it back together after de rusting. I think Im missing something here. Id better go have another look.
|
|
|
|
|
02-10-2012, 09:37 PM
|
#13 | |
|
Registered User
Join Date: Sep 2005
Location: Glendale Arizona
Posts: 1,188
|
Re: Disassembling the Bed
Maybe posting a picture might help
Quote:
|
|
|
|
|
|
02-11-2012, 10:06 AM
|
#14 | |
|
Registered User
Join Date: Feb 2010
Location: Lebanon, Ohio
Posts: 1,359
|
Re: Disassembling the Bed
Quote:
Let's start at the beginning. Do you have an air compressor? |
|
|
|
|
|
02-11-2012, 11:00 AM
|
#15 |
|
Registered User
Join Date: Jan 2011
Location: Northwest, NJ
Posts: 195
|
Re: Disassembling the Bed
I do have an air compressor but other than more common air tools, I dont think I have anything that could do the job better than the many electric angle grinders I have accumulated over the years. I was even thinking that if this is going to be a more delicate operation, maybe I should consider using a dremel with a cut off wheel?
If the piece of metal holding the pieces together is indeed like a piece of "tape" then I should be able to detect the edges- I cant even see them now which may be most of the problem. Im going to go down in the garage today and remove some paint and maybe that will make this job easier to visualize. Thanks for hanging in there with me. |
|
|
|
|
02-11-2012, 03:32 PM
|
#16 | |
|
Registered User
Join Date: Feb 2010
Location: Lebanon, Ohio
Posts: 1,359
|
Re: Disassembling the Bed
Quote:
|
|
|
|
|
|
02-11-2012, 03:50 PM
|
#17 |
|
Registered User
Join Date: Nov 2011
Location: Winlock Wa
Posts: 584
|
Re: Disassembling the Bed
Do not for get your
Protection!
__________________
Retired and too busy to work. |
|
|
|
|
02-11-2012, 05:13 PM
|
#18 |
|
Registered User
Join Date: Jun 2006
Location: Idaho
Posts: 8,800
|
Re: Disassembling the Bed
I looked at my fleetside and realized that the return is part of the bed, not a separate welded angle like the stepsides. I did see that Mar-k makes cover plates for the sides but if its rusted in between you need to fix the problem.
__________________
1959 Chevy Short Fleetside w/ 74 4WD drive train (current project) OrrieG Build Thread 1964 Chevelle Malibu w/ 355-350TH (daily driver) Helpful AD and TF Manual Site Old Car Manual Project |
|
|
|
|
02-12-2012, 01:13 PM
|
#19 |
|
Registered User
Join Date: Jan 2011
Location: Northwest, NJ
Posts: 195
|
Re: Disassembling the Bed
Okay, so here are the pics. The secong one shows the length of the seam with which I am working. The first shows the bottom of the same seam that needs to be separated from the end crossbar so it can be removed. There is one on the other side of this same metal plus the two on the left hand side (so four welds altogether). The third pic shows a junk piece of the same area. This was so rusted that the metal just broke while the weld remained strong. I hope these pictures help. As you can see by the proximity of the two pieces of metal that need to be separated, it would be difficult to cut one without cutting into the other since they lay flat- one on top of the other. If more pics are necessary I can certainly try to provide more.
|
|
|
|
|
02-12-2012, 08:42 PM
|
#20 | |
|
Registered User
Join Date: Jun 2011
Location: Floyds Knobs, IN
Posts: 430
|
Re: Disassembling the Bed
Quote:
|
|
|
|
|
|
02-12-2012, 09:42 PM
|
#21 |
|
Senior Member
Join Date: Nov 2008
Location: Glendora, CA
Posts: 6,338
|
Re: Disassembling the Bed
George, I may be misunderstanding what you're showing us but to me the photos are of the bedside post pocket. But the photo needs to be rotated 90 degrees to the right or clockwise.
IF I am understanding this right, why do you WANT to remove the post pocket? Per chance are you over analyzing this? Overthinking it? If you have rust in the post pocket so severely that the entire post pocket needs to come off, then use a cutting wheel to cut it off, carefully grind off the remnants and trash it. Buy a replacement to weld on. If just part of the post pocket is severely rusted, cut that part out, make a patch panel, weld it in, you're done. |
|
|
|
|
02-13-2012, 02:42 AM
|
#22 |
|
Registered User
Join Date: Feb 2009
Location: Glendale, Az
Posts: 1,062
|
Re: Disassembling the Bed
Is it the post pocket you're after? I think those are spot welded on?
|
|
|
|
|
02-13-2012, 11:01 AM
|
#23 | |
|
Registered User
Join Date: Feb 2010
Location: Lebanon, Ohio
Posts: 1,359
|
Re: Disassembling the Bed
Quote:
|
|
|
|
|
|
02-13-2012, 01:56 PM
|
#24 |
|
Registered User
Join Date: Jan 2011
Location: Northwest, NJ
Posts: 195
|
Re: Disassembling the Bed
Okay, this is as clear as I can possibly be: Im trying to disassemble the bed of my 1953 3100. I want to wind up with 4 pieces: 2 sides, 1 front piece (nearest the cab), and one rear cross piece which holds the two sides together at the rear of the truck and is located right under the tailgate. Four pieces altogether so I can stand the bed in the corner without taking up too much room.
So I took every nut and bolt out but the rear cross piece will not separate from the two sides because it seems to be welded in. First picture shows welds with arrows. Rear cross piece is the middle metal part. Outside metal is the bed sides. Second picture is my junk piece. It shows the rear cross piece and the metal which used to comprise the bed sides is pealed away but still welded in place. These pictures are taken from the view of a person lying on his back and looking up underneath where the bedsides and the rear cross piece come together. The question: How to remove the welds so I can separate the pieces without damaging the metal of either pieces. I want to wind up with four undamaged pieces altogether, if possible. 2 sides, one head piece, and one rear cross piece. I hope this is clearer and that someone may be able to help me. |
|
|
|
|
02-13-2012, 03:30 PM
|
#25 |
|
Registered User
Join Date: Jan 2011
Location: Northwest, NJ
Posts: 195
|
Re: Disassembling the Bed
I wanted the first picture to be bigger but for some reason it came out smaller
|
|
|
|
 |
| Bookmarks |
|
|


 Linear Mode

