
 |
|
|
#1 |
|
Registered User
Join Date: Feb 2014
Location: ft worth texas
Posts: 14
|
Rotisserie plans
I've been looking with no luck I'm in need of plans for a rotisserie that I can build in my shop maybe one for my cab but one that can do both would be nice anyone have plans
Thanks in advance |
|
|

|
|
|
#2 |
|
Registered User
Join Date: Oct 2005
Location: dayton, oh
Posts: 327
|
Re: Rotisserie plans
This is for a first gen Camaro, but should certainly be able to be modified for your needs. I built this over the course of a few weekends with very little into the overall cost. Going the route of buying the cherry pickers at Harbor Freight was less than half of what just the steel would have cost me at my local supplier.
http://www.camaros.net/forums/showthread.php?t=12222
__________________
My 51 project http://www.cardomain.com/ride/2285825 My 68 Camaro project http://www.cardomain.com/ride/2277404/1 |
|
|

|
|
|
#3 |
|
Hand Crafted C-10
 Join Date: Aug 2006
Location: Burien, WA
Posts: 5,180
|
Re: Rotisserie plans
I believe there's more than a few over in the tool forum...
__________________
. Forum Guidelines and Rules
Buying and Selling Code of Conduct Become a Board Supporter! Truck FAQ Ellen... the boards artsy-fartsy, eclectic, truck-lovin' gal-member... |
|
|

|
|
|
#4 |
|
Registered User
Join Date: Feb 2014
Location: ft worth texas
Posts: 14
|
|
|
|

|
|
|
#5 |
|
Hand Crafted C-10
 Join Date: Aug 2006
Location: Burien, WA
Posts: 5,180
|
Re: Rotisserie plans
 I already moved you! I already moved you! 
__________________
. Forum Guidelines and Rules
Buying and Selling Code of Conduct Become a Board Supporter! Truck FAQ Ellen... the boards artsy-fartsy, eclectic, truck-lovin' gal-member... |
|
|

|
|
|
#6 |
|
Registered User
Join Date: Feb 2014
Location: ft worth texas
Posts: 14
|
Re: Rotisserie plans
Awesome thank you
|
|
|

|
|
|
#7 |
|
Hand Crafted C-10
 Join Date: Aug 2006
Location: Burien, WA
Posts: 5,180
|
Re: Rotisserie plans
No prob.
Snoop around over here and you'll see some very cool stuff and meet some pretty neat folks! Have fun! Ellen
__________________
. Forum Guidelines and Rules
Buying and Selling Code of Conduct Become a Board Supporter! Truck FAQ Ellen... the boards artsy-fartsy, eclectic, truck-lovin' gal-member... |
|
|

|
|
|
#8 |
|
Registered User
Join Date: Jan 2013
Location: Leonardtown, MD
Posts: 1,648
|
Re: Rotisserie plans
Before designing and building my own rotisserie, I had looked at quite a few online. I had seen one of the "manufactured" ones up close and personal with a 57 Chevy on it, I think the steel was made of 1/8" thick tubing, which made for a less than snug fit on the pieces that slid together, enough so that the body support arms were sagging considerably. Perhaps the manner in which the car was bolted up could have contributed, but in order to not have that problem on mine, and to satisfy my anal retentive nature of overbuilding things (especially in putting someone else's vehicle on it), I made it with 1/4" thick square tubing (actually showed up as .22 wall thickness) which provided a nice snug fit. The downside to this design (besides the additional weight) is the welded seam on the inside must be removed for the pieces that slide together, unless you can find "seamless" tubing. Mine was also designed highly adjustable to allow flexibility for many different types of cars.
Some of the features I considered: Bottle jacks....I had plans to use two engine hoists to remove the body (already had them) so I saw no need for the added expense of bottle jacks on the rotisserie to lift a car off a frame or lift the pivot to find CG. May be a "nice to have", but would have been redundant with the hoists I already had. 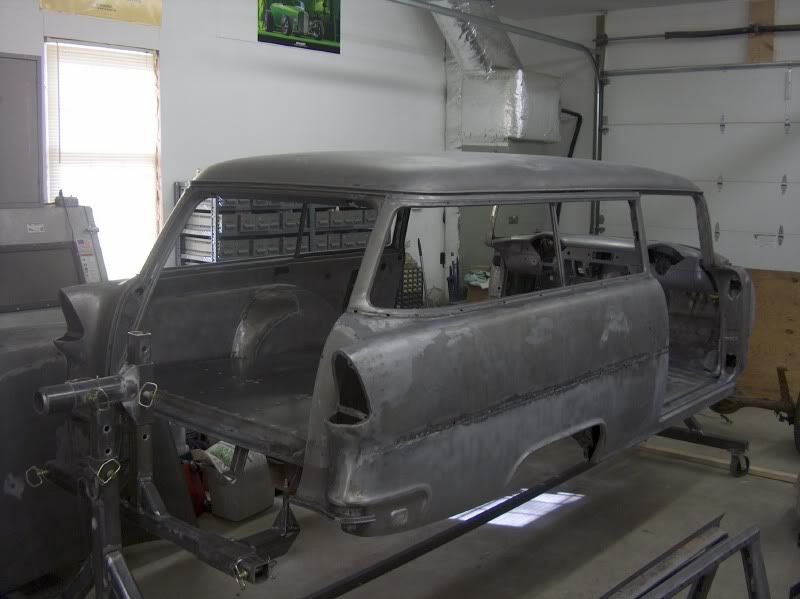 Standoffs....One feature to consider would be to weld gusseted 1/2" inside dia pipe to the support arms, as shown in the above picture, in order to "stand off" the car from the support arms and offer a virtually unobstructed area that is normally blocked by the support arm. Makes for easier sandblasting, painting , etc, without having to come back and repeat a process later. D-ring tie downs (as shown in above picture)....Another nice option so you can easily secure for transport to a media blaster. You'll get a much better job done of stripping a car if they can more readily get to everything standing up, as seen here on the return trip: 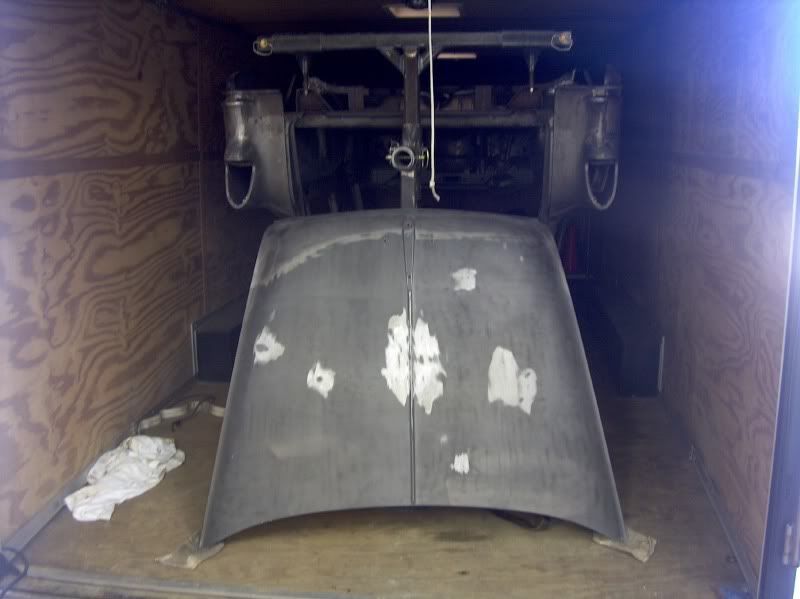 For the plans: 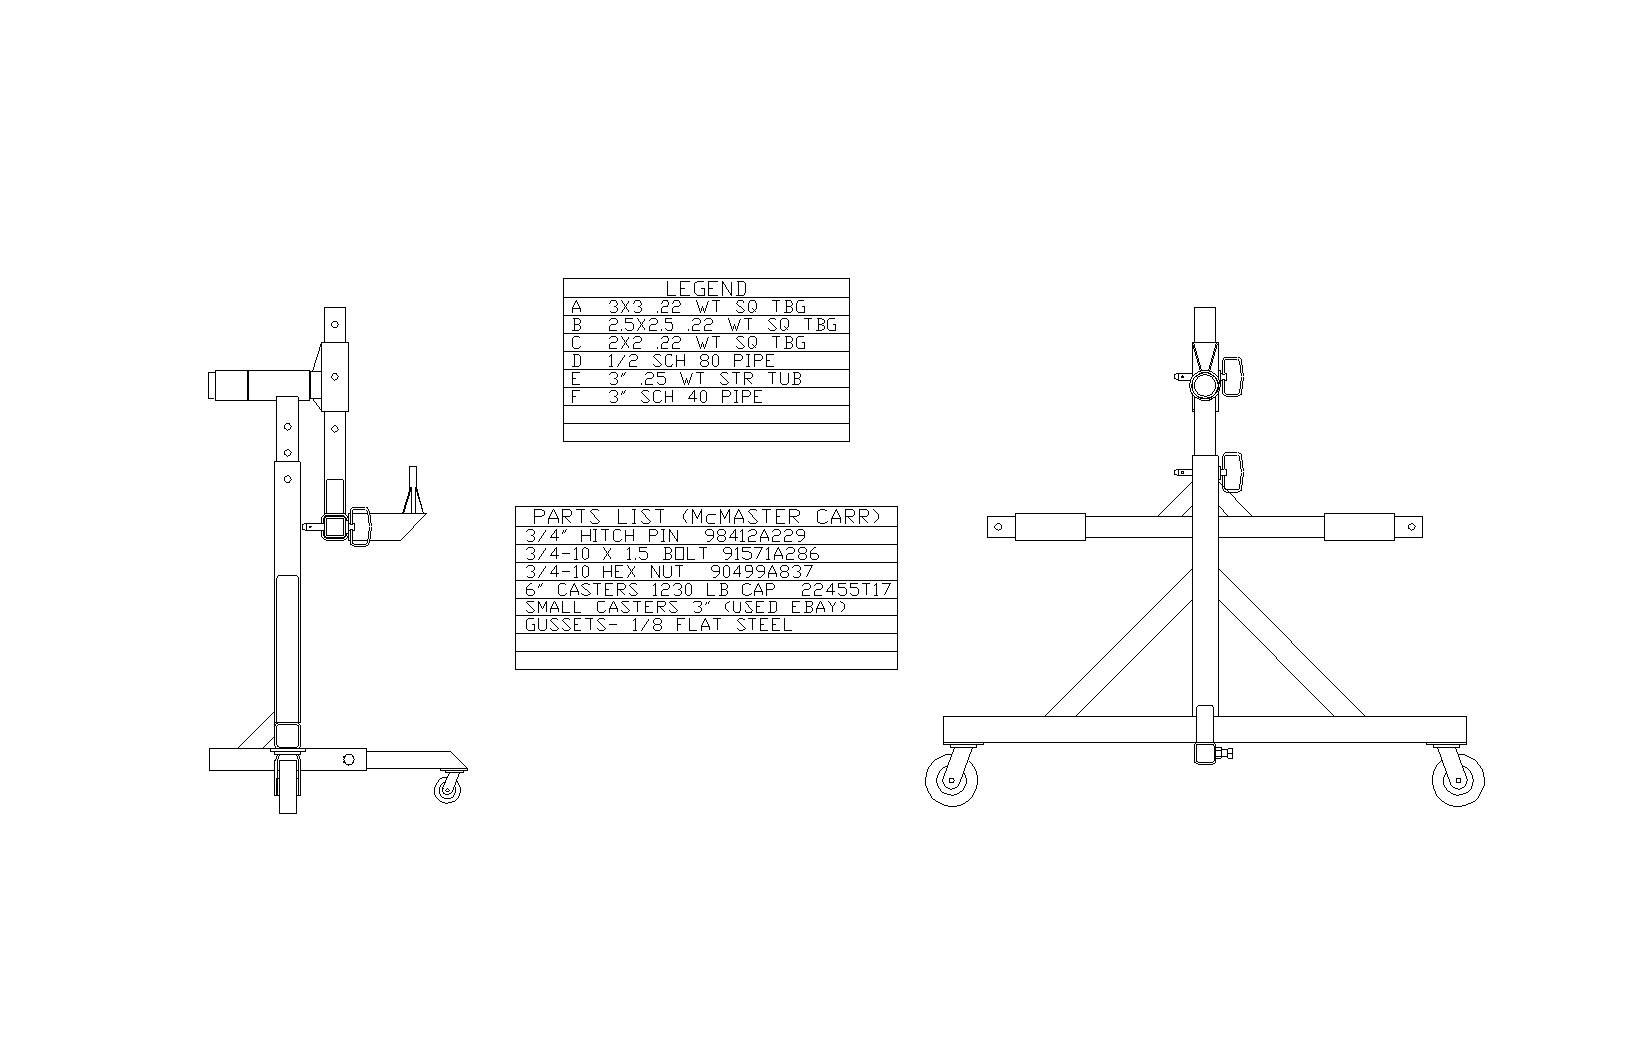 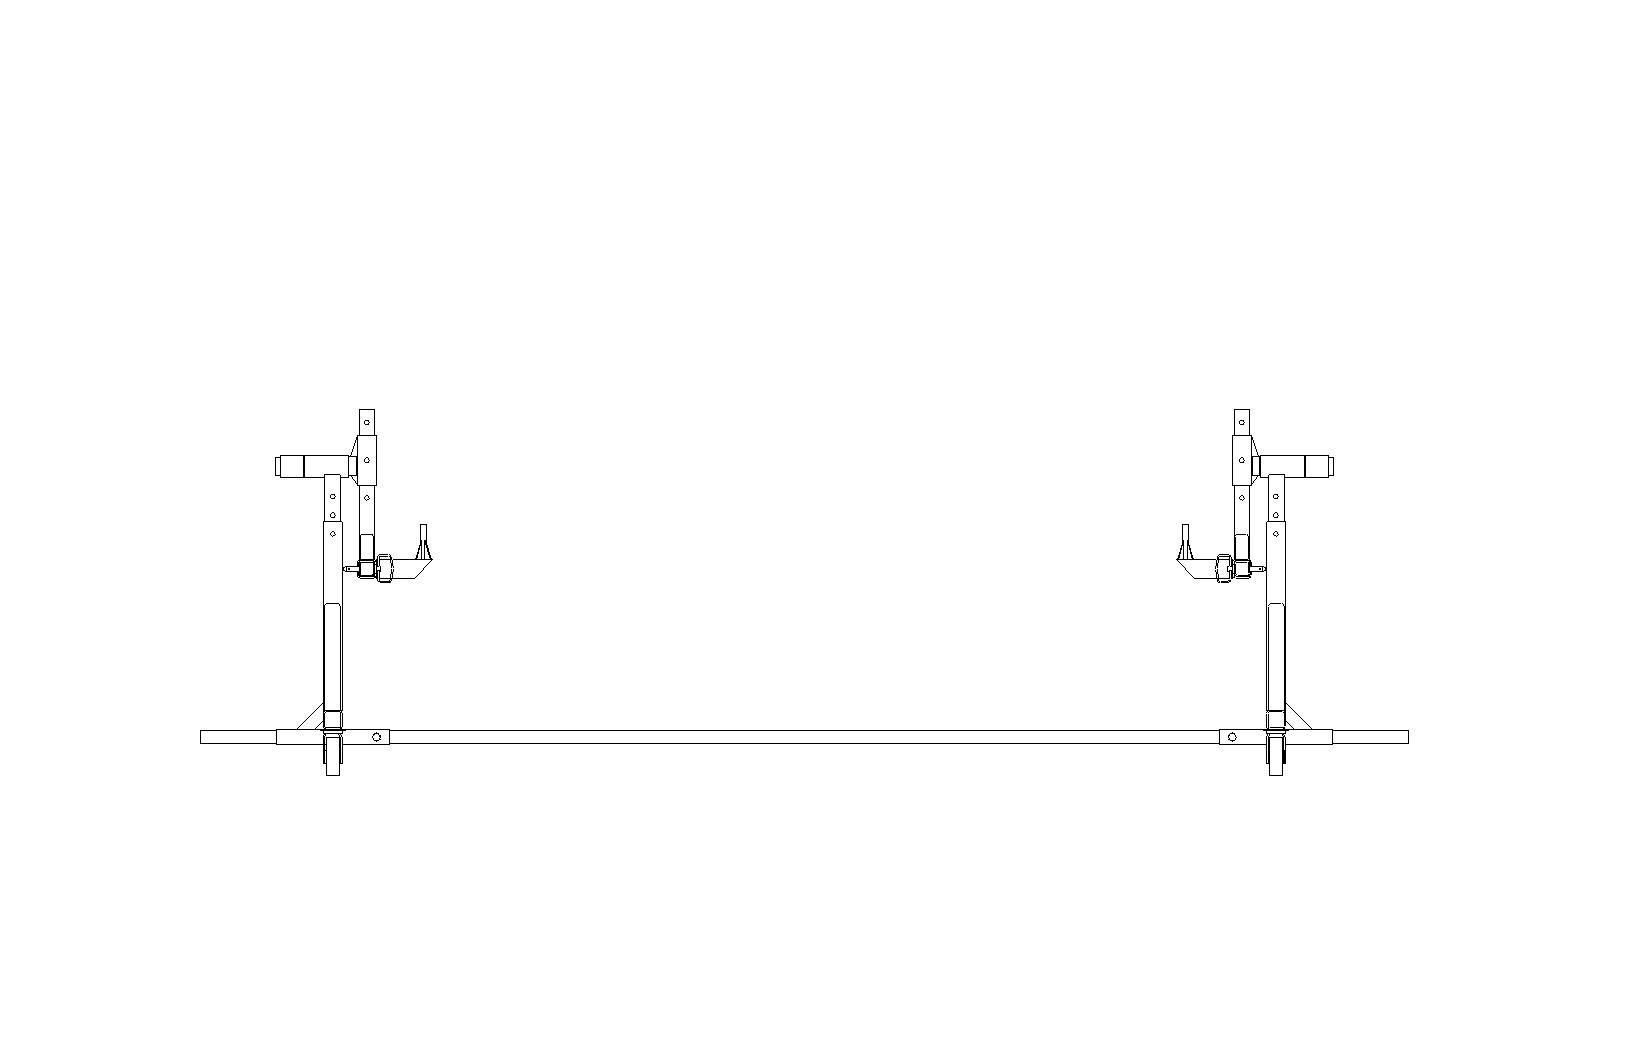 The short "third leg" caster on the right in the next picture was made to allow a partial breakdown of the pieces, and still be able to roll it around the shop without something getting away from you. With all the weight here, it does tend to take off pretty quickly. 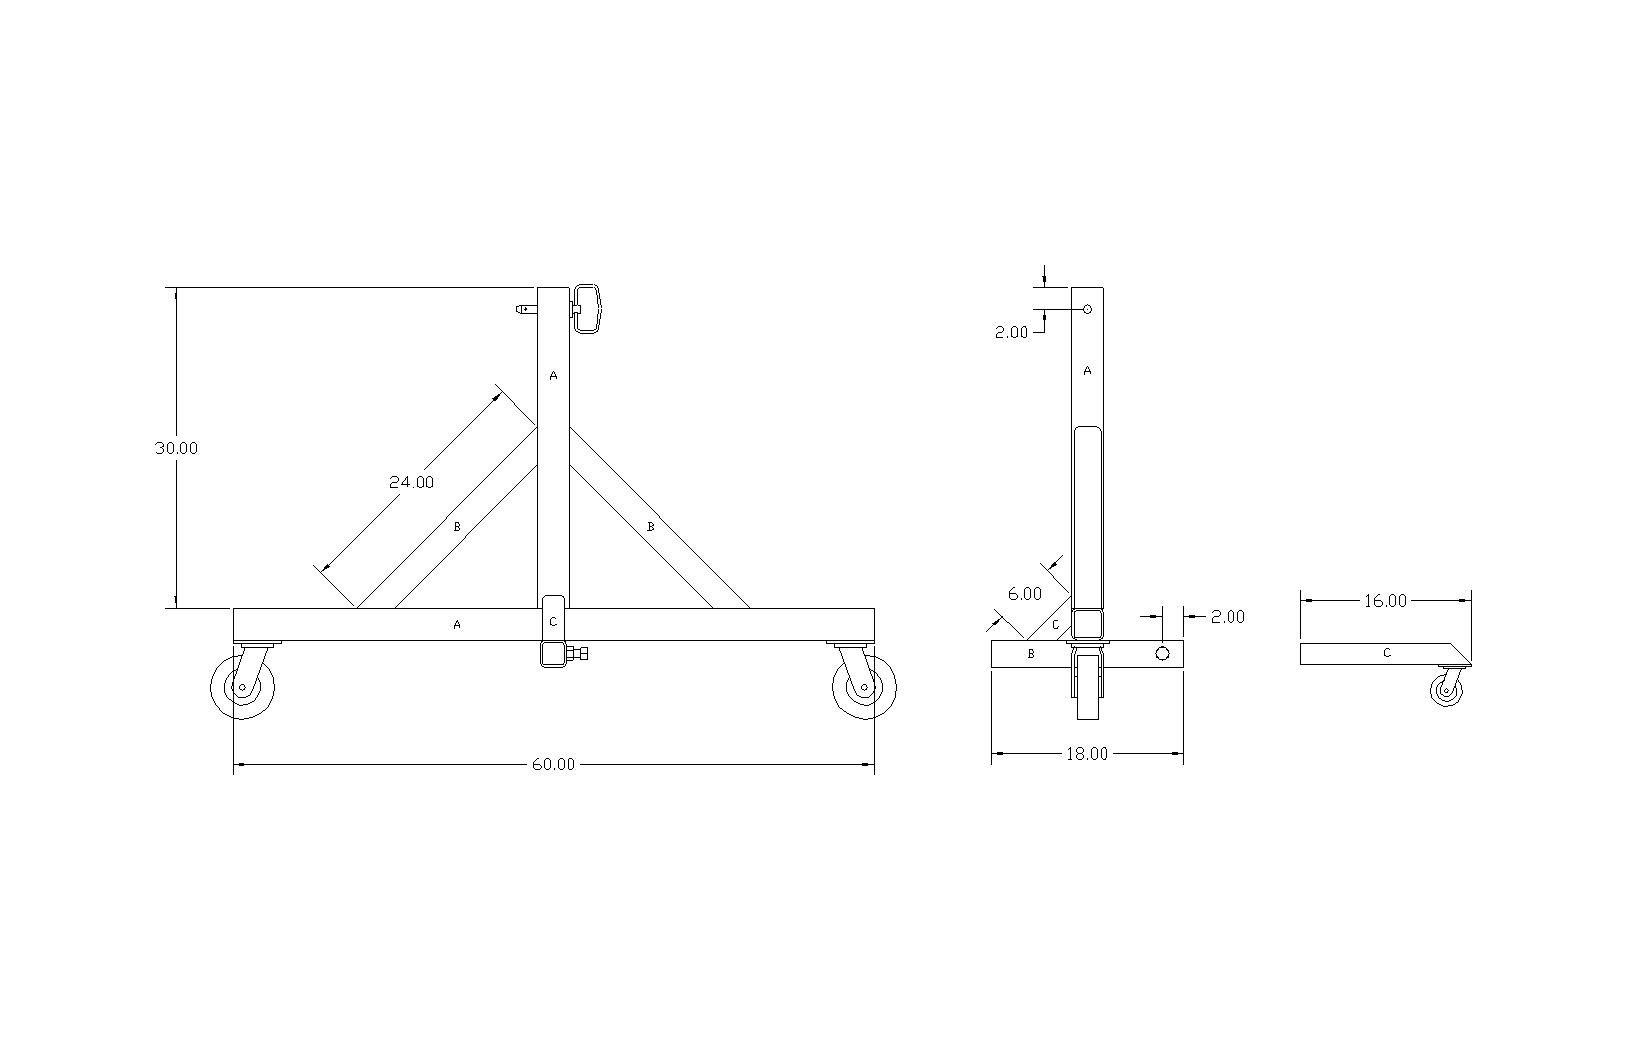 Notice in the next picture, the pivot bracket on the right, the hole for the hitch pin is offset 1" from the pivot centerline. Where the adjustments in the adjoining piece have three inch spacing between holes (following picture), this offset will allow even more fine tune adjustment for CG with a mere 180 degree rotation. 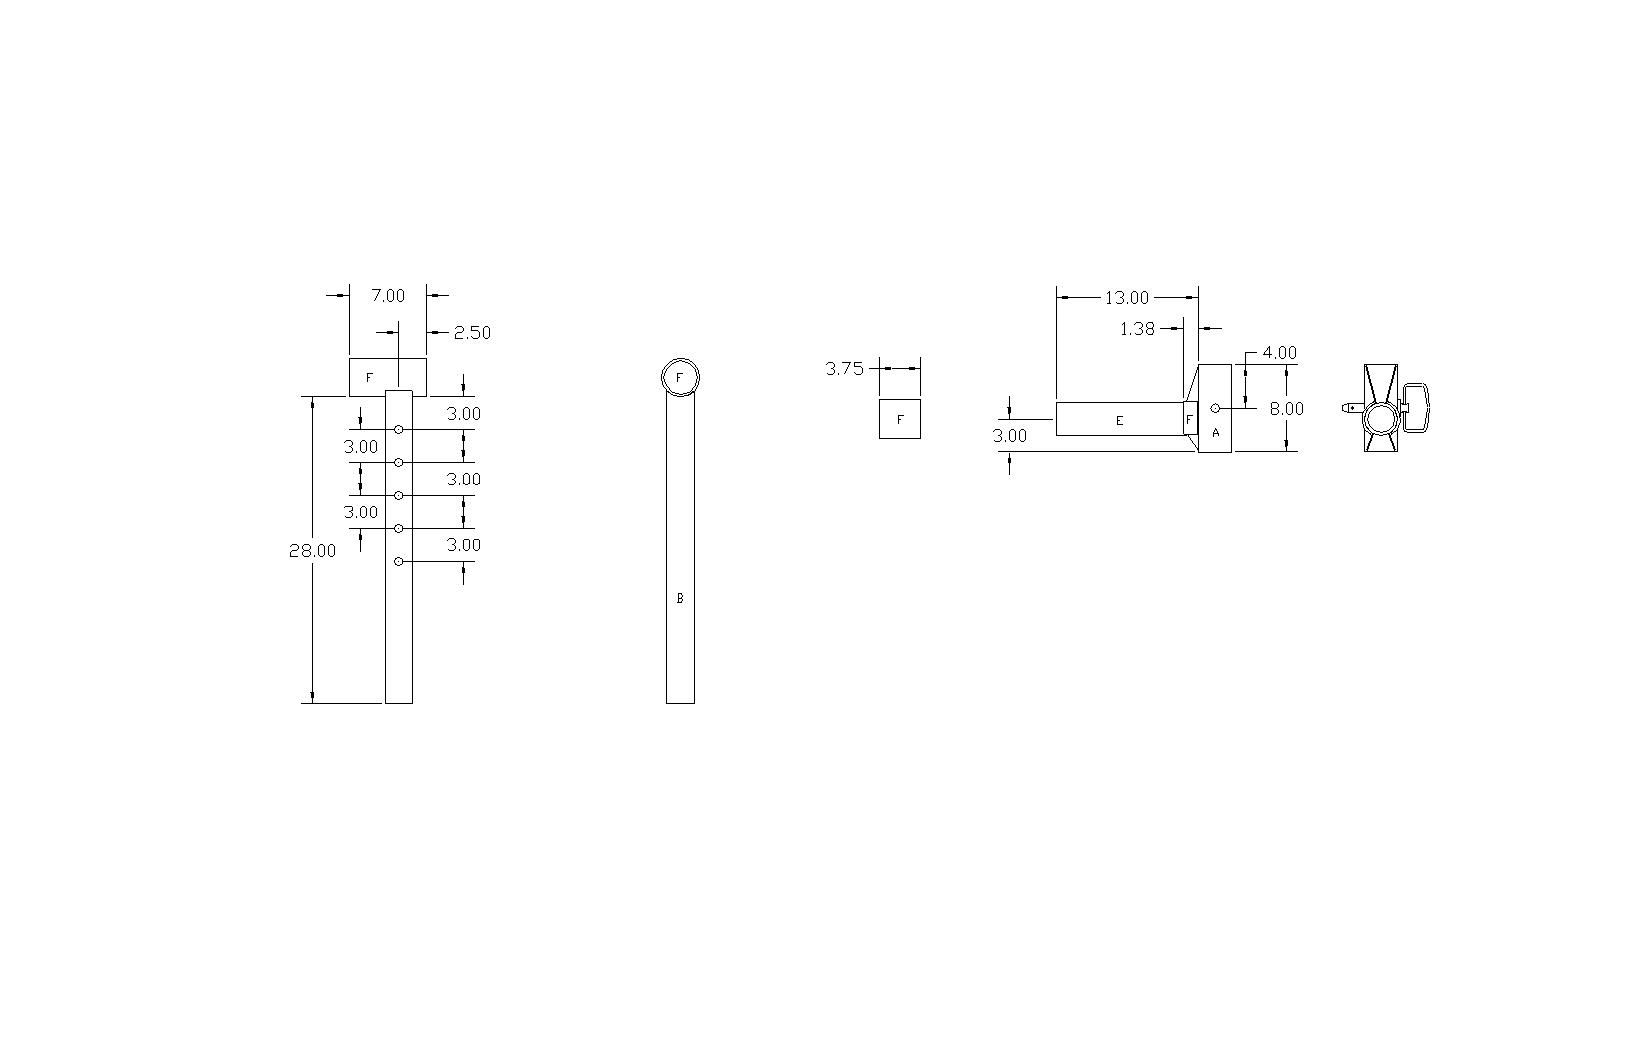 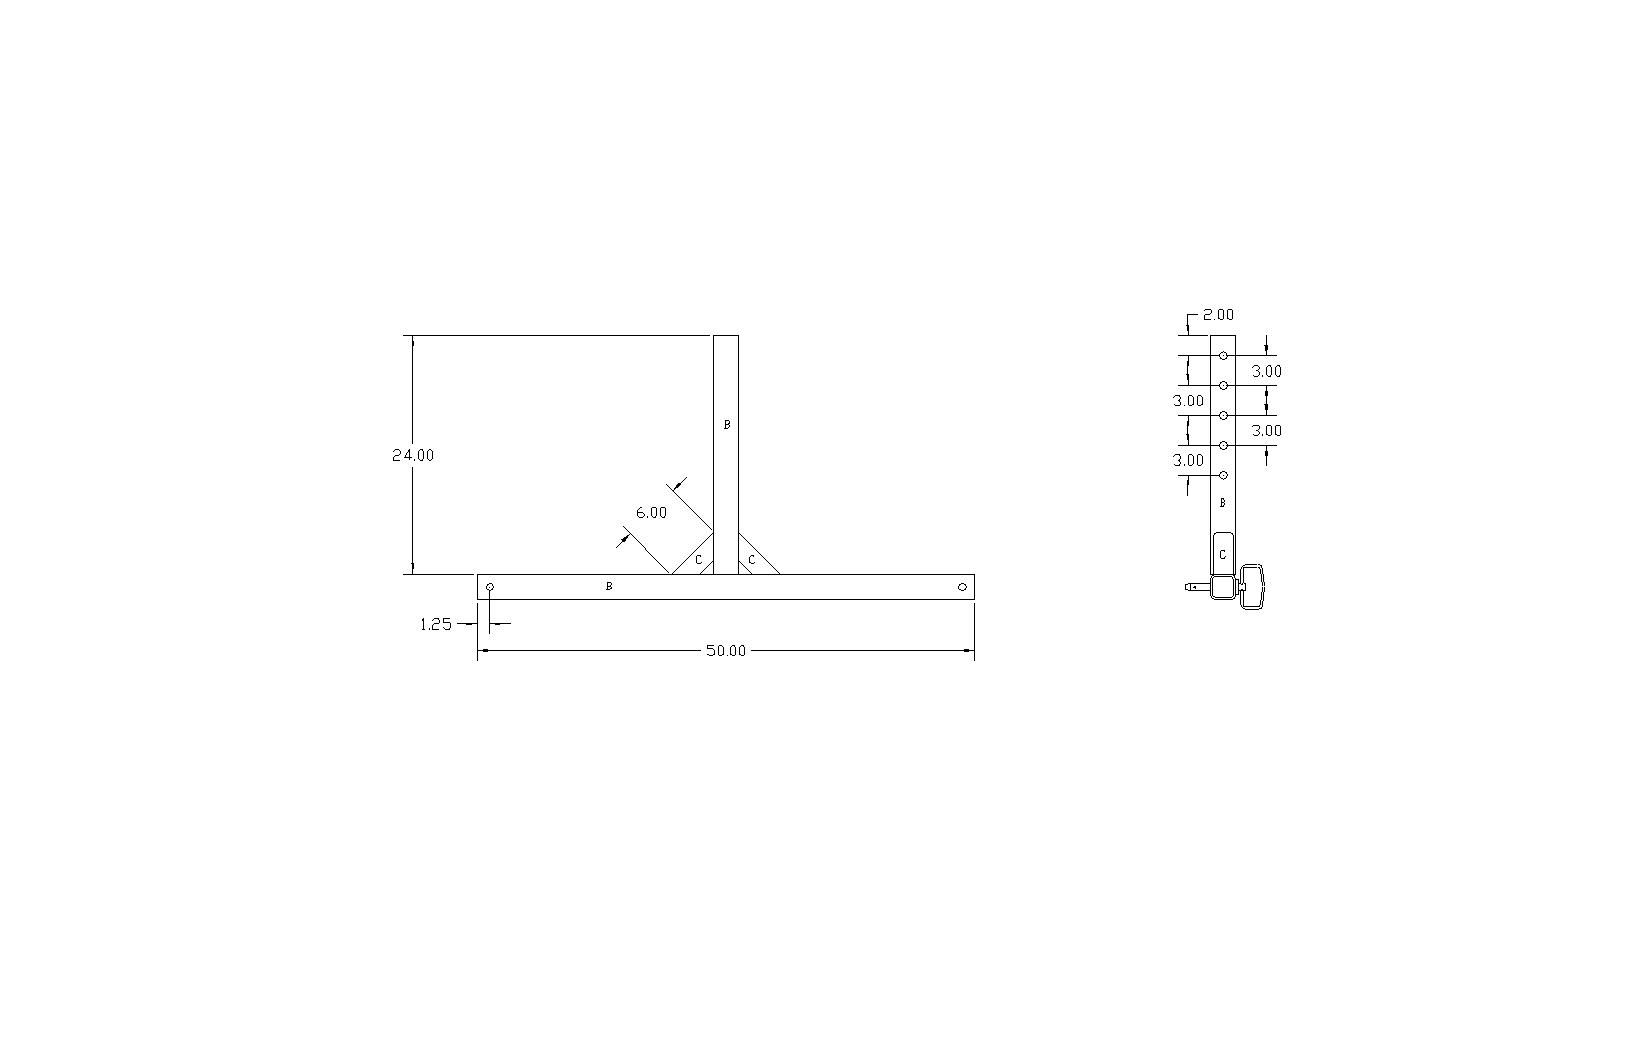 The standoffs in the next pictures did not get dimensioned as they were sized to fit some grade 8 bolts I had in stock. I believe they were about 5 or 5-1/2 inches tall, but size to the hardware you have readily available. 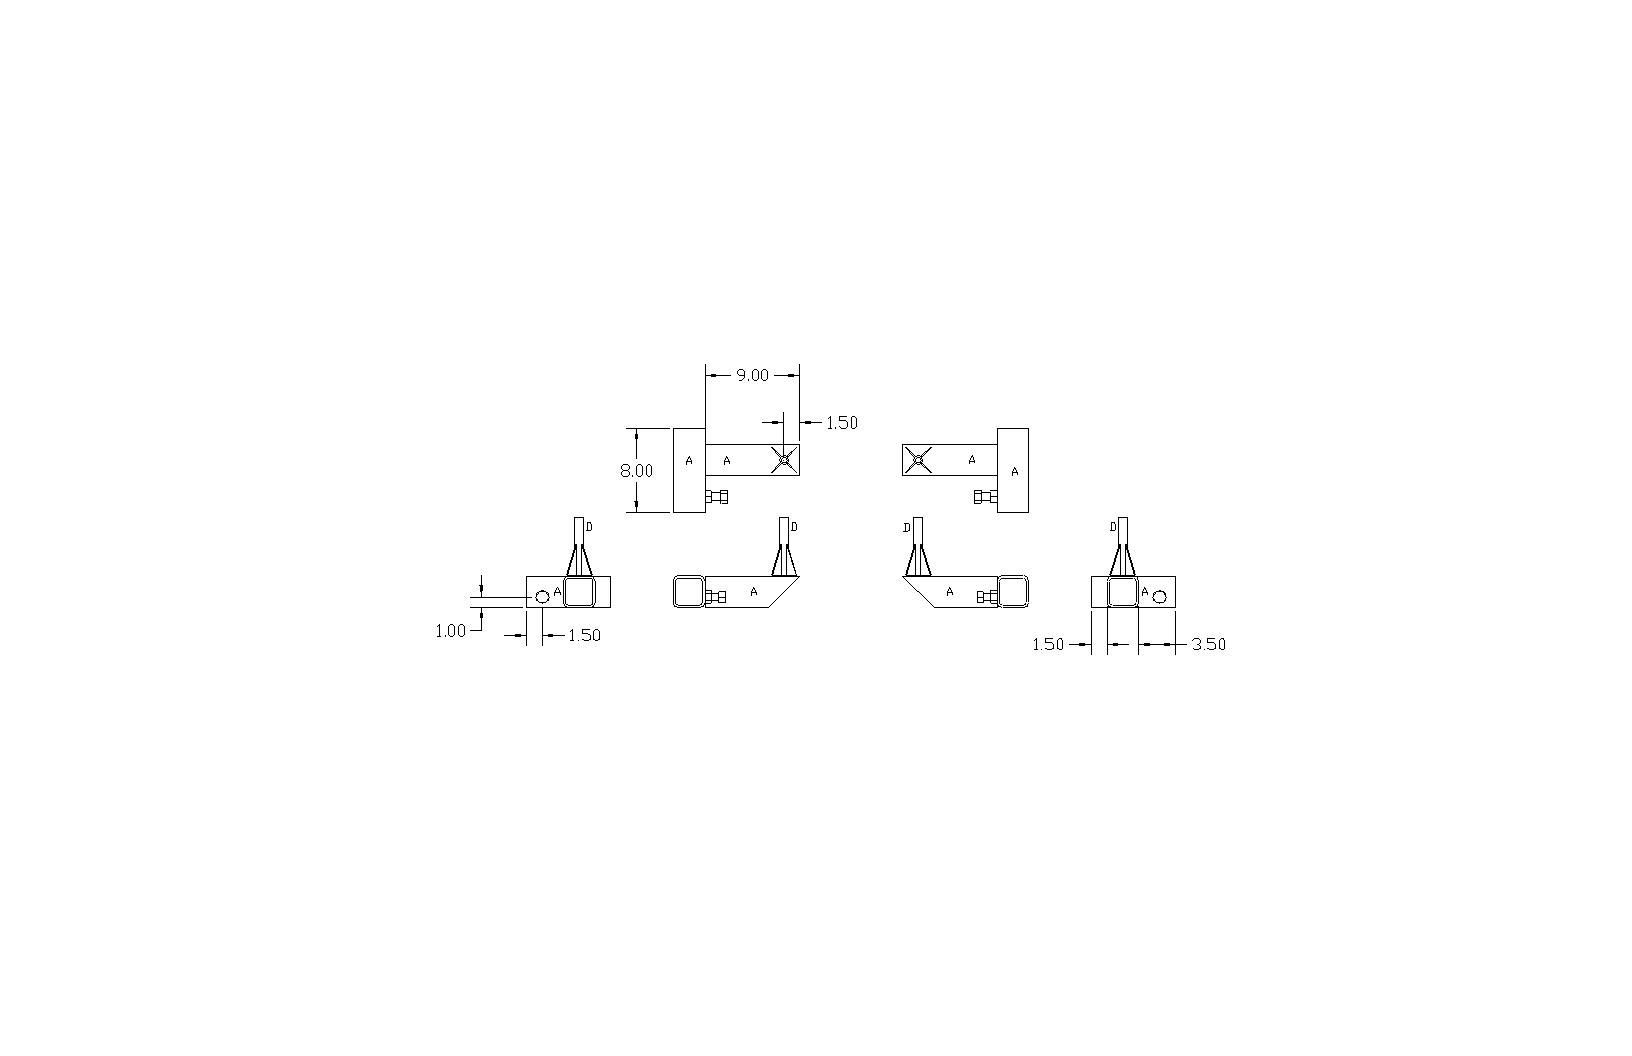 The downside to the "seamed" tubing, is that in order to slide within one another in such a "snug configuration", this weld needed to be ground smooth. In order to perform this function, a piece of .250 dia rod was welded onto a cutoff wheel arbor. I surprised myself by getting it right the first time, no wobble at all! Not shown is the auxiliary manuevering device. Basically go to your local hadware store and look for 1/4" id bearing pulleys (hint...sliding door hardware), so you can slide the pulley onto the shaft to be able to apply pressure/guidance to the cutoff wheel inside the tube. Not having this function, you hand will get warm quickly, even with gloves. 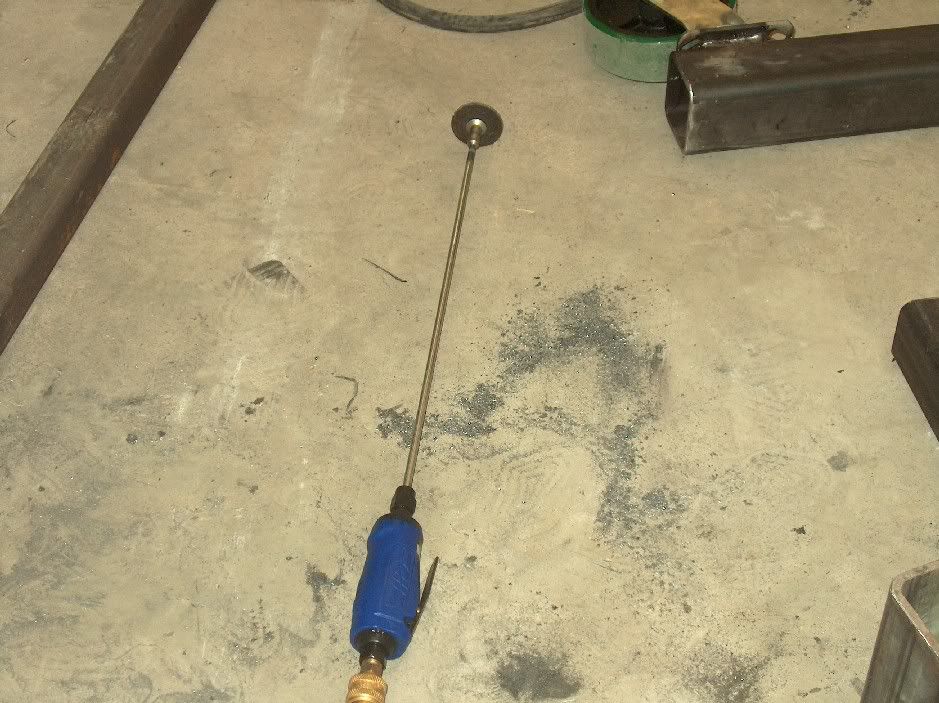 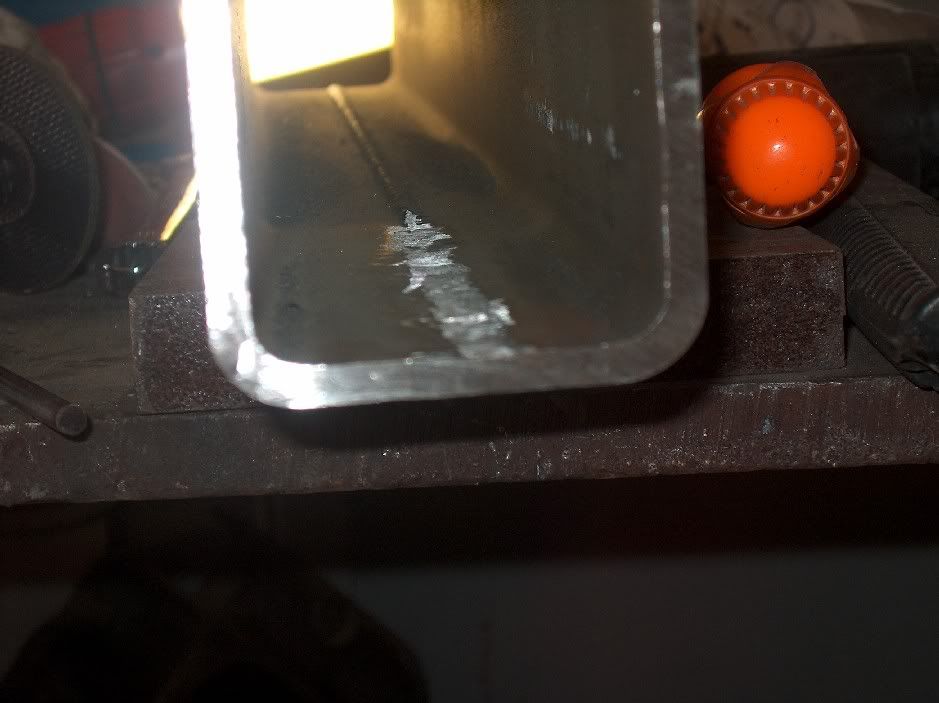 The set screws were all 3/4-10 bolts, and just incase anything slips, the ends of all the "sliders" had a fail safe in a 3/4 dia hitch pin. Looking at the pivot area, it was a bit looser than I intended, so the outer pipe was sliced lengthwise and tweaked with a dead blow hammer and welded back together. For rotational stabilization, one end uses a hitch pin, with the inner tube having holes drilled at 90* increments. This will allow you to pin the rotisserie in any position in 90* increments. For any oddball angles needed, the opposite end has a 3/4-10 set screw. Also not shown on the drawings, holes were drilled and tapped for grease zserks. 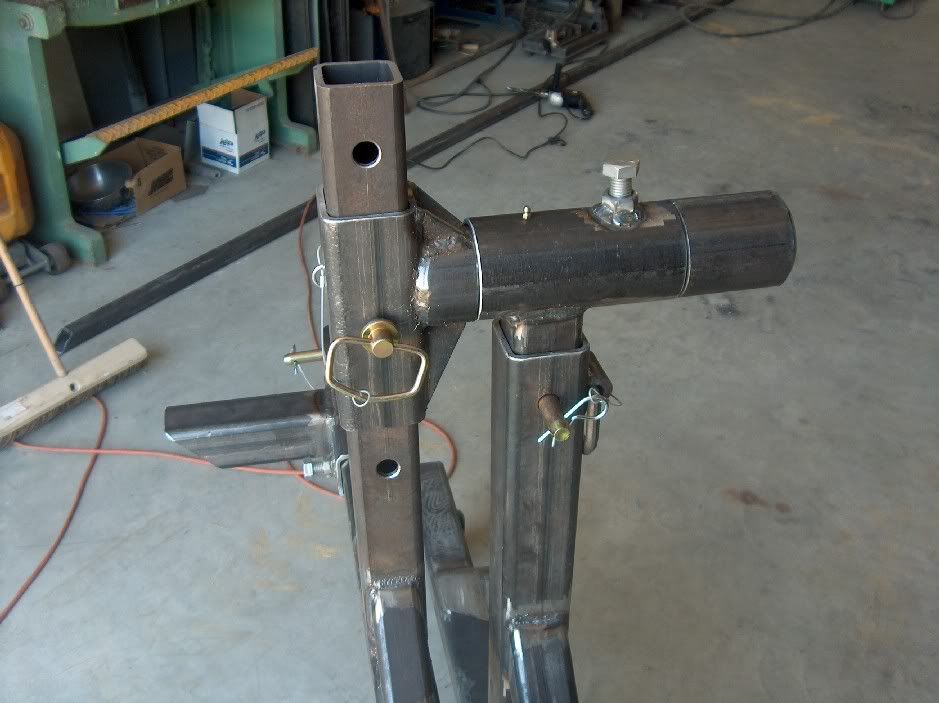 Overkill? You betcha. And with steel sold by the pound, more expensive. Would thinner walled tubing work? Sure it would. And I think strategic placement of the "setscrews" could miinimize any sagging issues on the support arms, and the steel would be much cheaper using 1/8 or 3/16 wall thickness. I was able to dial in the CG where it will stay in any position you stop at. It also spins effortlessly using one hand once you get the CG set, so worth the extra effort. 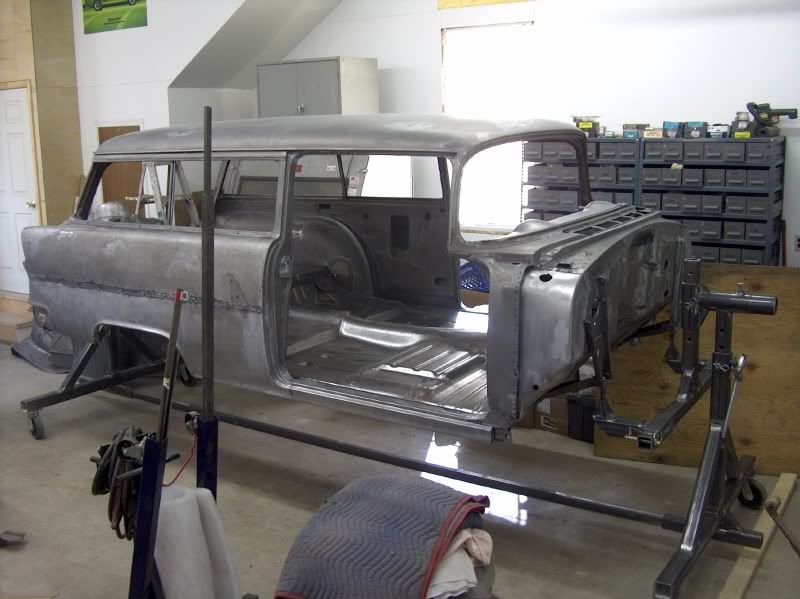 Here is a link that includes pictures and plans: http://s5.photobucket.com/albums/y16...ion/?start=all
__________________
Robert |
|
|

|
|
|
#9 |
|
Registered User
Join Date: Jan 2012
Location: Motown
Posts: 7,680
|
Re: Rotisserie plans
you don't indicate what your working on
i can understand the need for a rotisserie to work on the bottom of a car, but not a truck cab a truck cab can be rolled on the firewall or back of the cab (on blankets) to work on the bottom a simple dolly to roll the cab around the shop and elevate the cab to working height is important i've rolled my truck cab on the firewall and back many times during it's restoration i also rolled a truck on the roof going down the interstate, while it gives good access to the bottom it didn't do much for the roof, windshield, doors or my body: i don't recommend this method 
__________________
cool, an ogre smiley  Ogre's 58 Truk build Ogre's 58 Truk buildhow to put your truck year and build thread into your signature shop air compressor timer |
|
|

|
|
|
#10 |
|
Senior Member
 Join Date: Jan 2011
Location: Hayes Va
Posts: 4,569
|
Re: Rotisserie plans
I think there is a thread here somewhere on a cab dolly you could roll front to back on on its side. Anyone remember that one?
Jimmy
__________________
60 to 66 Chevy and GMC window decals http://67-72chevytrucks.com/vboard/s...d.php?t=661131 Good friends, good food and a hotrod what else do you need? 1966 BBW long fleet Daily driver 1965 BBW short fleet Sold and going to a good home 1965 Suburban 2003 3500 Duramax 2005 Ultra Classic |
|
|

|
|
|
#11 | |
|
Registered User
Join Date: Aug 2007
Location: Corona, California
Posts: 7,998
|
Re: Rotisserie plans
Quote:
Kim http://67-72chevytrucks.com/vboard/s...ght=flip+dolly |
|
|
|

|
|
|
#12 |
|
Registered User
Join Date: Oct 2007
Location: Spanaway
Posts: 8,451
|
Re: Rotisserie plans
I know its on the cheap but this guy made a cab rotisserie out of a couple engine stands for his cab, would probably work for the frame as well. scroll to post 116, the posts with picks go a couple pages.
http://67-72chevytrucks.com/vboard/s...=659403&page=5
__________________
Mike. Swamp Rat build thread : http://67-72chevytrucks.com/vboard/s...d.php?t=595019 72 3/4T 4X4 4" BDS Lift 33" BFG's |
|
|

|
|
|
#13 |
|
Registered User
 Join Date: Apr 2001
Location: Beavercreek, Ohio 45431
Posts: 737
|
Re: Rotisserie plans
Red Wing Steel Works has free online plans.
__________________
1967 K30 461/TH400/Np205/D60/14FF/BDS MTZ 375/75/16 on 16x10 Pro Comps |
|
|

|
|
|
#14 |
|
meowMEOWmeowMEOW
Join Date: Sep 2009
Location: MKE WI
Posts: 7,128
|
Re: Rotisserie plans
I had to look into it, since "free" is my key word
 Here's the link to the one your referring to. http://redwingsteelworksplans.com/fr...isserie-plans/
__________________
'66 Short Step / SD Tuned / Big Cam LQ4 / Backhalfed /Built 4l80e / #REBUILDEVERYTHING  |
|
|

|
 |
| Bookmarks |
|
|